La documentación del producto está disponible solo en inglés.
The documents workspace
The documents workspace is where your firm keeps every file in one organized place: scanned PDFs, Word documents, images, spreadsheets, and the rich-text documents you write inside Esqase. You can organize files into folders, upload and version them, share them with colleagues, mark them as templates, and send them out for signature. This page covers the everyday file-management tasks. The rich-text editor, document templates, share links, and eSignatures each have their own page (see Related).
Before you begin
A few things to know before you start:
- You need document access. The documents workspace is gated by your role's document permissions. If your role does not include View access for documents, you will not see Documents in the sidebar at all. If it does not include Create access, you will not see the New button. If it does not include Update access, you will not see Rename, Move to, Make a copy, Assign to matter, or Move to Trash. If it does not include Delete access, you will not be able to permanently delete trashed items. Firm owners always have full access.
- Folders, files, and rich-text documents share one tree. A folder can hold uploaded files, rich-text documents, and other folders, just like the file explorer on your computer.
- Some folders are system folders. A small number of built-in folders that Esqase maintains for the whole firm (the Templates folder and the Matters folder that holds every matter's documents) cannot be renamed, moved, assigned to a matter, or moved to Trash. You simply will not see those options on them. Everything inside them behaves normally, including each matter's own folder.
Browse the documents workspace
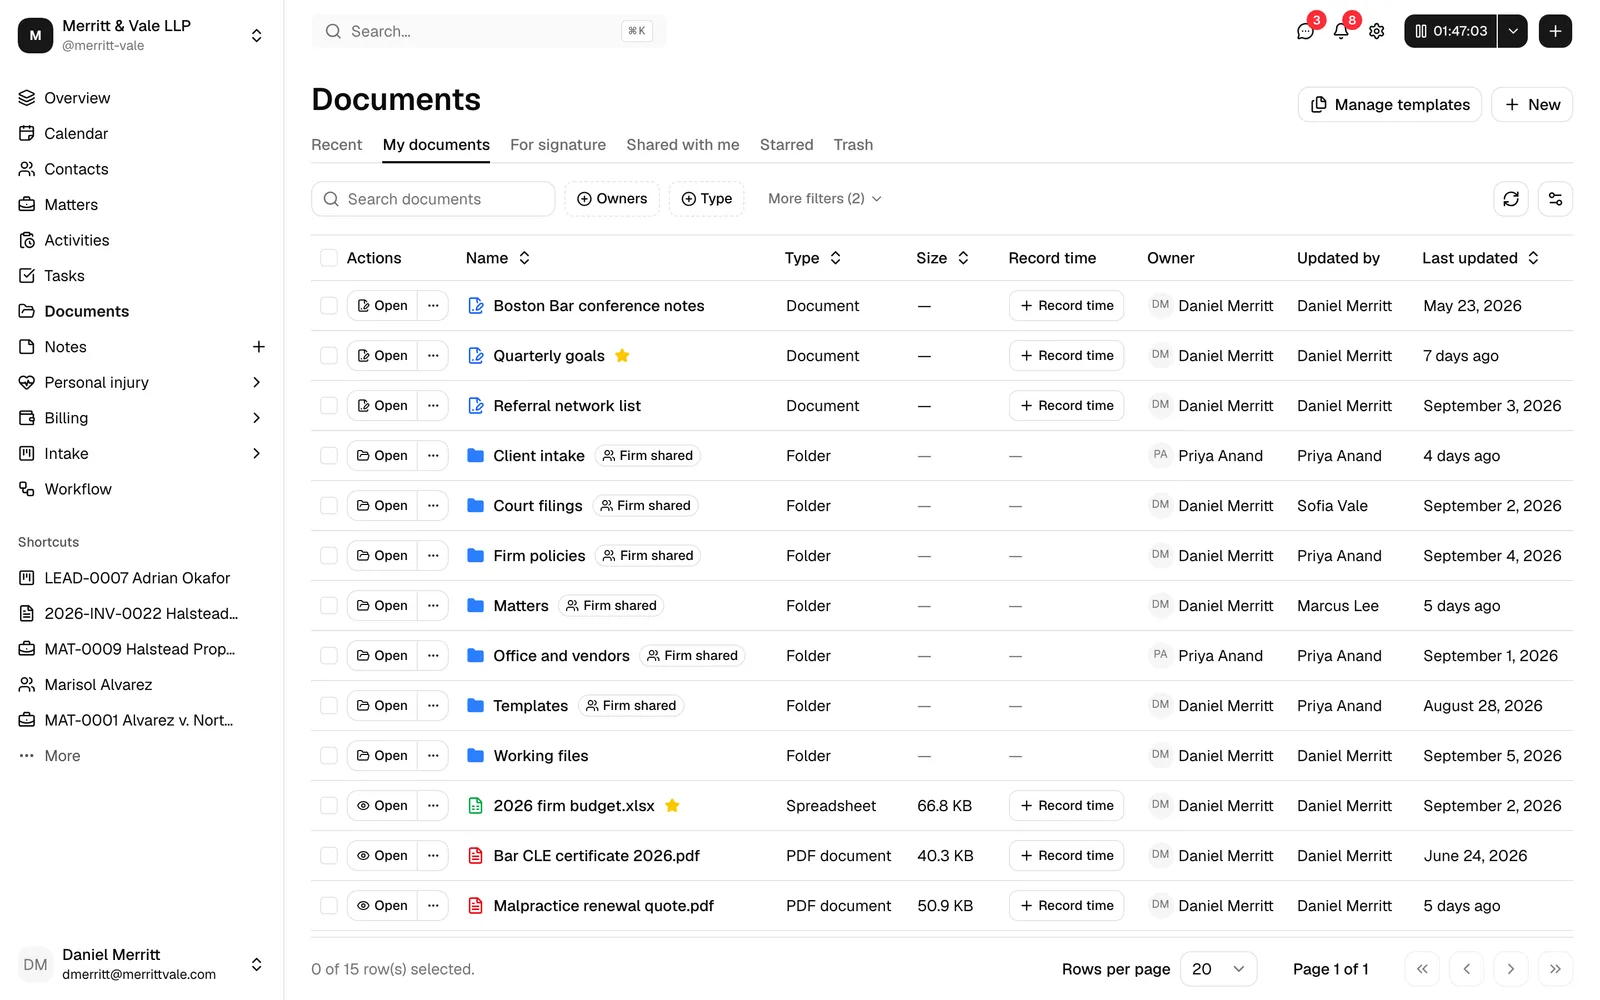
The documents workspace opens to a table of items, with a row of tabs across the top that filter what you see.
- In the sidebar, click Documents.
- Use the tabs at the top to switch views:
- Recent shows the items you have worked with most recently, across all folders.
- My documents is the full folder tree you can browse. This is the only tab that lets you open folders and move between them, showing a breadcrumb trail once you are inside one. It shows your own documents plus anything shared with your whole firm (see Why My documents only shows some of the firm's files).
- For signature shows every document your firm has sent out for eSignature, narrowed to the files with a signature request on them, with stat cards and a Status filter for tracking each one through to completion. See Managing signature requests.
- Shared with me shows documents another member has shared with you (where you are not the owner).
- Starred shows only the items you have starred for quick access.
- Trash shows items that have been moved to Trash but not yet permanently deleted.
- To find an item, type in the Search documents box at the top left (see Search your documents). Click Clear filters to reset the search.
- Narrow the list further with the filter controls above the table: filter by Owner or Type right away, or click to reveal more filters for Tags and a Last updated date range. Any filter you set, along with your sort order and column choices, is remembered the next time you open the same view. To start over, open the columns menu (the gear icon) and choose Reset table view.
- Click a column heading such as Name or Last updated to sort by it. Click again to reverse the order.
Each row shows the item's Name (with an icon for the file type), a Record time control (for tracking billable time spent on a file), the Owner, who last updated it (Updated by), and the Last updated date. A file involved in an eSignature request shows a badge next to its name telling you where it stands (see Signature badges on a row). A document shared with your whole firm shows a Firm shared badge next to its name instead (see Why My documents only shows some of the firm's files). Once a tracked time entry has been billed or paid, its Record time control becomes a view-only eye icon that opens the entry read-only. See Time and expense tracking.
If a tab or a search and filter combination has nothing to show, Esqase tells you so instead of leaving the table empty and unexplained, for example No documents yet, This folder is empty, Nothing shared with you yet, No starred documents, or Trash is empty. Searching or filtering with no matches shows No matches, with a Clear filters button to reset and see everything again.
Tip: Only the My documents tab lets you navigate into folders. In Recent, For signature, Shared with me, Starred, and Trash, items are shown in a flat list regardless of which folder they live in.
Why My documents only shows some of the firm's files
At the top level of My documents, you see two kinds of items: documents you own yourself, and documents that have been shared with the whole firm, such as the Templates and Matters folders. You do not see, at that top level, every document owned by every other member of your firm. Once you open a folder, everything inside it is visible to anyone with document access, including files owned by colleagues, so this only affects what shows up at the very top of the tree.
A firm-shared item carries a Firm shared badge next to its name so you can tell it apart from your own documents at a glance. Firm-shared folders are also protected: you cannot rename, move, or delete them, since they are shared infrastructure for the whole firm rather than something one person owns.
Tip: If a colleague's document is not showing up in your My documents root, it has not been shared with the whole firm and is not yours to own. Ask them to share it with you directly (see Grant, change, and revoke document access), or find it from within the folder it lives in if you already have access there.
Signature badges on a row
When a file has been through, or is going through, an eSignature request, a badge next to its name tells you where it stands without opening it:
- A solid Signed badge with a check mark means every signer has finished. The file's current version is the signed copy. See Managing signature requests.
- An outline Signed 2 of 3 badge, marked with a minus sign, means the request is still out and some signers have finished. The numbers show how many of the request's signers have signed so far.
- An outline Awaiting signatures badge, marked with the same minus sign, means the request is out but nobody has signed yet.
A file with no signature request on it shows no badge at all.
Tip: The in-progress badges are the quickest way to spot a request that has stalled. To see who is holding it up, open the file and check the Signers list, or open the For signature tab. See Managing signature requests.
Search your documents
The Search documents box does more than match file names. Esqase reads the contents of your files, including scanned PDFs, images, and other uploads, as well as the text of the rich-text documents you write in Esqase, so you can find something by what it is about even when those exact words are not in its name. A search for "lease termination notice" can surface the right letter even if the file was named "Smith - final.pdf".
- In the Recent, My documents, and Trash views, search looks at both the name and the contents, and orders the results by how closely they match your search.
- In Shared with me, Starred, and when you are browsing inside a folder, search matches on the name.
- Content search covers a document a short while after it is added, while Esqase finishes reading it (see the tip under Upload files). A brand-new upload is findable by name right away and by its contents a moment later.
- A content search shows the top matches rather than every document that contains your words, so the strongest matches for what you typed stay at the top and the list stays easy to scan even in a large firm. If you cannot find something, try narrowing your words or adding a filter (see Browse the documents workspace).
This same content-aware search powers the firm-wide search you open with the keyboard shortcut from anywhere in Esqase: document results there show a short summary of what the file is about, so you can tell why each one matched.
Note: Reading your documents' contents to power this kind of search is controlled by the AI document indexing switch in your firm's settings. If a firm owner turns it off, new and updated documents stop being sent for that processing, and content search falls back to matching names only. See Your firm profile and details.
Open an item
How you open an item depends on its type:
- Folders (in My documents): click the folder name, or click Open at the start of the row, to go inside it. Once you are inside a folder, a breadcrumb trail appears in its own row above the search box so you can jump back up. At the top level of a tab, before you have opened any folder, there is no breadcrumb row.
- Rich-text documents (the ones you create in Esqase): click the name, or click Open, to open the full editor. See Editing documents (the file editor).
- Uploaded files (PDFs, images, and so on): click the name, or click Open, to open the file in its full-screen viewer. See Open an uploaded file.
Every document and file opens on its own page with its own web address, so you can bookmark it, share the link with a colleague at the firm, or open it in a new browser tab. Closing it brings you back to the folder you were browsing.
Folders and your browser
The folder you are in is part of the page address, so the folder view behaves like any other page in Esqase:
- Your browser's Back and Forward buttons step through the folders you opened.
- Refreshing the page keeps you in the same folder, with the breadcrumb trail still above the search box.
- You can bookmark a folder, or send its link to a colleague at the firm, and it opens on that folder.
- The tab you are on is stored in the address as well, so a bookmark or a link brings back both the tab and the folder.
Create a folder
Folders keep related documents together (for example, one folder per matter or per client).
- On the Documents page, open the My documents tab and navigate into the folder where you want the new folder to live. New folders are created inside whatever folder you are currently viewing.
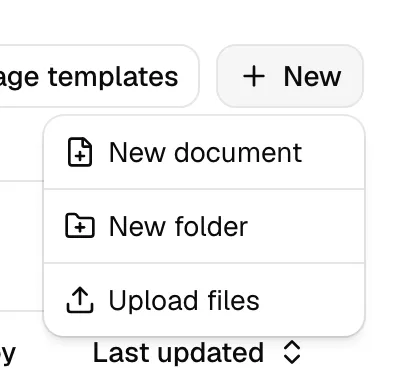
- Click New at the top right, then choose New folder.
- In the New folder dialog, type a name in the Folder name field. The placeholder reads Untitled folder.
- Click Create folder.
The folder appears in the current view. You can rename or move it later.
Upload files
Upload existing files (PDFs, Word documents, images, spreadsheets, and more) from your computer. Files start uploading the moment you add them, so there is nothing to click to begin.
- Navigate to the folder where you want the files to land (in My documents).
- Click New, then choose Upload files.
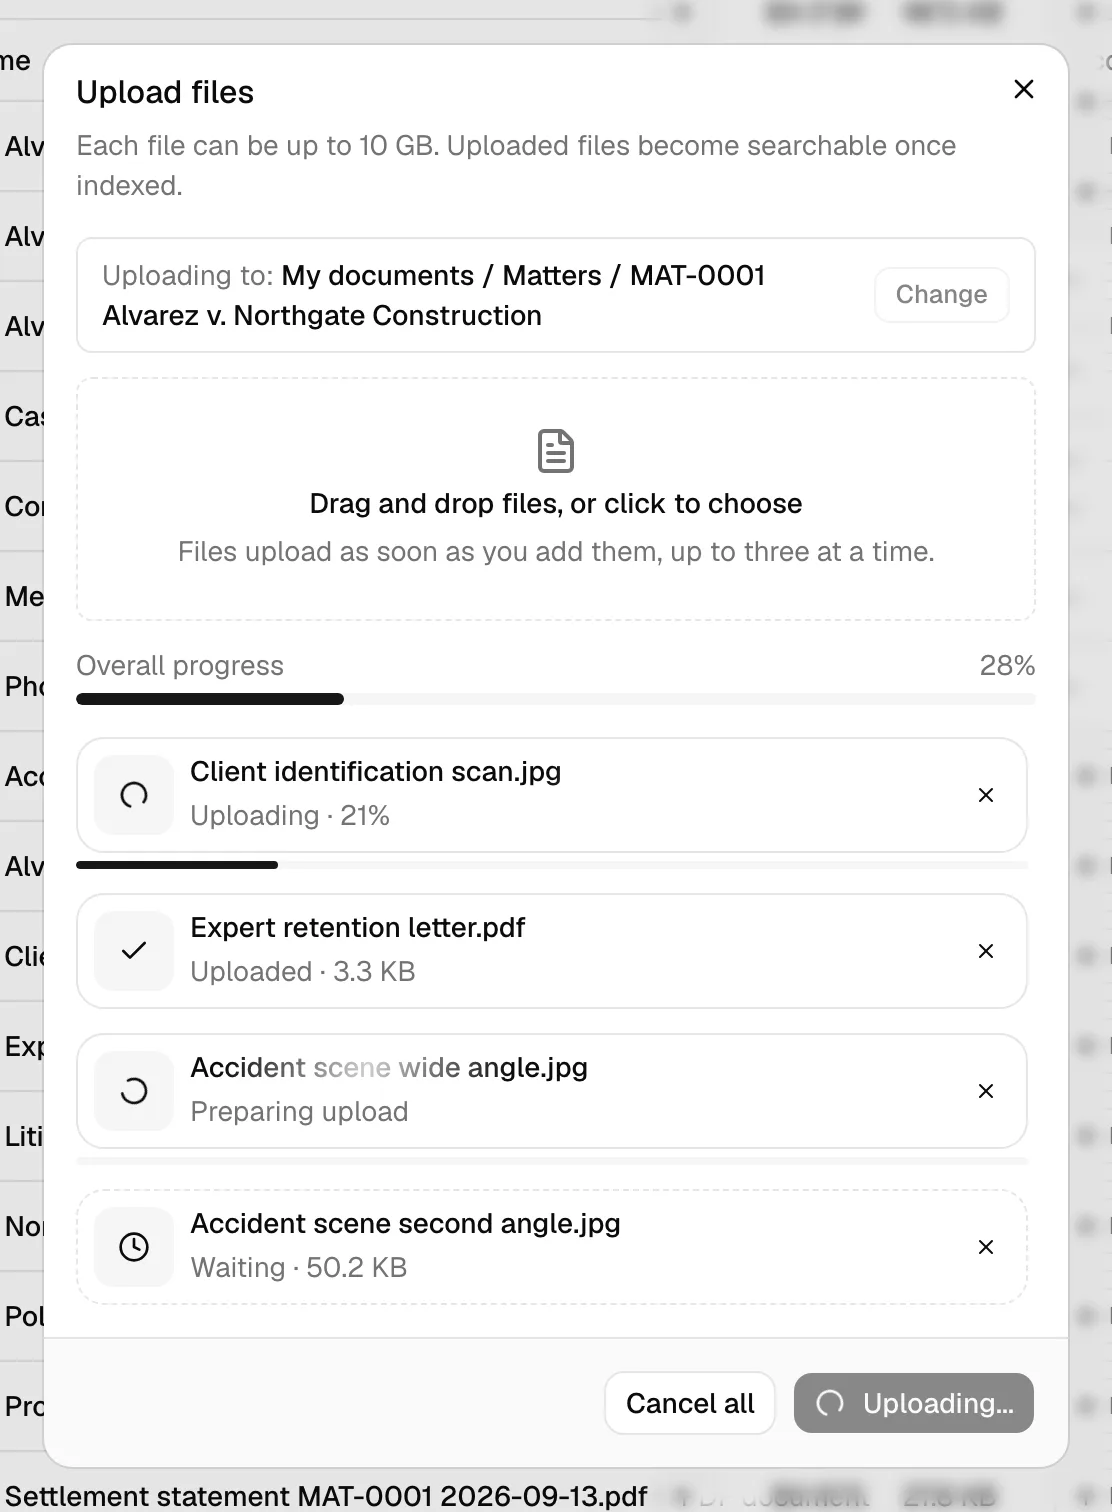
- In the Upload files dialog, drag files onto the drop zone (it reads Drag and drop files, or click to choose) or click it to browse. You can select multiple files at once.
- Uploading starts on its own. Each file gets its own row showing the file name and what is happening to it: Waiting with the file size while it sits in line, then Preparing upload, then Uploading with the percentage done so far, then Saving to documents, and finally Uploaded with the file size and a check mark. Files go up one at a time, so everything behind the current file stays on Waiting until its turn.
- Every row has an x. On a file that is still uploading, it stops that transfer. On a finished file, it only clears the row from the list: the file itself stays in Documents.
- If a file fails, its row turns red and says what went wrong, and a circular-arrow retry button appears next to the x. Click it to try that file again.
- When everything has finished, the button at the bottom of the dialog reads Done. Click it to close.
Note: While a transfer is running, the button at the bottom reads Uploading... and cannot be clicked, and the dialog will not close. Either wait for the queue to empty or cancel the remaining files with their x buttons.
Note: The maximum size for a single file is 10 GB. An empty file, or one over the limit, is never uploaded: it appears in the list as a red row reading File is empty or Exceeds the 10 GB limit, and you clear it with its x. The rest of your files carry on as normal.
Tip: After you upload a file, Esqase reads its contents in the background so you can later find it by what it contains, not only by its name (see Search your documents). This finishes a short while after the upload completes, so a brand-new file is findable by name immediately and by its contents a moment later.
Files clients attach to your forms
Not every file arrives from the Upload files dialog. When one of your forms includes a File upload question, the files the person attaches are saved here automatically as soon as the form is submitted, whether a client filled it in themselves or a member of your firm filled it in for them.
Where they land depends on the question's Upload destination:
- If a folder was chosen on the question, the files go into that folder.
- If it was left on the default, the files go into a Forms folder at the top level of My documents, inside a subfolder named after the form. Esqase creates both folders the first time they are needed. The Forms folder is visible to every member with document access, the same way the Matters folder is.
Each file is a normal document from that point on: you can open it, download it, rename it, move it, assign it to a matter, or share it. You can also download the files from the submission itself. See The form builder in depth for the upload settings and Reviewing form submissions for reading a submission.
Note: The folder browser you use to set an Upload destination shows your own My documents, so a folder one member picks may not sit at the top level of a colleague's list. Leaving the destination on the default puts the files somewhere the whole firm can find them.
Create a new rich-text document
A rich-text document is one you write and format directly inside Esqase, with comments, page setup, and export. It is different from an uploaded file.
- Navigate to the folder where you want the document to live.
- Click New, then choose New document.
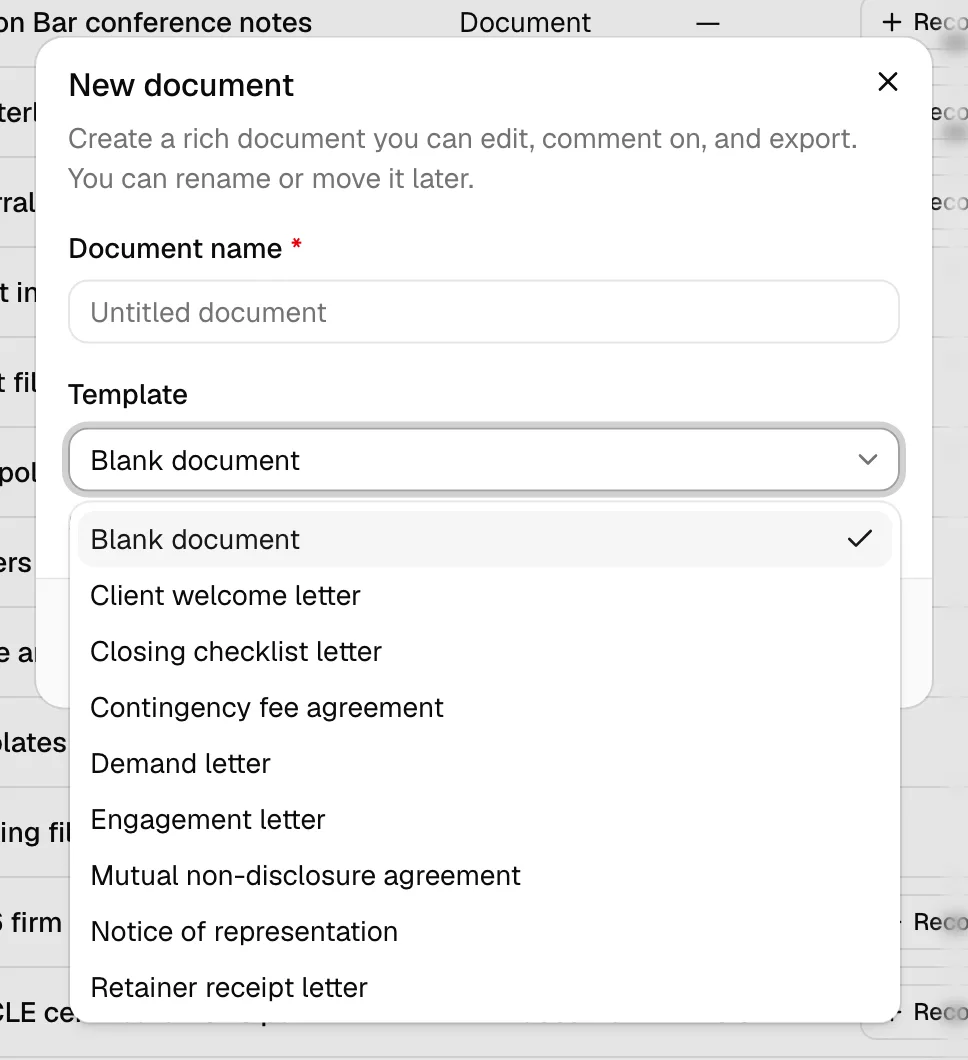
- In the New document dialog, type a name in the Document name field (the placeholder reads Untitled document).
- Optionally pick a starting point in the Template field:
- Leave it on Blank document to start from scratch.
- Or search for and select a saved template to copy its content and page setup. See Document templates.
- Click Create document.
Esqase creates the document and opens it in the full editor so you can start writing right away. See Editing documents (the file editor).
Rename a document or folder
You can rename any item you have Update access to (except built-in system folders).
- Find the item in the table.
- Click the More actions button (the ... icon) at the start of the row.
- Choose Rename.
- In the Rename dialog, edit the name. The field label reads Folder name for folders and File name for files.
- Click Save changes.
Renaming only changes the display name; the underlying file is untouched, so download links and history stay intact.
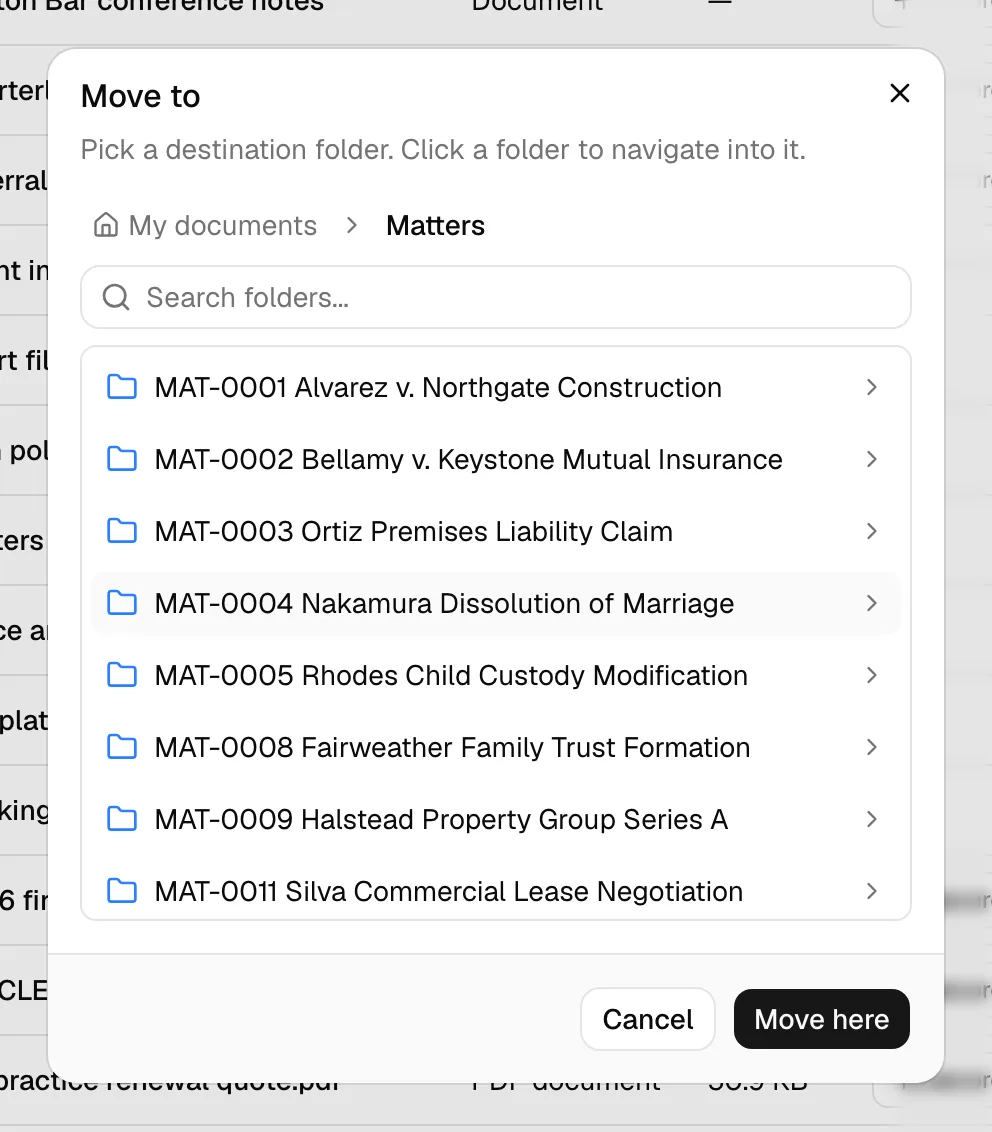
Move a document into a folder
Moving relocates an item to a different folder.
- Click the More actions (...) button on the item's row.
- Choose Move to.
- In the Move to dialog, browse the folder tree. Click a folder to go inside it, and use the breadcrumbs (starting at My documents) to step back out.
- Navigate to the destination, then click Move here.
The item moves into the folder you are viewing when you confirm. To move it to the top level, navigate all the way back to My documents before clicking Move here.
Note: You cannot move an item into itself, and the Move here button is disabled if you pick the folder the item is already in.
Tip: To move several items at once, select their checkboxes in the table and use the batch actions. (See the Common questions below.)
Copy a document
Copying creates an independent duplicate of a file or rich-text document. (Folders cannot be copied.)
- Click the More actions (...) button on the item's row.
- Choose Make a copy.
- In the Copy to dialog, browse to the folder where you want the copy to live.
- Click Copy here.
A duplicate is created in the chosen folder. Edits to the copy do not affect the original.
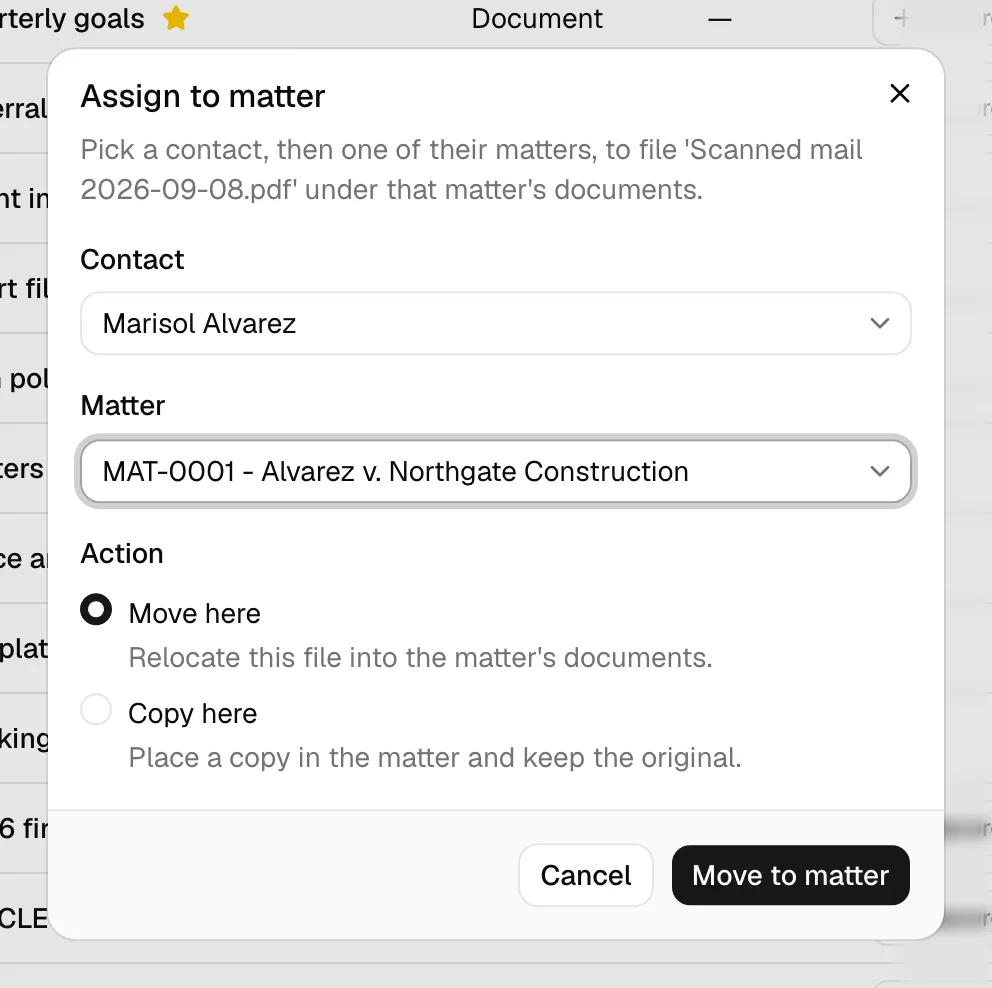
Assign a document to a matter
Assigning puts a document, file, or folder under a matter by way of one of the matter's clients. It is a quick way to put something into the right matter's documents without browsing the folder tree. This action is available both from the main Documents page and from a matter's own Documents tab.
- Click the More actions (...) button on the item's row.
- Choose Assign to matter.
- In the Assign to matter dialog, pick a Contact. Start typing to search your contacts.
- Pick one of that contact's Matters. The list shows only the matters where the selected contact is a client. If the contact is not a client on any matter, you will see This contact isn't a client on any matters and cannot continue.
- Choose what to do with the item:
- Move here relocates the item into the matter's documents. Folders can only be moved.
- Copy here places a copy in the matter's documents and keeps the original where it is. This is available for files and rich-text documents, not for folders. Copying a rich-text document opens the new copy so you can keep working in it; copying a file leaves you on the current page.
- Click Move to matter or Copy to matter to finish.
Note: The contact is only used to find the right matter; assigning does not otherwise link the document to that contact. A matter is always required.
Tip: Each matter keeps its documents in its own folder, named with the matter's number and title. Those folders sit inside a Matters folder at the top level of My documents, which every member with document access can see. The first time you assign something to a matter that does not have a documents folder yet, Esqase creates one automatically.
Star and unstar
Starring marks an item so it appears under the Starred tab for quick access. A starred item shows a small yellow star next to its name.
To star an item:
- Click the More actions (...) button on its row.
- Choose Star.
To unstar an item:
- Click the More actions (...) button.
- Choose Unstar.
Stars are personal to you. Starring an item does not change anything for other members.
Tip: When you have an uploaded file open, you can also click the star icon in its header to star or unstar it.
Trash a document and restore it from Trash
Moving an item to Trash hides it from the normal views without permanently deleting it. You can restore it later.
To move an item to Trash:
- Click the More actions (...) button on its row.
- Choose Move to Trash.
The item disappears from the current view and moves to the Trash tab.
Important: Moving a document to Trash also revokes every share link on it and cancels any eSignature request still in progress on it, right away. Anyone holding a share link loses access immediately, and a signer's link stops working. Restoring the document from Trash does not bring the old share links or signature request back; create new ones if you still need them. See Sharing documents and Managing signature requests.
To restore an item:
- Open the Trash tab.
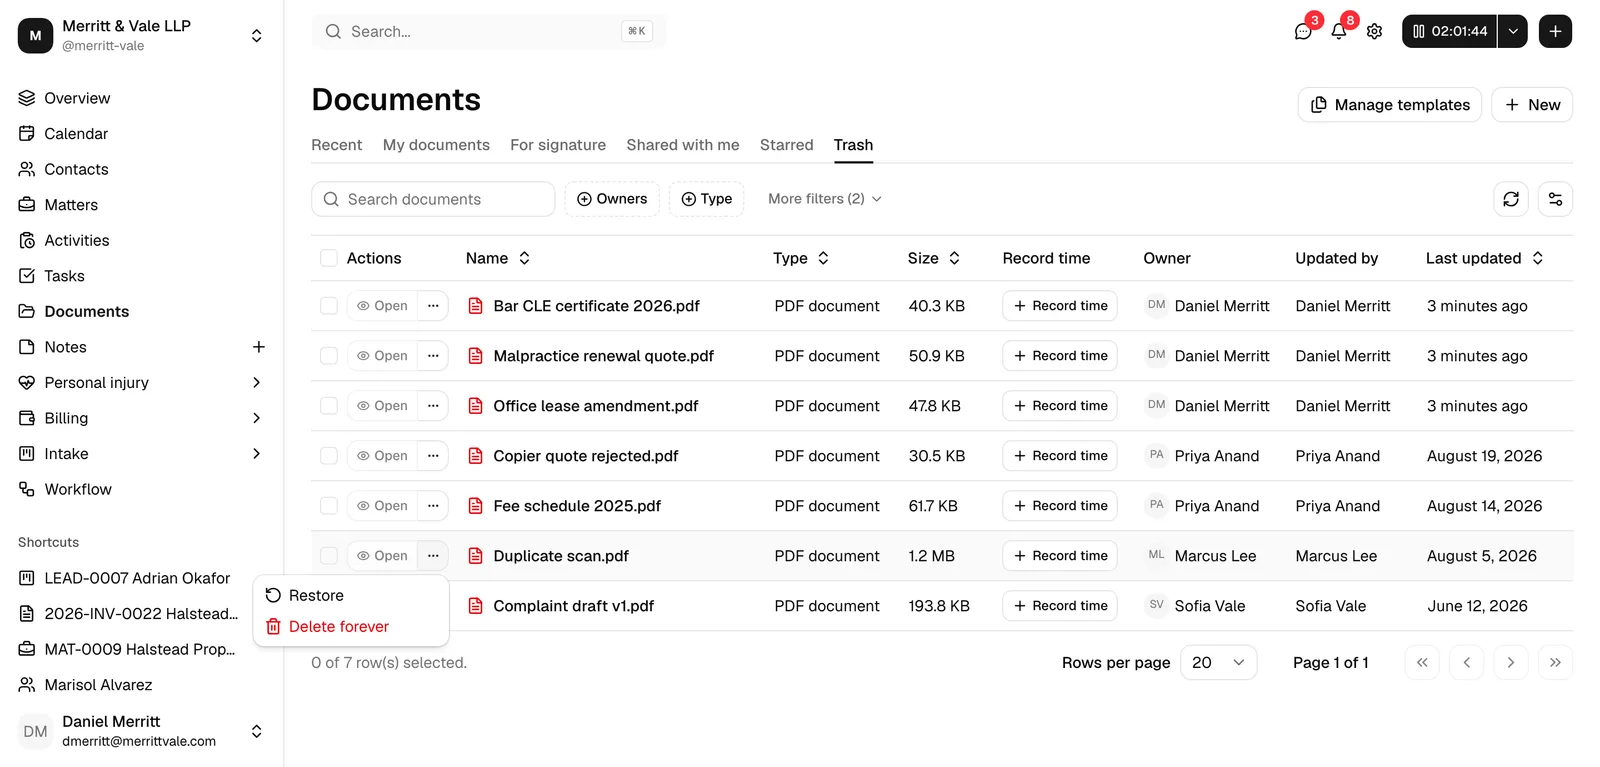
- Find the item, click its More actions (...) button, and choose Restore.
The item returns to where it was before.
Important: Moving a folder to Trash also affects everything inside it. Restore the folder to bring its contents back.
Permanently delete
Permanently deleting removes an item for good. This is only possible from the Trash tab, and only if your role includes Delete access for documents.
- Open the Trash tab.
- Click the More actions (...) button on the item, then choose Delete forever.
- In the Delete forever? confirmation dialog, read the warning. The item and all of its stored data will be permanently removed.
- Click Delete forever to confirm.
You can also permanently delete several items at once. In the Trash tab, select their checkboxes, then click Delete forever in the batch actions toolbar. Confirm in the Delete selected items forever? dialog to finish. This option only appears in the Trash tab, and only if your role includes Delete access for documents.
Important: Permanent deletion cannot be undone. There is no way to recover an item, or items, after you confirm Delete forever. If you are not certain, leave it in Trash instead.
Open an uploaded file
Opening an uploaded file shows it full screen on its own page, so you can read it without downloading it. (Rich-text documents open in the editor instead. A folder is a place in your file tree rather than something to read, so opening one takes you inside it.)
- In the table, click the file's name, or click Open at the start of its row.
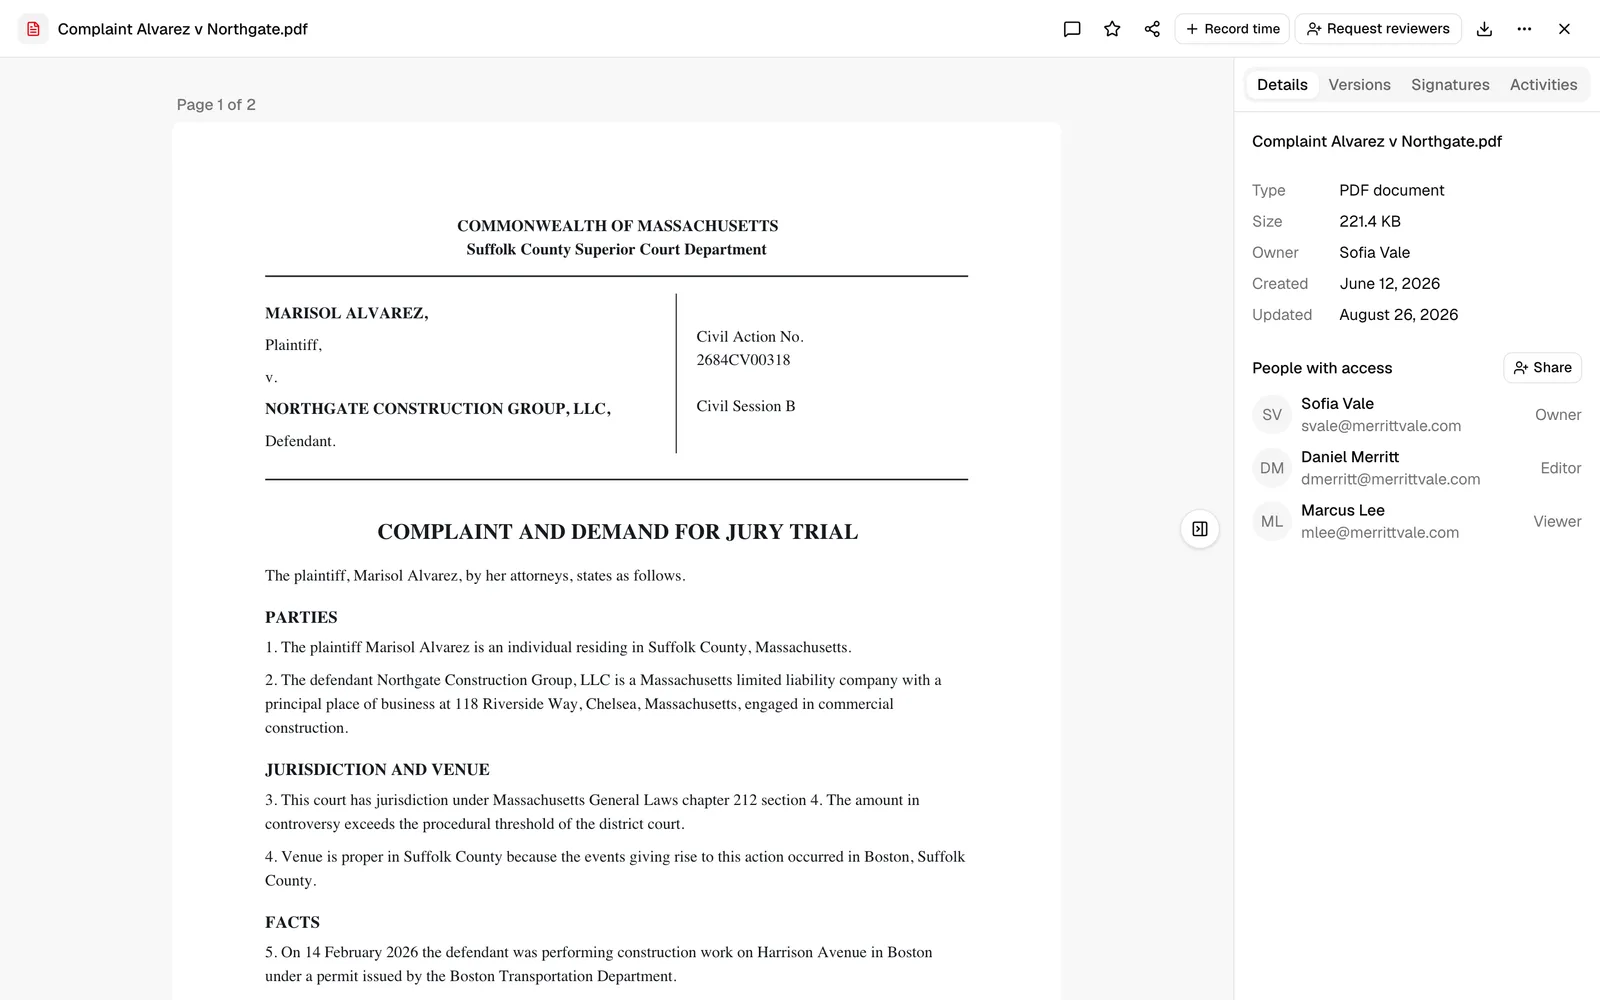
- The file opens full screen on its own page, with its own web address you can bookmark or share with a colleague at the firm. PDFs, images, video, audio, and plain-text files render directly in the viewer. For file types that cannot be displayed on screen, such as Word, Excel, and PowerPoint files, you will see the file's name with a friendly type label (for example Word document, Spreadsheet, or Presentation, rather than a technical file type) and a message telling you to download it to open it in the matching program, alongside a Download button.
- Use the panel on the right to review details. Switch between the tabs:
- Details shows the file type, size, owner, created and updated dates, and People with access.
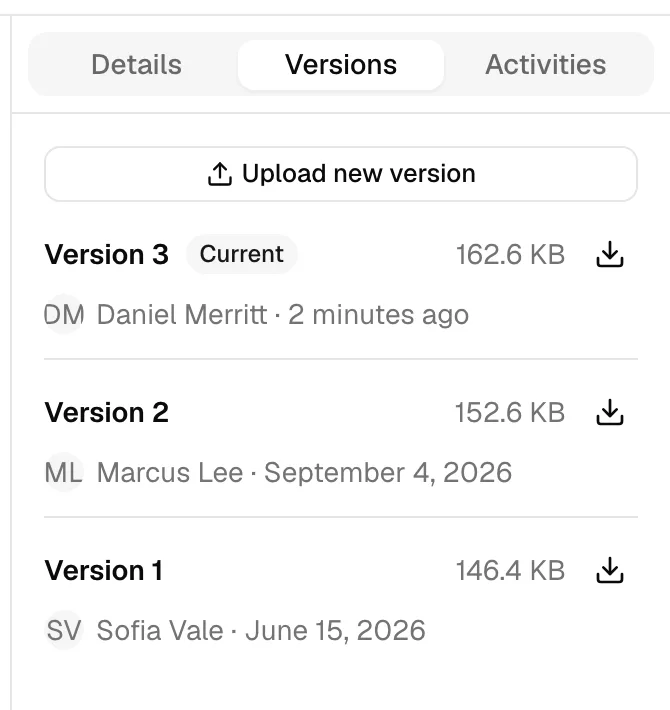
- Versions lists every uploaded version, with the current one marked Current. See Upload a new version and view version history.
- Signatures appears for PDFs and is where you place signature fields and send the file out to sign. Once a signature request finishes, this tab shows the completed-request actions instead. See Requesting eSignatures and Managing signature requests.
- Activities shows the file's activity timeline: content and version changes, access changes, shares, comments, stars, renames and moves, downloads, previews, and (for PDFs) the full signature history (request sent, viewed, signed, completed, declined, or voided). Downloads and previews show up here as they happen, so you can see when a copy was taken or the file was opened, and by whom. Use the filter button next to the heading to turn on Show view activity and also include every time the file's page itself was opened. See Activity timelines and audit logs.
- From the header at the top of the page you can also open Comments (the speech-bubble icon, covered below), star, Share, record time, open the approvals control (covered below), Download, or open the More actions menu (Rename, Move to, Upload new version, Make a copy, Move to Trash).
- Click the X in the top right to close the file. You return to the tab and folder you opened it from, with the same breadcrumb trail you left. Your browser's Back button takes you to the same place.
Tip: Use the panel toggle on the edge of the page to hide or show the right-hand details panel and give the document more room.
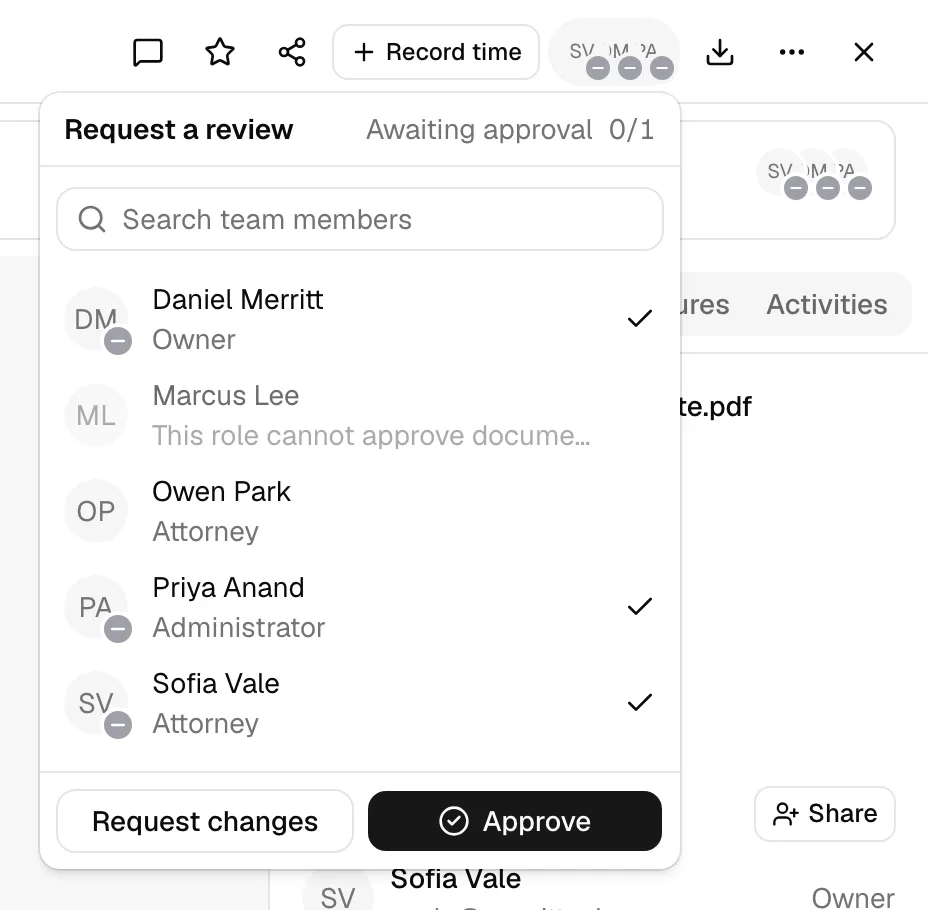
Send a file for review
If your firm has document approvals turned on, an open file's header carries its review control, in the row of actions at the top right between the record-time control and Download. Before anyone has been asked it is a Request reviewers button; once someone is reviewing it becomes a small group of reviewer avatars, each marked with that person's decision. Click it to open the review panel, where you search for colleagues and click their names to ask them (clicking a name again takes the request back), read the review's status and its approvals count, and approve or request changes yourself.
Asking for changes posts what you wrote into the file's Comments panel with a Review chip on it, and that panel opens as soon as you send the review. A reviewer who has asked for changes shows a View feedback button on their row in the panel, which reopens the comments at their note and highlights it. See Comment on a file.
This works on every kind of file, not just PDFs, so you can put a Word document, a spreadsheet, or an image through the same review. The control stays available after a document has been fully signed, and it is hidden on files in Trash. If your firm has approvals switched off and the file has no review on it, nothing appears. For the full walkthrough, see Approvals for invoices and documents.
Comment on a file
Every document, including uploaded files like PDFs and images, has a comment conversation. With the file open, click the Comments (speech-bubble) icon in its header to open the Comments panel on the right. From there you can post a comment, @mention a teammate, react with an emoji, reply, and edit or delete your own comments, exactly as in the rich-text editor. The panel updates live too, so a colleague's comment appears while you are reading, with no refresh needed. Commenting on a file notifies its owner, the people it is shared with, and anyone who already commented (and anyone you mention). Comments carrying a Review chip come from a reviewer asking for changes, and anyone else on the file can mark them Done once handled. For the full walkthrough, see Comment on a document and Review comments.
Download
Downloading saves a copy of a file to your computer.
- From the table: click the More actions (...) button on the row and choose Download.
- From the open file: click the Download icon in its header.
For a PDF that has completed an eSignature request, Download gives you the finalized, signed copy rather than the original unsigned upload. That is because the signed copy is filed as the document's newest version when signing completes. The version from before signing is still available from the Versions tab, and an unwatermarked copy of the signed document can be downloaded from the completed request. See Managing signature requests.
Note: Folders cannot be downloaded. The Download action only appears on files and rich-text documents.
Upload a new version of a file and view version history
When a file changes (for example, a revised contract), you can upload the new file as a new version of the existing record instead of creating a separate file. Older versions stay accessible.
To upload a new version:
- Open the file's More actions (...) menu, either on its row in the table or in the header once the file is open.
- Choose Upload new version.
- In the Upload new version dialog, click the drop zone to choose the replacement file.
- Click Upload version.
- When it shows Uploaded, click Close.
To view the version history:
- Open the file.
- Select the Versions tab in the right-hand panel.
- Each version is listed with its Version number, file size, who uploaded it, and when. The newest version is labeled Current.
- Click the Download icon next to any version to download that specific version.
Note: Uploading a new version keeps the file's name, sharing, and history. Only the file contents change, and the older versions remain downloadable from the Versions tab.
Important: Uploading a new version cancels any eSignature request still in progress on that file, so nobody ends up signing content that has since changed. If you need signatures on the new version, start a fresh request. This does not affect the file's existing share links, since a share link keeps showing whichever version was current when it was created (see Sharing documents). See Managing signature requests.
Tip: Rich-text documents you write in Esqase have their own snapshot-style version history, managed from inside the editor rather than here. See Editing documents (the file editor).
Grant, change, and revoke document access
You can control which firm members can see and work with a document, and at what level. This is separate from public share links (which are covered in Sharing documents).
Open the share dialog from any of these places:
- Click the More actions (...) button on a row and choose Share (files and rich-text documents).
- Open the file and click the Share icon in its header, or Share next to People with access on the Details tab.
- For a rich-text document, open the editor and click Share next to People with access in the Details side panel.
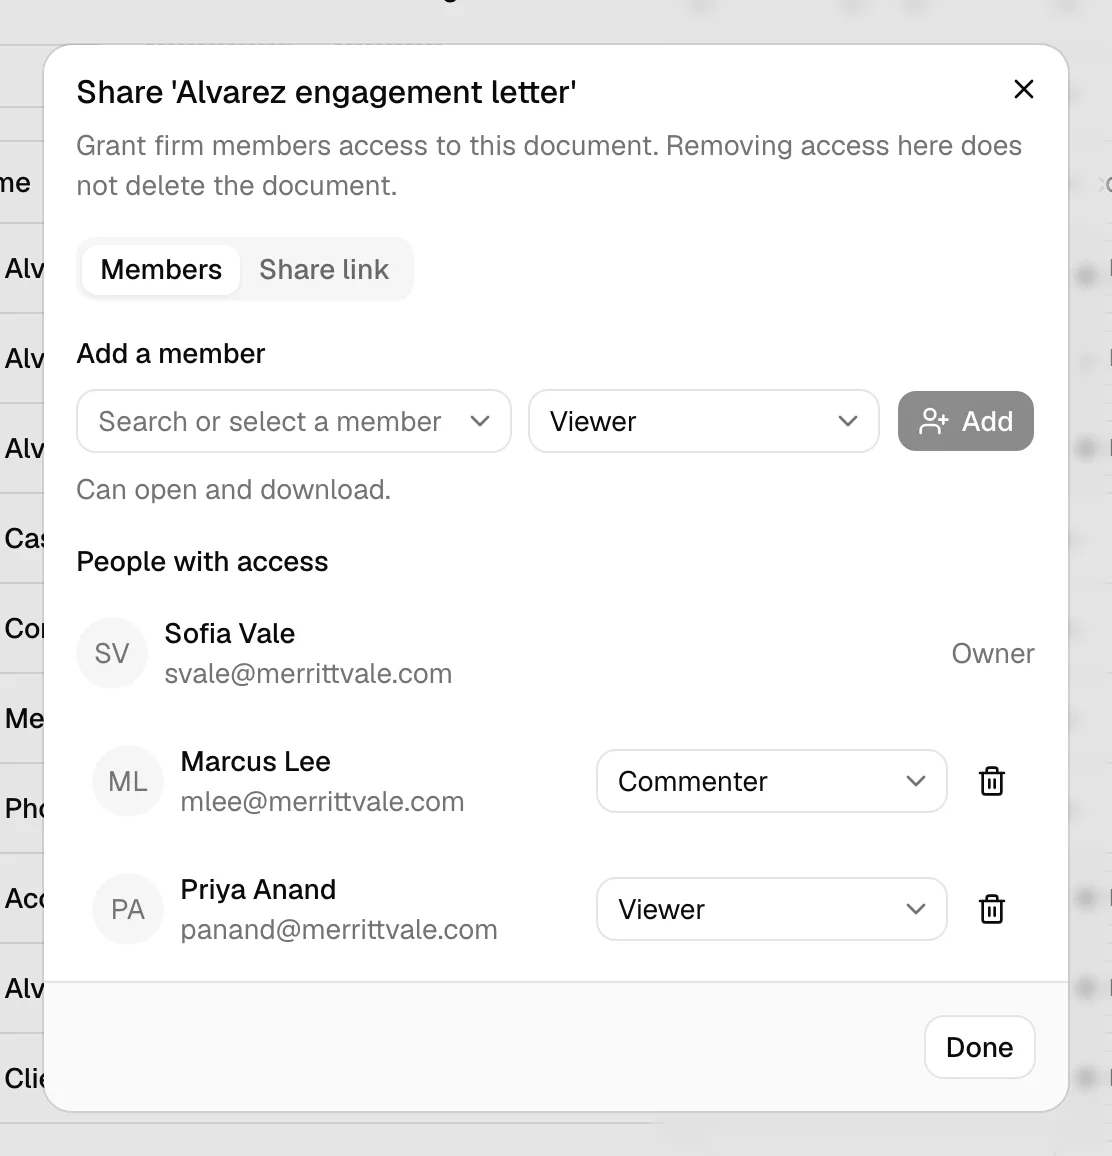
In the Share dialog:
- Make sure the Members tab is selected.
- Under Add a member, pick a colleague from the Select a member list.
- Choose an access level next to it. Each level is described as you choose it:
- Viewer can read and download the document.
- Commenter can read, download, and comment.
- Editor can rename, move, and upload new versions.
- Owner can transfer ownership and revoke other people's access.
- Click Add. A toast confirms Access granted, and the member appears under People with access.
To change someone's access level:
- In the People with access list, find the member.
- Pick a new level from the dropdown next to their name. The change saves immediately.
To revoke access:
- Find the member in the People with access list.
- Click the trash icon next to them. Their access is removed right away.
Click Done when you have finished.
Note: The document's owner is always listed first and cannot be removed here. Revoking a member's access does not delete the document; it only removes that person's ability to open it.
Add and remove document tags
Tags are colored labels that help you group and find documents. Tags are managed on rich-text documents from inside the editor.
- Open the rich-text document in the editor (click its name or Open in the table).
- In the side panel, open the Details tab. Tags appear under the Tags heading.
- To add a tag, click Tag, then pick a tag from the list. You can search by name. The tag appears immediately as a colored badge.
- To remove a tag, click the X on its badge.
The list of available tags is shared across your firm. To create new tags or change their colors, an administrator manages them in firm settings (see Tagging contacts for how tags work elsewhere in Esqase).
Note: You need Update access to add or remove tags. With view-only access, the tags are shown but the Tag button and the remove buttons do not appear.
Common questions
Can I act on several documents at once? Yes. In the table, select the checkboxes on the rows you want, then use the batch actions in the toolbar. Depending on your access, you can Download, Star, Make a copy, or Move to Trash the whole selection in one step. On the Trash tab, the batch actions offer Delete forever instead, so you can permanently delete several trashed items together; that action needs Delete access for documents and asks you to confirm first, since it cannot be undone. The checkbox column only appears if your role includes Update access.
Why can't I rename, move, or trash a particular folder? A few built-in folders that Esqase maintains for the whole firm are protected so the structure stays intact: the Templates folder used by document templates, and the Matters folder that holds every matter's documents. Esqase finds those folders by name, so renaming or moving one would break the link, and the actions simply do not appear on them. The folders inside them, including each matter's own folder, keep all their normal actions.
What's the difference between Share access and a share link? Granting access lets specific firm members open the document inside Esqase. A share link lets you send the document to people outside the firm (such as clients) through a secure link. Both live in the Share dialog, on the Members and Share link tabs. See Sharing documents.
Where do signed PDFs come from? When a PDF finishes an eSignature request, Esqase seals the signatures into it and files that as the file's newest version. There is no second, separate signed file: the document you sent out is the signed document. It shows a solid Signed badge in the table, downloading it gives you the signed version, and the copy from before signing stays in the Versions tab. See Requesting eSignatures and Managing signature requests.
Troubleshooting
- An open file says it can't load, or shows as blank. The secure link Esqase uses to display a file expires after a few minutes. Refresh the page, or use Download to get the file directly. Some file types (such as Word documents) cannot be displayed in the browser and will offer a Download button instead.
- An item disappeared from My documents. Check the Trash tab in case it was moved there, and the Shared with me tab if you are not its owner. You can also search by name from any tab.
- A file I just uploaded does not come up when I search its contents. Searching by contents becomes available a short while after the upload, once Esqase has finished reading the file. Search for it by name in the meantime, or try again in a moment. See Search your documents.
- I don't see the New button or row actions. These are gated by your document permissions. If the New button or Rename/Move/Trash options are missing, your role does not include the matching access level. Ask a firm owner or administrator to adjust your role.