La documentación del producto está disponible solo en inglés.
Editing documents (the file editor)
The file editor is Esqase's built-in word processor. When you open a rich-text document, the editor fills the whole screen so you can write, format, and lay out a document the way you would in any familiar word processor, while everything you type saves automatically. This page walks through opening and editing a document, adding images and other media, how autosave works, setting page size and orientation, saving and restoring versions, exporting, and commenting.
Note: This page covers native rich-text documents, the ones you create inside Esqase and edit on a blank page. Uploaded files (PDFs, Word files, images) open in a full-screen viewer on their own page instead, not in the editor. See Open an uploaded file. To learn about the broader workspace, folders, uploads, and trash, see The documents workspace.
Before you begin
- The editor lives inside your firm's documents area, so you need access to your firm's Documents to use it.
- What you can do in the editor depends on your role's permissions for documents:
- View access lets you open and read a document. Without edit access, the editor opens in read-only mode and shows View only next to the document name.
- Update (edit) access lets you change the content, rename, move, copy, mark as a template, change page setup, and save versions.
- Create access lets you make new documents, including the PDF copy the Sign button produces when you want signatures on what you wrote.
- Delete access lets you move the document to Trash.
- Firm owners can always do everything.
- Comments are available to anyone who can view the document, so you can leave feedback even when you cannot edit the body text.
Open and edit a rich-text document
You open a document from the documents workspace, and it takes over the full window so you can focus on writing.
- In the sidebar, click Documents.
- Find the document you want. It can live at the top level or inside a folder. Rich-text documents are the ones you created in Esqase (not uploaded files).
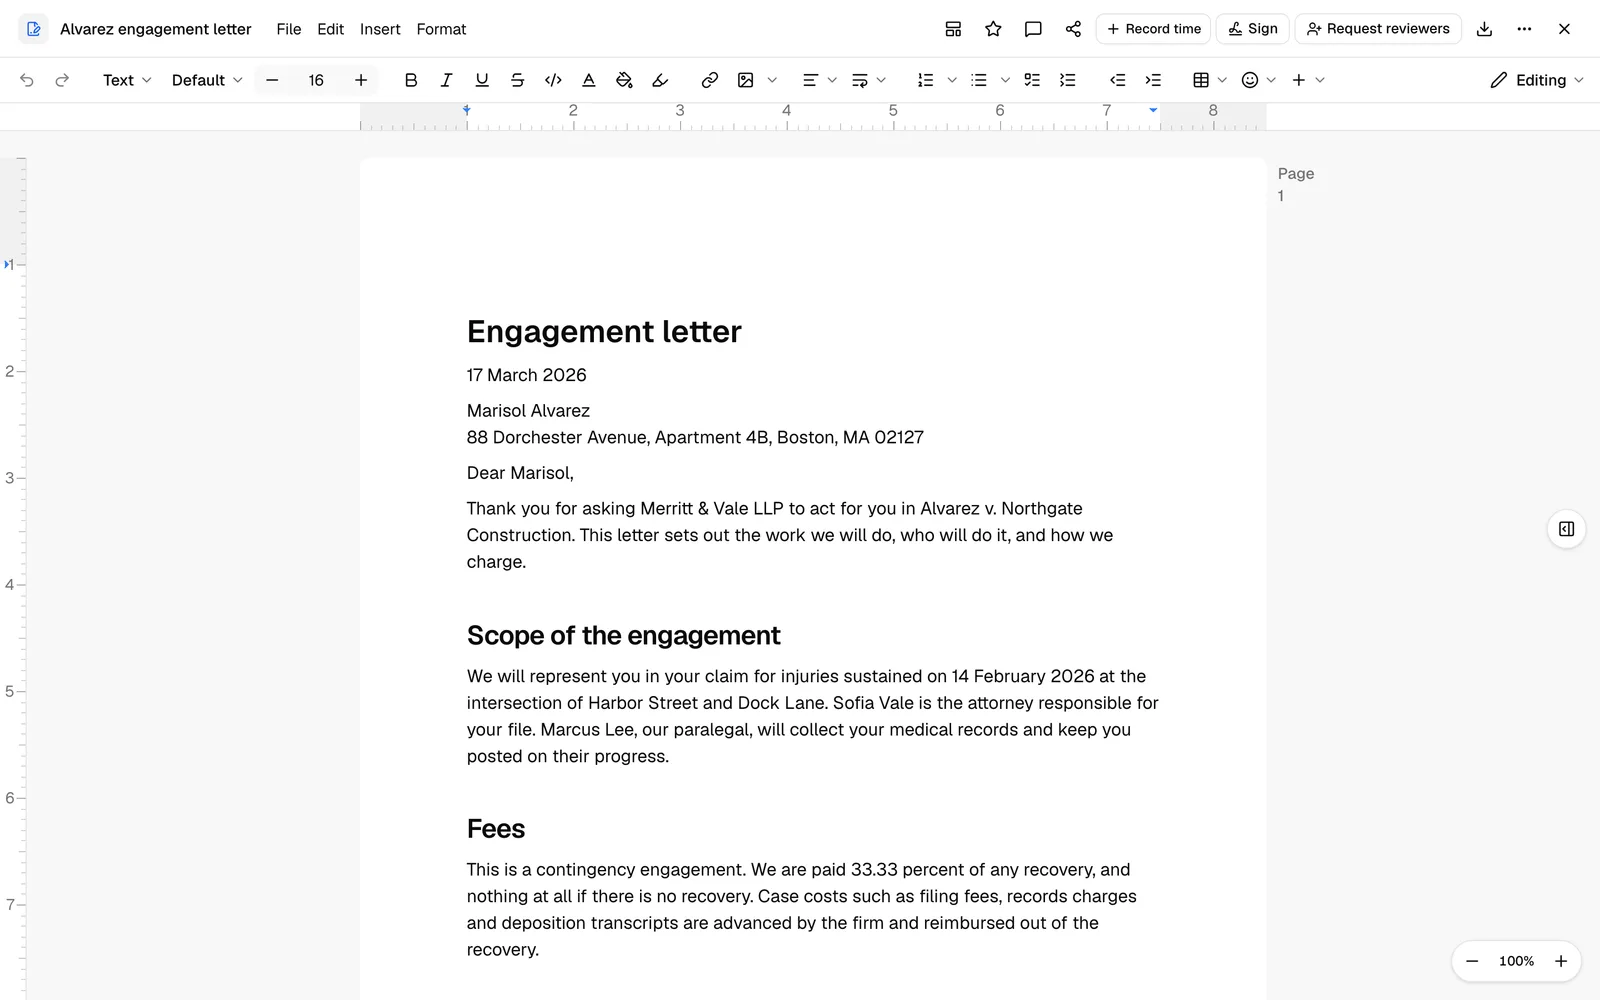
- Click the document to open it in the editor. The editor opens full-screen with the document name in the top-left corner and a toolbar above the page.
- Click into the page and start typing. The page is laid out like real paper, so you can see exactly where text falls on the page and where each page break lands.
Format your text with the toolbar
The toolbar across the top of the page holds the everyday formatting controls. Hover over any button to see what it does. From left to right you will find:
- Undo and Redo for stepping back and forward through your changes.
- A turn into control plus font family and font size pickers to change how a block or selection looks.
- Text styles: Bold, Italic, Underline, Strikethrough, Code, Text color, Background color, and Highlight.
- Link and Image for inserting a hyperlink or a picture. The Image button lets you upload a file from your computer or embed one from a web address (see Add images and other media).
- Align and Line height for paragraph layout.
- List buttons: Numbered list, Bulleted list, and a to-do (checkbox) list, plus a toggle (collapsible) block.
- Outdent and Indent to shift content left or right.
- Table, Emoji, and an Insert menu for adding other content.
Tip: Common formatting has keyboard shortcuts, for example Cmd/Ctrl + B for bold, Cmd/Ctrl + I for italic, and Cmd/Ctrl + U for underline. Hover a toolbar button to see its shortcut.
Use the menu bar for everything else
Next to the document name at the top of the screen is a compact menu bar with File, Edit, Insert, and Format. These mirror the toolbar and add a few document-level actions.
- File: New document, Download (PDF or Word), Import Word (.docx), Rename, Make a copy, Save version, Version history, Page setup, Print, and Move to Trash. Some items appear only if your role allows them.
- Edit: Undo, Redo, and Select all.
- Insert: Table (pick a size from 1 x 1 up to 4 x 4), Image, Link, and Horizontal line.
- Format: Text (bold, italic, underline, strikethrough), Paragraph styles (Normal text, Heading 1, Heading 2, Heading 3, Quote), Bulleted list, Numbered list, and Clear formatting.
Tip: When you choose Insert > Image or Insert > Link from the menu bar, you are prompted to paste in a URL. To upload a picture from your computer instead, use the toolbar Image button, or paste or drop the file straight onto the page (see Add images and other media).
Rename, star, and other actions in the header
The header at the top of the editor also has quick actions on the right side:
- Mark as template / Remove template: turns this document into a reusable starting point. See Document templates.
- Star / Unstar: pins the document to your starred list for fast access later.
- Comments: the speech-bubble icon opens (or closes) the Comments panel on the right. See Comment on a document.
- Share: opens sharing options so others can view or comment. See Sharing documents.
- A record time control (if your role allows time tracking) to start or stop a timer tied to this document. Once that time entry has been billed or paid, the control becomes a view-only eye icon that opens the entry read-only. See Time and expense tracking.
- A review control, just to the right of Sign, if your firm has document approvals turned on. Before anyone has been asked it is a Request reviewers button; once someone is reviewing it becomes the row of reviewer avatars, each marked with that person's decision. Click it to open the review panel. See Send a document for review.
- Sign (the signature icon): makes a PDF copy of this document and opens it ready for signature setup. See Send a document for signature.
- Download: exports the document (covered below).
- More actions (the three-dot menu): Rename, Move to, Make a copy, and Move to Trash.
- Close (the X): returns you to where you opened the document from, on the same tab and in the same folder. If you came to the document from a link, it takes you to the folder the document lives in.
To rename quickly, click the document name in the top-left corner (if you have edit access) and type a new name.
Important: If you only have view access, the body text is locked, the toolbar is hidden, and you will see View only by the document name. You can still read, comment, download, and print.
Choosing Move to Trash, either from the header's More actions menu or from File > Move to Trash, opens a Move to Trash? confirmation naming the document and warning that anyone you shared it with loses access until you restore it. Click Move to Trash to confirm, or Cancel to leave it where it is. See Trash a document and restore it from Trash for what moving a document to Trash does to its share links and any signature request in progress on it.
When a document cannot be opened
On rare occasions the editor cannot make sense of a document's saved content and is unable to load it. Rather than risk showing you a blank page and letting you accidentally save over your real content, Esqase stops and shows a notice: We could not open this document, explaining that editing, saving, and downloading are turned off so the version on file is not replaced by a blank page.
From this notice you can:
- Reload the page to try again, in case it was a one-off problem.
- Click Version history to open the version list and check the versions saved before now, or restore an earlier one that does open. See View, preview, and restore an earlier version.
If the problem keeps happening after a reload, restoring the most recent version that opens cleanly is the safest way forward, since your content is never actually lost, only the current unopenable state.
Add images and other media
You can place images directly on the page, and attach video, audio, and other files alongside your text. Everything you insert is uploaded to secure storage and saved with the document, so it is still there the next time the document opens. Everyone who can open the document sees the same media: members with access, view-only readers, and people you share the document with by link.
Insert an image
You need edit access to add media. There are three ways to get an image onto the page:
- Click where you want the image to go.
- Insert it in whichever way suits you:
- From the toolbar: click the Image button, choose Upload from computer, and pick the file. (Choose Insert via URL instead to embed an image that is hosted on the web.)
- Paste: copy an image and press Cmd/Ctrl + V in the document.
- Drag and drop: drag an image file from your computer and drop it on the page.
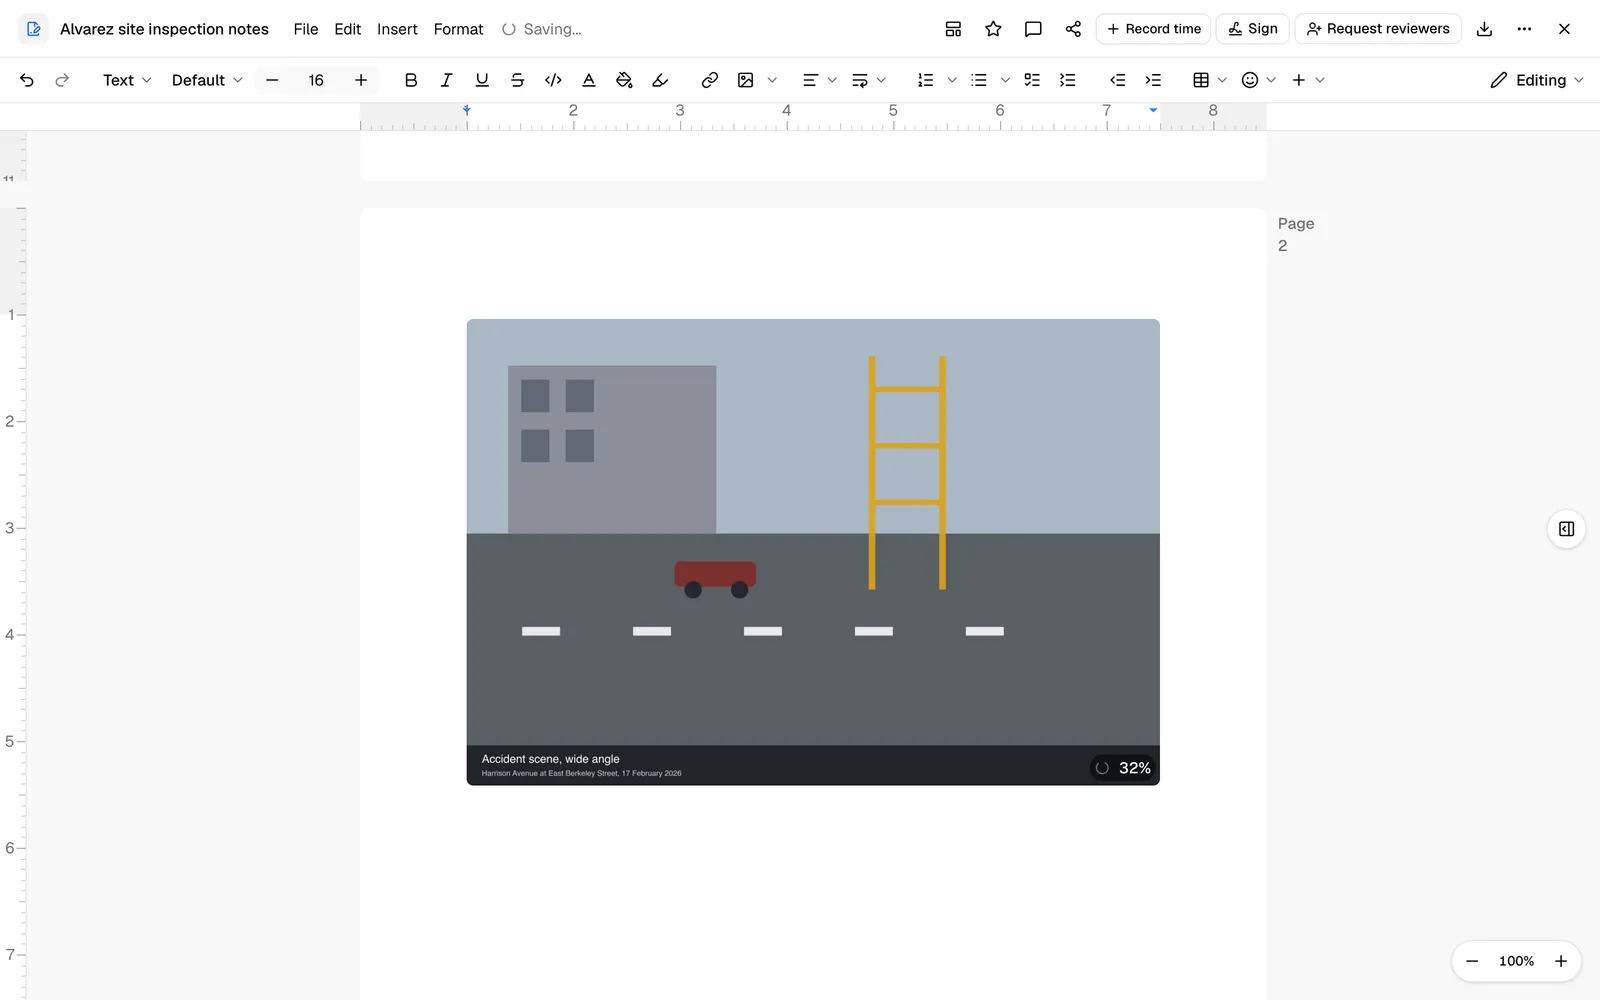
- While the file uploads, a placeholder on the page shows the upload progress. When the upload finishes, the image appears in place.
You can add video files, audio files, and other file attachments the same way, by dropping or pasting them into the document.
Note: Per-file upload limits: images up to 4 MB, videos up to 16 MB, and audio up to 8 MB. Any other attached file can be up to 25 MB. SVG images are not supported, so convert those to PNG or JPG first.
Note: If an upload fails, an error message appears and the placeholder is removed from the page. Check your connection and insert the file again.
Position an image (align and text wrapping)
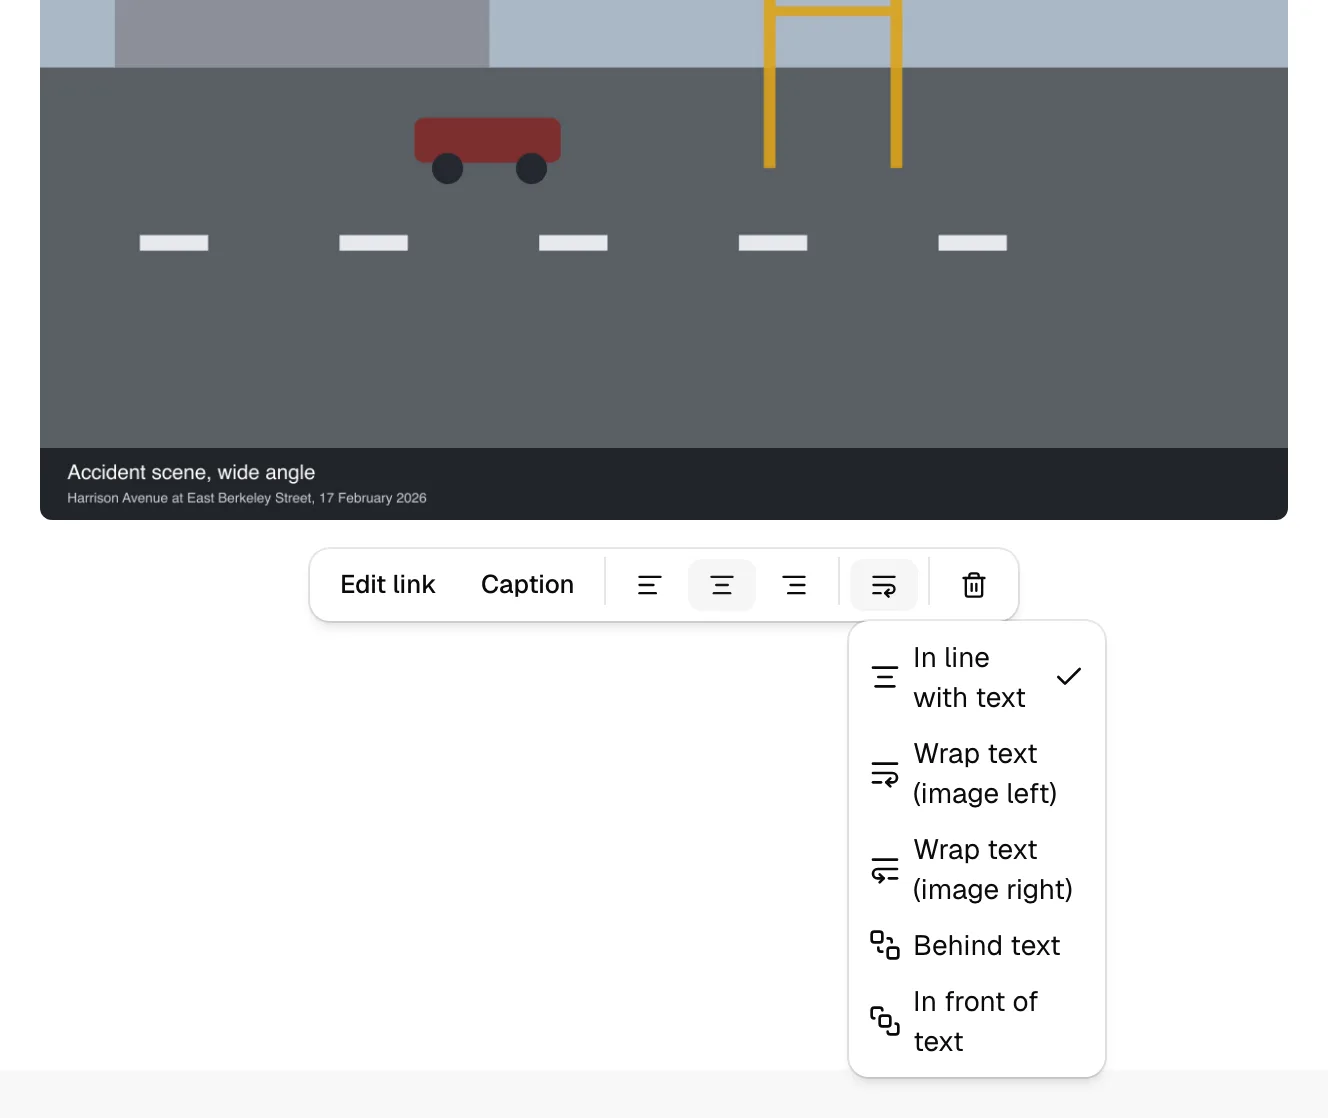
Click an image to select it. A small toolbar appears above it with Align left, Align center, and Align right buttons, a Caption button, and a Text wrapping menu.
The Text wrapping menu controls how the surrounding text flows around the image:
- In line with text (the default): the image sits in the flow of the text, like a very large character.
- Wrap text (image left): the image moves to the left and text wraps along its right side.
- Wrap text (image right): the image moves to the right and text wraps along its left side.
- Behind text: your text runs over the top of the image.
- In front of text: the image sits on top of your text.
With Behind text or In front of text, drag the image to place it exactly where you want on the page. Your wrapping choice and position are saved with the document and look the same to everyone who opens it, including view-only readers and shared links.
Tip: Behind text works well for letterhead art or a watermark, because your paragraphs keep flowing over the image as you type.
How autosave works
You never have to click Save in the file editor. Esqase saves your changes for you as you type, so your work is always kept up to date.
- A small status indicator sits next to the menu bar at the top of the screen. It shows:
- Saving... while your latest changes are being written.
- Saved (with a checkmark) once they are stored.
- Save failed (in red) if something went wrong, for example a dropped connection.
- Autosave waits a brief moment after you stop typing, then saves in the background. This means it batches a burst of edits into one save rather than saving every keystroke.
- If you close the tab or navigate away while a change is still pending, Esqase makes a final attempt to save it for you.

Important: If you see Save failed, your most recent edits may not be stored. Check your internet connection and keep the document open. Esqase keeps trying as you continue to type. To be safe, you can also save a manual version (see below) once the indicator returns to Saved.
How autosave differs from versions
Autosave keeps the single, current copy of your document up to date. It does not create a snapshot you can roll back to. When you want a labeled point you can return to later, save a version (covered in the next section). Think of autosave as "never lose your latest work" and versions as "remember this exact state."
Set page size and orientation (Page setup)
Page setup controls the shape of the page, useful for matching court formatting rules or a firm template. The page on screen updates to match your choices, and exports and printouts use the same settings.
- In the menu bar, click File, then Page setup. (You can also open it from the File menu at any time.)
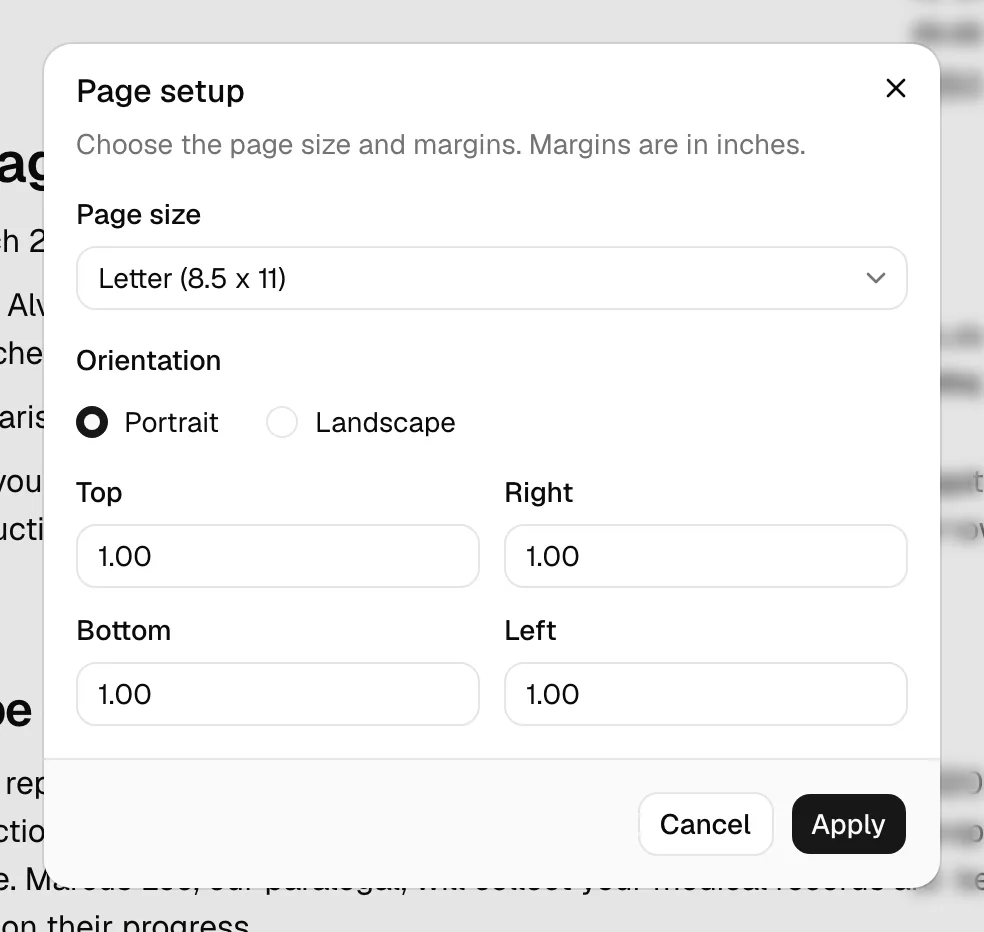
- In the Page setup dialog, choose your options:
- Page size: pick from the dropdown. Options include Letter (8.5 x 11), Tabloid (11 x 17), Legal (8.5 x 14), Statement (5.5 x 8.5), Executive (7.25 x 10.5), Folio (8.5 x 13), and the ISO sizes A3, A4, A5, B4, and B5. The dropdown is searchable, so you can type to filter.
- Orientation: choose Portrait (taller than wide) or Landscape (wider than tall).
- Margins: set the Top, Right, Bottom, and Left margins. Margins are entered in inches.
- Click Apply to use the new layout, or Cancel to discard your changes.
When you click Apply, the page redraws immediately. If you have edit access, the settings are also saved with the document, so the next time you (or anyone else) opens it, the same page setup is used. New documents start at Letter, Portrait, with one-inch margins by default.
Tip: Page setup also drives your exports. A document set to Legal and Landscape exports to PDF and prints at exactly that size and orientation, so set this up before you download or print.
View and restore content versions
A version is a saved snapshot of the document's content at a moment in time. Versions let you keep a record of major drafts and roll back if a later edit goes wrong. They are separate from autosave: autosave keeps the live copy current, while a version freezes a copy you can return to.
Save a version
- In the menu bar, click File, then Save version. (You can also save a version from inside the Version history dialog.)
- Optionally, type a short note in the What changed? field describing what is different in this snapshot (for example, "First draft for client review" or "Added indemnification clause"). This is optional, but it makes the version list far easier to scan later.
- Esqase captures the current content and adds it to the version list. A confirmation shows the version number that was saved (for example, Version 3 saved).
You can save a version any time you reach a milestone, such as finishing a first draft or before making a big change.
View, preview, and restore an earlier version
- In the menu bar, click File, then Version history.
- The Version history dialog lists every saved version, newest at the top, with who saved it, when, and its What changed? note if one was added.
- To capture the current state before browsing, click Save current version at the top of the dialog (available if you have edit access).
- Click a version in the list to preview it. Its content renders read-only in the dialog, so you can check it is the one you want before doing anything to it. Selecting nothing yet shows Select a version to preview it.
- To go back to an earlier snapshot, click Restore next to that version.
- In the Restore this version? confirmation, review the warning that the current text is replaced by this saved version, then click Restore to confirm.
When you restore, the document content is replaced with that version's content and the editor reloads to show it. Restoring does not delete your other versions, so you can always move forward again to a later one.
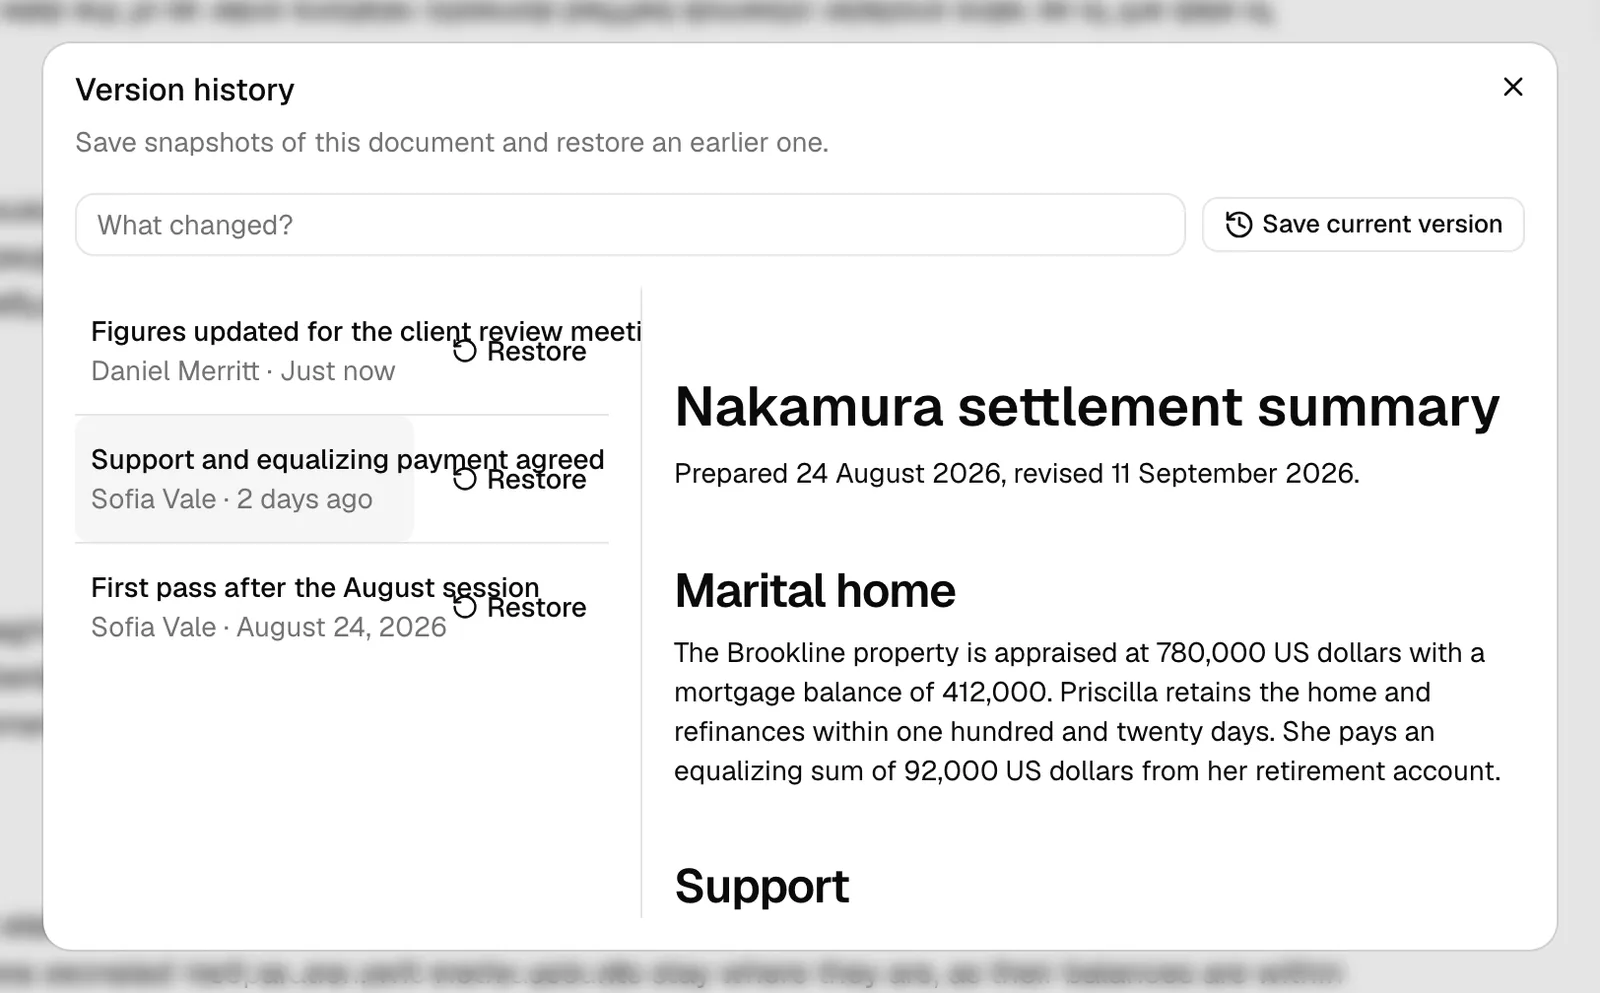
Tip: Before restoring an older version, save a version of the current state first. That way the work you have now becomes its own snapshot you can come back to. The confirmation on Restore is there precisely to give you that reminder before the current text is replaced.
Note: Saving and restoring versions requires edit access. With view-only access, the Version history dialog still opens so you can see the list and preview a version, but the save and restore actions are hidden.
Export a document
You can download a document as a PDF or Word file, or send it straight to your printer. Exports use the document's current page size, orientation, and margins.
Download as PDF or Word
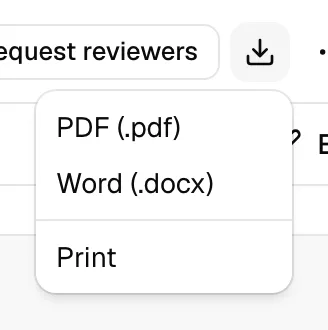
- In the editor header, click Download (or open the File menu and choose Download).
- Pick a format:
- PDF (.pdf): a fixed-layout file that looks the same everywhere, ideal for filing, sharing, or signing.
- Word (.docx): an editable Microsoft Word file.
- While Esqase prepares the file, a Preparing your PDF... (or Preparing your Word file...) notice shows and the Download menu is unavailable, so you can see the export is under way rather than wondering whether your click registered. It updates to PDF downloaded (or Word file downloaded) once your browser has the file.
- Your browser downloads the file, named after the document.
Tip: If you are downloading a PDF only so someone can sign it, use the Sign button instead. It creates the same PDF and files it in Esqase for you, so there is nothing to download and upload again. See Send a document for signature.
In the Download menu (or the File menu), click Print to open your browser's print dialog. The printed pages match the page size and orientation set in Page setup.
Import a Word file
If you have edit access, you can pull the contents of a Word document into the current document. In the File menu, choose Import Word (.docx), then select a .docx file from your computer.
In the Import a Word file? confirmation, Esqase explains that importing replaces the text currently in the document, and that it saves a version of what you have now first, so you have somewhere to go back to. Click Import to confirm, or Cancel to back out and change nothing. Once you confirm, Esqase saves a version labeled Before Word import, then brings the Word file's content into the editor where you can keep editing.
Important: Importing a Word file adds its content to the document you have open. If you want to keep your current document untouched, create a new document first (File > New document) and import there. If you do go ahead in the current document, the automatic Before Word import version means your previous text is never lost; open Version history to get back to it. See View, preview, and restore an earlier version.
Troubleshooting exports
- The buttons are greyed out. The editor is still loading, or an export is already running. Wait a moment and try again.
- The export did not download. Your browser may have blocked the download or a pop-up. Check your browser's download bar or settings, then retry.
- You see "We couldn't complete that. Please try again." A one-off problem interrupted the export. Try the download once more.
Send a document for review
If your firm has document approvals turned on, a colleague can sign off on a document before it goes out for signature. A document never enters review on its own: someone asks for it.
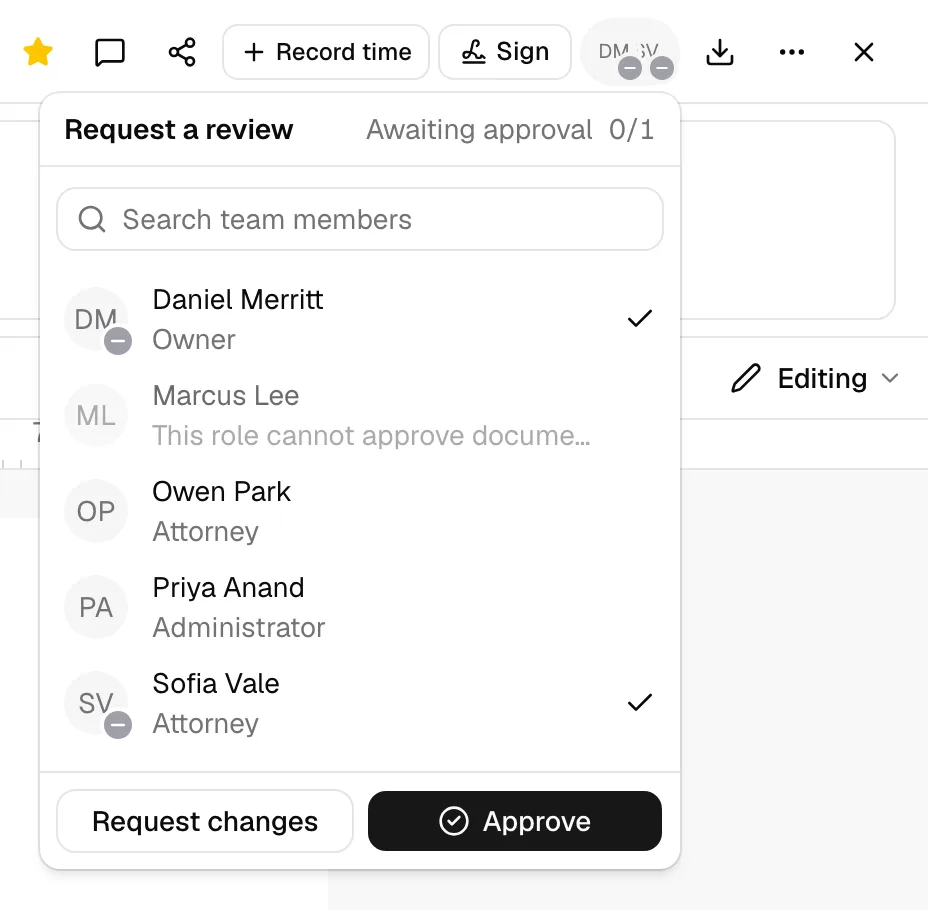
- Open the document in the editor and click the review control in the header (to the right of Sign). Before anyone has been asked it is a Request reviewers button; once someone is reviewing it is the row of their avatars.
- The panel opens on the Request a review list, each row showing an avatar, a name, and a role. Type in the Search team members box to narrow it down, then click a colleague to request their review straight away. They are notified. Colleagues who cannot review this document are still listed, greyed out, with the reason where their role would be, so you can see who was considered. If your firm set default reviewers and the document has no review yet, the panel also offers Submit to the firm's reviewers.
- The review's status now sits beside the panel's heading (for example, Awaiting approval), along with a count such as 1 of 2 approvals, and the header control becomes the reviewer avatars with their decision badges.
If your role can approve documents, the same panel gives you Approve and Request changes. Asking for changes blocks the document and is reversible: the same reviewer can approve later, once the changes are in. What they wrote is posted into the document's Comments panel with a Review chip on it, and that panel opens automatically the moment the review is sent. Work through those comments and click Mark as done on each one as you handle it. See Comment on a document.
To take a colleague off the review, open the panel again and click their name a second time. Removing the last reviewer cancels the review, unless your firm requires this document to be reviewed, in which case Esqase asks you to add another reviewer first.
Until an open review is approved, the document cannot be sent for signature. You can keep writing, and you can set up signers and place fields on the PDF copy, but the send action stays unavailable. See Approvals for invoices and documents.
Important: A review covers the version of the document that was reviewed. Editing the body text after approval clears the approvals collected so far and opens a fresh review, carrying the same reviewers over so they can look at the new text. Renaming, tagging, moving, sharing, and page setup are cosmetic and leave the review alone.
Note: This section covers documents you write in the editor. An uploaded file (a PDF, a Word file, a spreadsheet, an image) is reviewed the same way, but you open its approval control from the header of the file's own page instead. See Send a file for review.
Send a document for signature
Electronic signatures are collected on PDFs, so a document you wrote in the editor has to become a PDF before anyone can sign it. The Sign button does that in one step: it turns the document into a PDF, files that PDF in your documents, and opens it ready for you to set up signatures. Your original document is untouched and stays editable.
- Open the document in the editor and read it through. The PDF captures the document exactly as it appears on screen, so finish your edits, set the page size and orientation you want (see Set page size and orientation (Page setup)), and fill in any placeholder values first.
- In the editor header, click Sign (the signature icon, just to the right of the record time control and to the left of the download icon).
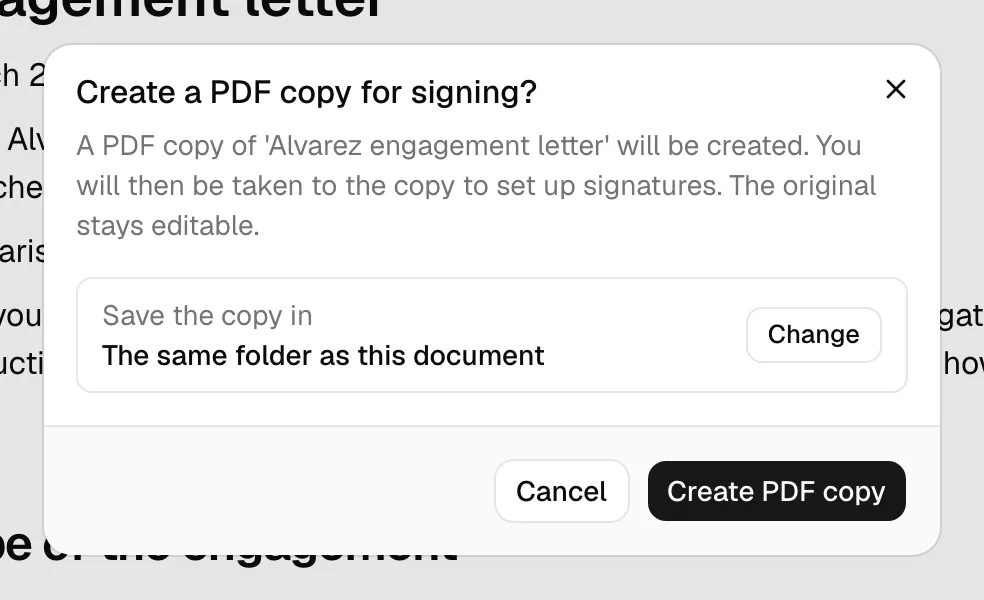
- The Create a PDF copy for signing? dialog opens and confirms what will happen: a PDF copy of the document is created, you are taken to the copy to set up signatures, and the original stays editable.
- Check the Save the copy in row. It reads The same folder as this document unless you change it, which is what most signing runs want. To file the copy somewhere else, see Choose where the PDF copy is saved below.
- Click Create PDF copy to continue, or Cancel to close the dialog and change nothing.
- Esqase creates the PDF in the destination shown, named after the document with a
.pdfending, then opens it for you. - The new PDF opens on its own page with the right-hand panel on the Signatures tab. From here you add signers, place their fields on the pages, and send the request, exactly as you would for any PDF you uploaded. See Requesting eSignatures.

Choose where the PDF copy is saved
By default the copy lands in the same folder as the document you are signing, so the usual route stays a single click. When you want it somewhere else, for example in a matter's folder or a folder you keep for documents out for signature, set the destination before you create it.
- In the Create a PDF copy for signing? dialog, click Change next to Save the copy in.
- The Choose a folder browser opens. It works exactly like Move to and Copy to: the breadcrumb trail at the top starts at My documents, and you click a folder to go into it. Use the breadcrumb to step back out.
- When the browser is showing the folder you want, click Select this folder. The browser closes and the folder's name appears in the Save the copy in row.
- Click Create PDF copy. The copy is created in the folder you chose.
Note: The folder browser always opens at My documents, not at the folder the document is currently in, so you may need to click down to where you are going. Move to and Copy to behave the same way.
Tip: The destination only lasts for that one dialog. If you click Cancel and open it again, Save the copy in is back to The same folder as this document, so a destination you picked once never surprises you on a later signing run.
Note: The PDF is produced the same way as File > Download > PDF (.pdf), so it uses the document's page size, orientation, and margins, and it shows your filled-in placeholder values rather than the {{tokens}}. A placeholder you left empty still appears as its token, so fill those in before you create the copy. See Document placeholders.
Note: The PDF copy behaves like any other file in your documents. It appears in the folder and in the documents list, its creation is recorded on its own Activities tab, and it becomes searchable by its contents once Esqase has finished reading it. See The documents workspace.
Note: The copy takes the document's own name. Characters that a file name cannot contain are replaced with spaces, and a very long name is shortened so the file name, counting the .pdf ending, stays within 255 characters. PDF and Word downloads are named the same way, so rename the document first if you want a tidier file name.
Important: Every click of Sign creates another PDF copy, so use it once per round of signing. If you edit the original after creating a copy, create a fresh copy so the version you send out matches the current text, and delete or ignore the copy you no longer need.
Troubleshooting the Sign button
- You do not see a Sign button. It appears only if your role includes Create access for documents, and it is hidden for documents in Trash. Restore the document from Trash, or ask a firm owner or administrator about your role. See Roles and permissions.
- The Sign button is greyed out. The document is still loading. Wait until the page is fully on screen and try again.
- You see "We couldn't create the PDF copy. Please try again". Something interrupted the conversion or the save. Check your connection and click Sign again. No copy is created when this happens.
- The PDF copy will not send to signers. If your firm has document approvals turned on, the PDF needs its own approval before it can be sent: the copy is a separate file, so approving the rich-text original does not carry over. Open the PDF copy and use the approval control in the top-right row of header actions on its page. See Send a file for review.
Comment on a document
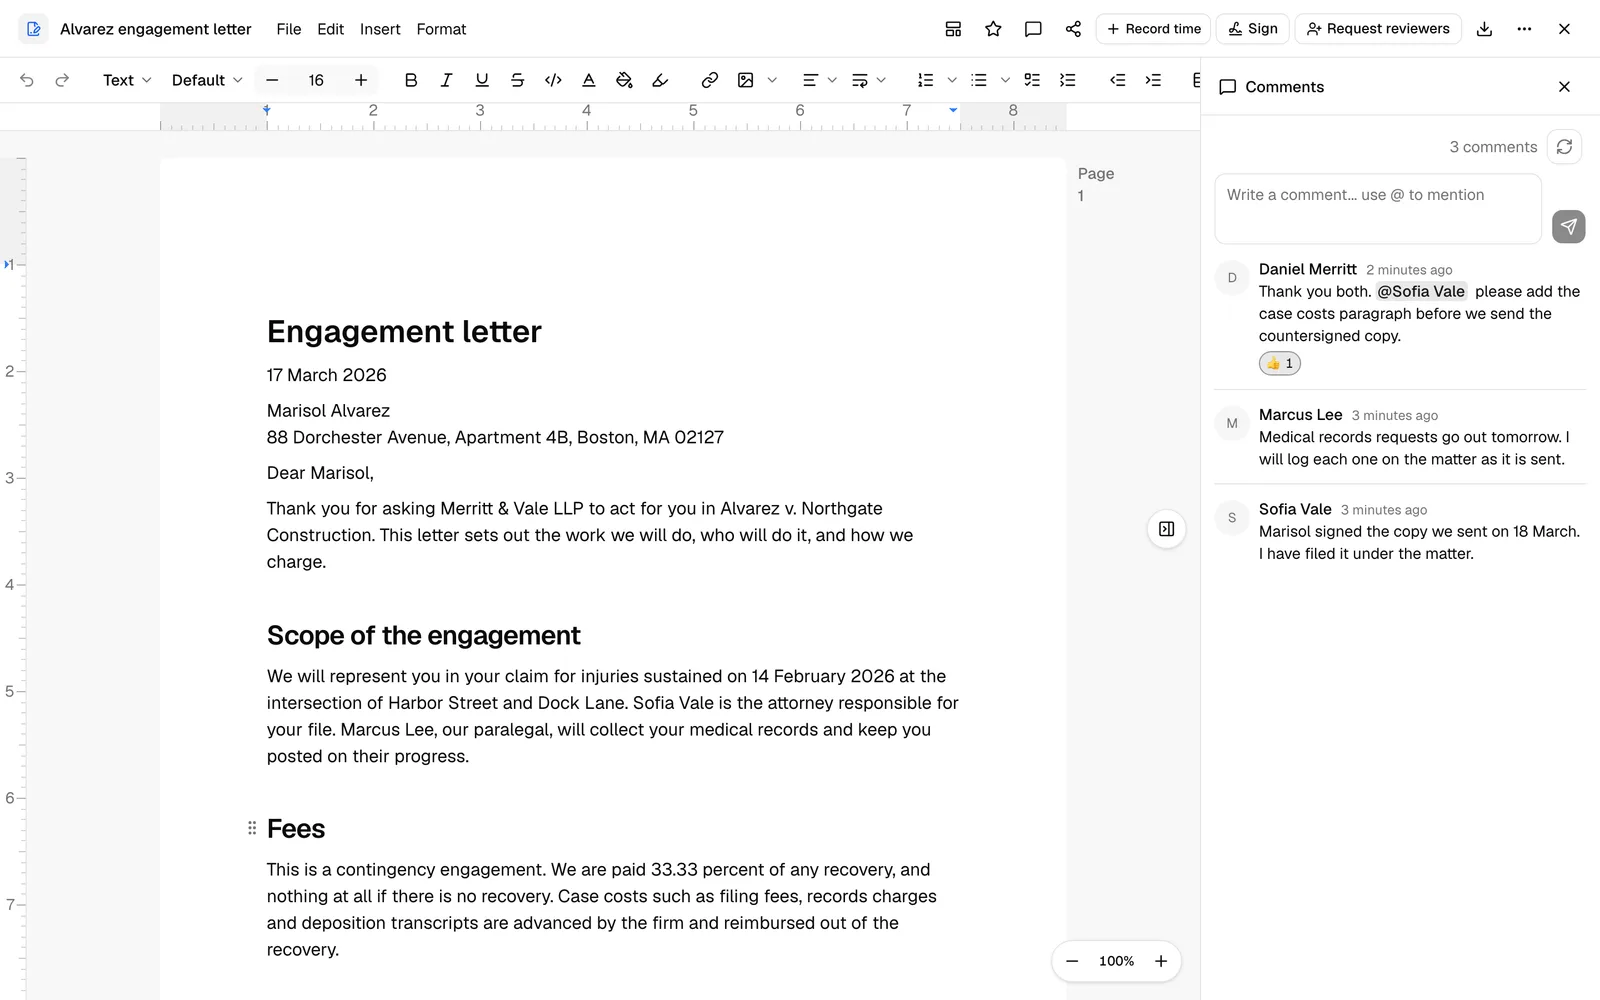
Comments let you and your colleagues leave feedback on a document without changing its text. They are a chat-style conversation: one line per comment with the author's initial, name, and time. The conversation updates live, so a colleague's comment appears in your panel moments after they post it. Anyone who can view the document can comment, so it works for informal feedback even when someone cannot edit. The same comments panel is available on every kind of document, including uploaded files (see The documents workspace).
The panel is also where formal review feedback lands. When a reviewer clicks Request changes on a document, what they wrote is posted here as a comment with a Review chip on it, and the panel opens automatically so you see it arrive. See Review comments and Send a document for review. An ordinary comment, by contrast, never changes a document's approval status.
Open the Comments panel
- In the editor header, click the Comments (speech-bubble) icon. The Comments panel opens on the right, with its own heading and a close (X) button.
- The panel is separate from the side panel's Placeholders, Details, and Activity tabs. Opening comments hides that tabbed panel, and vice versa; only one shows at a time.
- Click the X in the panel header, or the Comments icon again, to close it.
Add a comment
- In the Comments panel, type your note into the Write a comment... use @ to mention box at the top.
- Click the send button (or press Enter). A Comment posted confirmation appears, and your comment shows in the list with your name and how long ago you posted it.
If there are no comments yet, the panel reads No comments yet. Start the discussion.
Mention a teammate
Type @ in the comment box to bring up a list of your firm's members, each with their profile photo (or initials), then keep typing to search and click the person you want. Their name is inserted and highlighted in the posted comment, and they are notified (see the note on notifications below).
React and reply
- React: hover over a comment and click the add reaction (smiley) button, then pick one of the six quick reactions: 👍, ❤️, 😂, 😮, 😢, or 🙏. Reactions gather into small counters beneath the comment; click a counter to add or remove your own.
- Reply: hover over a comment and click the reply button. A Replying to banner naming the author appears above the box; type your reply and send it. The reply is posted with a short quote of the comment you answered.
Edit or delete your own comment
Hover over a comment you wrote to reveal its actions:
- Click the edit (pencil) button to change the text in place, then click Save. The comment then shows an edited marker next to its time.
- Click the delete (trash) button, then confirm. This removes the comment for everyone and cannot be undone.
Note: You can only edit or delete comments you wrote. To clear someone else's, ask them to remove it.
Review comments
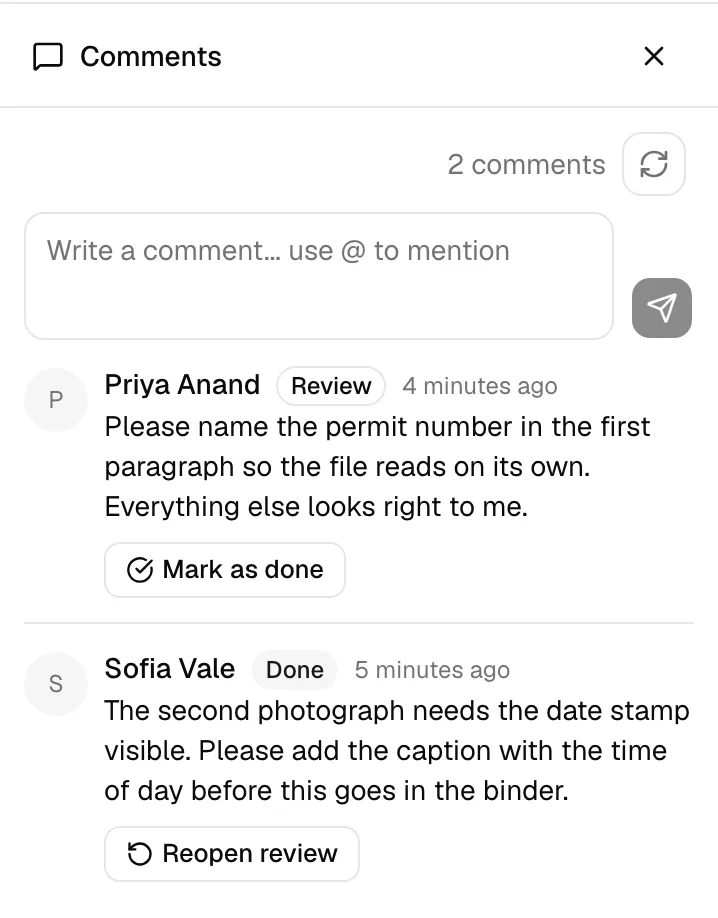
A comment carrying an amber Review chip is what a reviewer wrote when they clicked Request changes on the document. It reads and behaves like any other comment (you can reply to it, react to it, and mention people in your reply), with one extra action.
- Find the review. The quickest way is to open the review control in the header, find the reviewer who asked for changes, and click the View feedback button on their row: the panel closes, this panel opens, and their comment is scrolled into view and highlighted for a moment.
- Make the change the reviewer asked for.
- Click Mark as done, the button just below the text of the review comment. The chip changes to a grey Done.
- Changed your mind? Click the same button, which now reads Reopen review, to put it back to Review.
When every point one reviewer raised is marked Done, their avatar badge on the review control turns amber and they are notified that the document is ready for another look. They still have to approve it themselves.
The Mark as done button is shown on every review comment you are allowed to close, so you do not have to hover anything to find it. It needs edit access to the document, and it never appears on the reviewer's own comment, so nobody signs off their own feedback. If you can view but not edit the document you can still read and reply to a review, you just cannot mark it done. See Approvals for invoices and documents.
Note: If the review you are looking for is older than the page of the conversation you are on, View feedback opens this panel but highlights nothing. Page back with the buttons beneath the panel until you reach it.
Live updates and older comments
The Comments panel keeps itself up to date. While you have it open, anything a colleague does to the conversation appears on your screen within about a second: a new comment, an edit, a deletion, or a reaction. You do not have to refresh, and you do not have to reopen the document.
A few things worth knowing:
- Live updates reach only the people who have that document's Comments panel open, and only members of your own firm. If you close the panel, comments posted in the meantime are waiting for you the next time you open it.
- If you have paged back to an older stretch of the conversation, you stay on that page when a live update arrives. You keep your place instead of being pulled back to the newest comments.
- Posting, replying, mentioning, editing, deleting, and reacting all work exactly as before, and so do notifications.
The panel shows the 20 newest comments first. Use Page 1 of N with the back and next buttons beneath it to reach older comments. Posting a comment brings you back to the first page so you can see what you just wrote.
The refresh button at the top of the panel is still there as a fallback. Click it whenever you want to pull the conversation again by hand.
Note: On rare occasions live updating cannot start, for example on a restricted network. Nothing breaks and no error appears: the panel still shows the conversation correctly, and refresh brings in anything new.
Note: Commenting on a document notifies the people connected to it: its owner, everyone it is shared with, and anyone who already commented. Anyone you @mention is notified too. You control how you receive these under Settings > Notifications (the Comment on my document and Mentioned in a document comment events). See Notifications.
Common questions
- Does commenting change the document? No. Comments live in their own panel alongside the document and never edit the body content.
- Do I need to refresh to see new comments? No. With the Comments panel open, your colleagues' comments, edits, deletions, and reactions arrive on their own. Refresh is there if you ever want to pull the conversation by hand.
- Can clients see comments? No. These comments are for your firm's internal review. They are not shown on shared or signing links.