La documentación del producto está disponible solo en inglés.
Navigating the dashboard
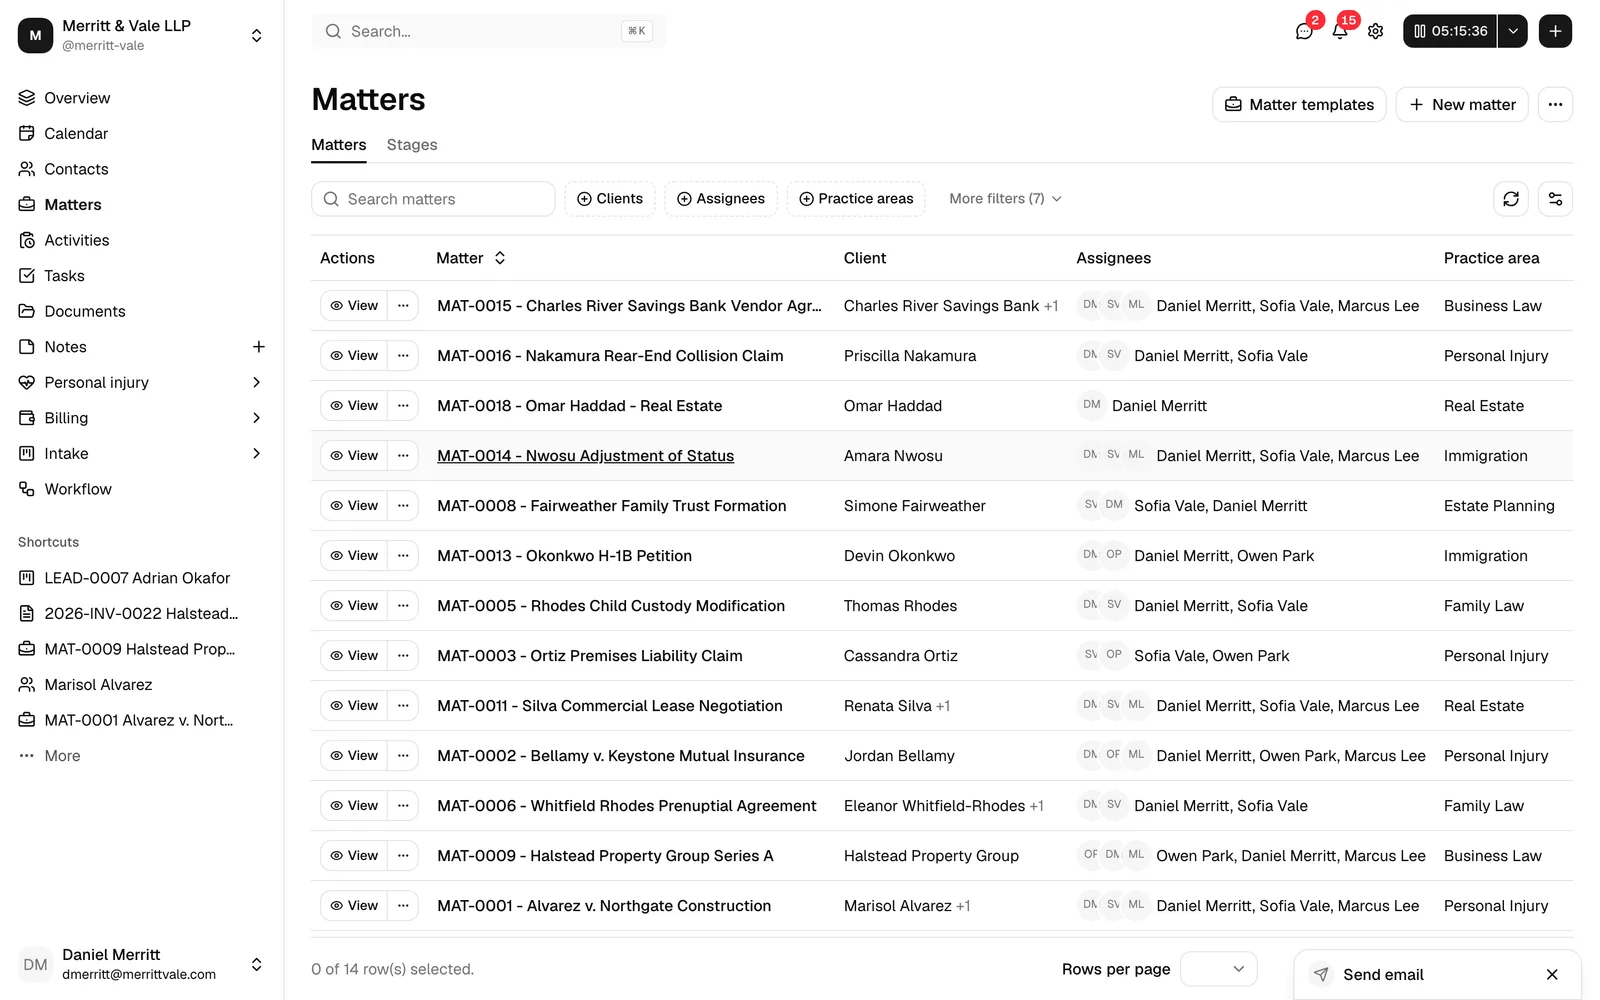
The Esqase dashboard is where you and your colleagues run the firm: matters, contacts, billing, intake, documents, and more. Once you understand the three pieces of "chrome" that frame every screen (the left sidebar, the top header, and your sidebar shortcuts), you can move anywhere in seconds. This page is a guided tour of that chrome, the links built into every list, and the fastest ways to get around.
Before you begin
- You need to be signed in to your firm. If you have not signed in yet, see Signing up and signing in.
- What you see depends on your role. The sidebar only shows the areas your role can view. If a teammate has a navigation item you do not (for example, Billing or Workflow), that is because their role includes view access for it and yours does not. See Roles and permissions for how this works.
- If you belong to more than one firm, everything you see is scoped to the firm currently shown at the top of the sidebar. See Switch between firms below.
The left sidebar
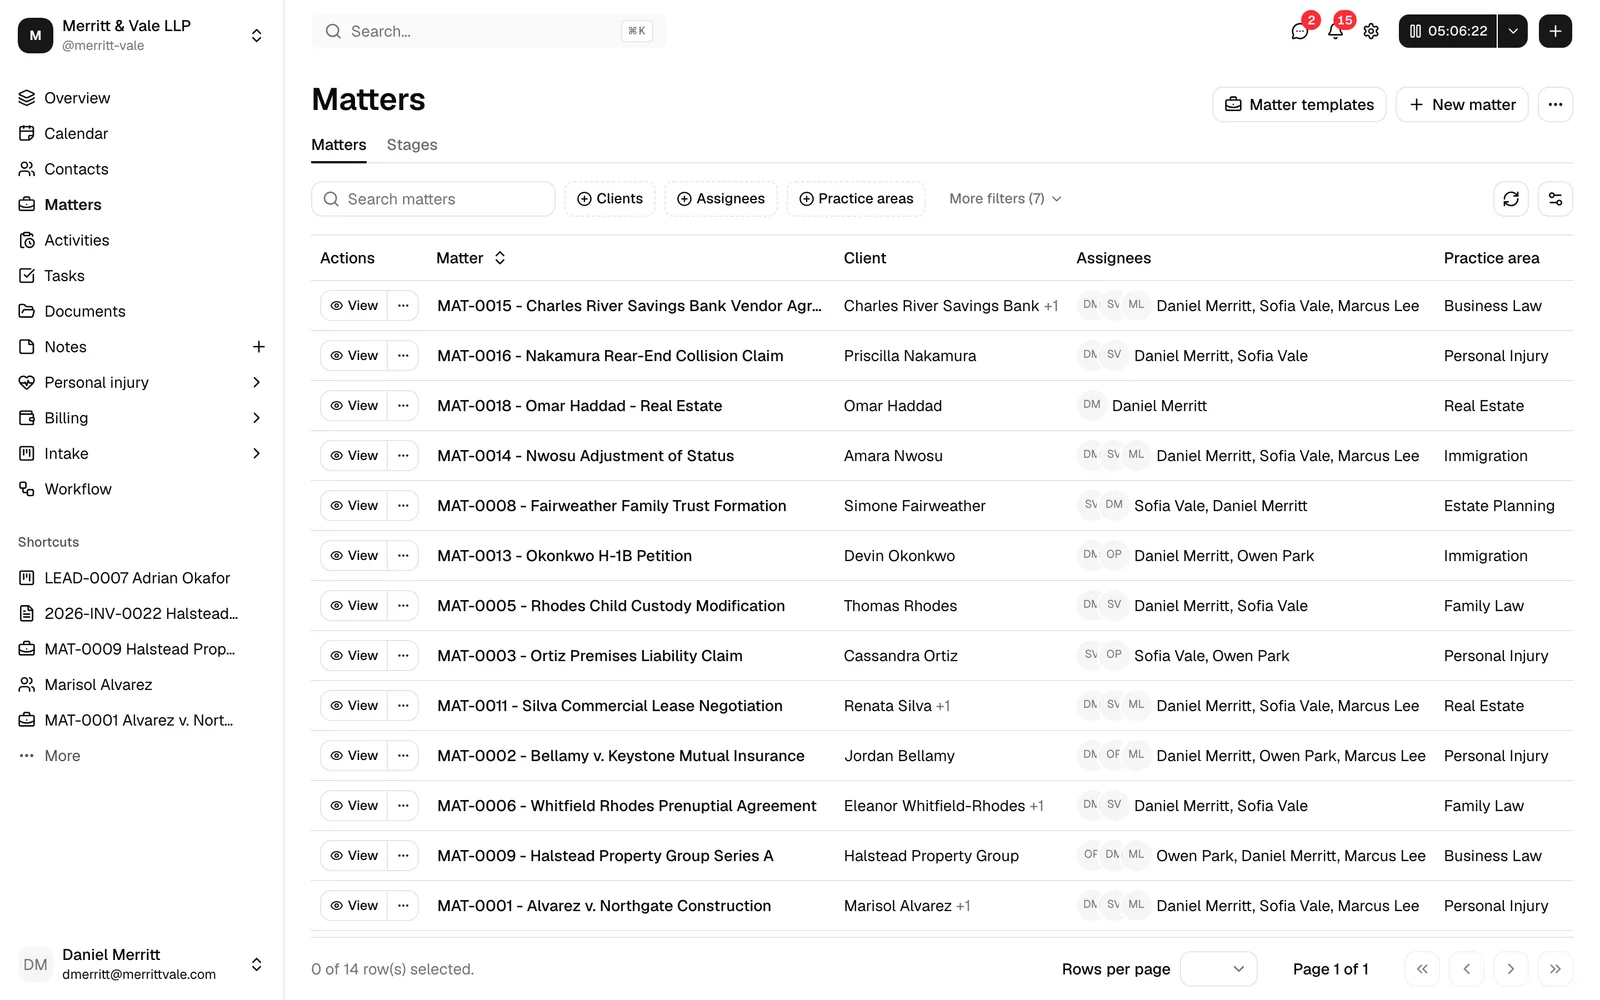
The sidebar runs down the left edge of every dashboard screen. It is your main map of the app and is organized top to bottom into the firm switcher, the navigation groups, your shortcuts, and your account menu.
The navigation groups
The middle of the sidebar holds your navigation, split into two labeled groups.
The first group (no heading) is your day-to-day work:
- Overview is your dashboard home: a billing snapshot plus at-a-glance lists of your upcoming events, due tasks, due invoices, and unbilled activity. Click it to return here from anywhere. See Your dashboard home (Overview).
- Calendar opens your scheduling view with events and task due dates. See Calendar and events.
- Contacts is your people directory: clients, opposing parties, and anyone else. See Working with contacts.
- Matters lists your cases and legal matters. See Browsing matters.
- Activities is where time entries and expenses live. See Time and expense tracking.
- Tasks is your to-do board across the firm. See Creating and managing tasks.
- Documents is your files workspace. See The documents workspace.
- Notes appears just below Documents. Click the label to open your notes list, or click the + on the right of the row to start a new note without leaving the page. See Notes.
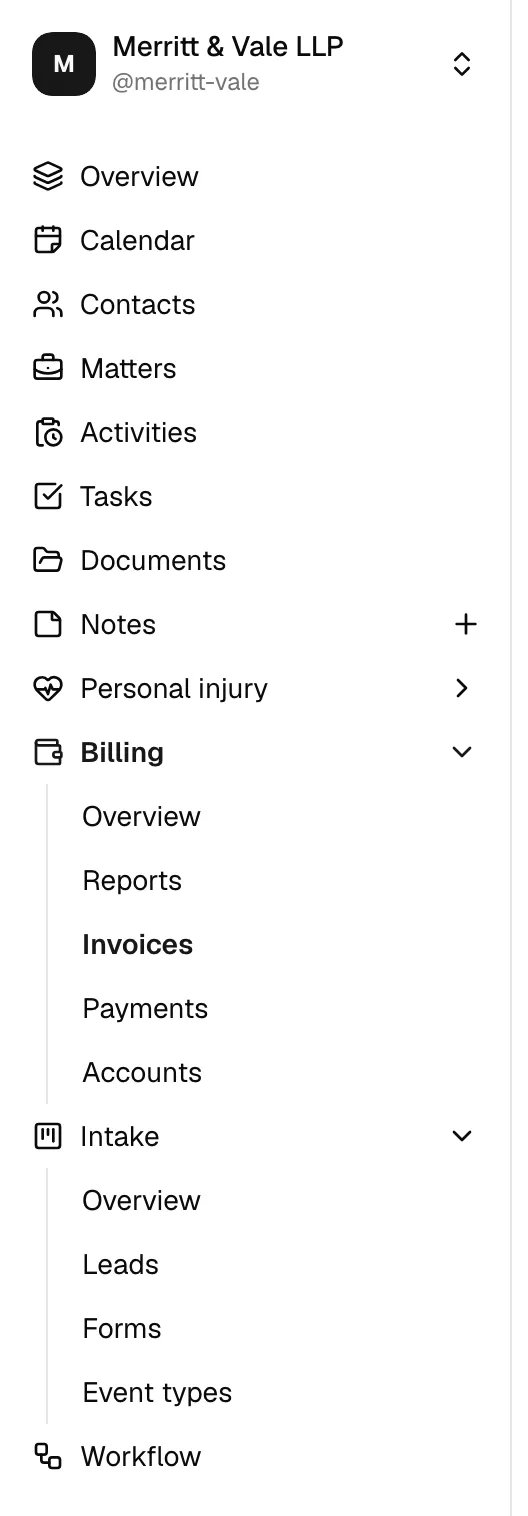
- Billing is a collapsible group. Click it to expand its sub-links: Overview, Invoices, Payments, and Accounts. See The billing overview dashboard, Creating and sending invoices, Recording and managing payments, and Accounts, trust, and transactions.
- Intake is also collapsible, with sub-links Overview, Leads, Forms, and Event types. See The intake overview, Managing leads, Building forms, and Event types (scheduling).
- Workflow opens your automation builder. See Workflows and the builder.
- Personal injury is a collapsible group for firms running injury claims, with sub-links Overview, Records, Liens, Settlements, Deadlines, and Reports. It is the last item in this part of the sidebar. See The personal injury workspace and reports.
Note: If your role does not include view access for any item in a group, that item is hidden. If none of a group's items are visible to you, the whole group disappears. So the exact set of links above will differ from member to member.
To expand or collapse the Billing, Intake, or Personal injury group, click the group's name, or click the small chevron arrow at the right edge of the row. The group stays open or closed as you navigate, so you can keep your most-used area expanded.
Collapsing the sidebar
To give yourself more room, you can collapse the sidebar to a narrow strip of icons:
- Move your pointer to the thin rail along the right edge of the sidebar and click it, or press Ctrl + B (on Windows) or Cmd + B (on Mac).
- The sidebar shrinks to icons only. Hover any icon to see its label in a tooltip.
- Click the rail again, or press the same shortcut, to expand it back to full width.
Tip: On a small screen or phone, the sidebar hides off-screen and slides in as an overlay instead of collapsing to icons.
The top header
The header is the strip across the top of every dashboard screen. From left to right it holds global search and then a cluster of quick tools on the right.

Global search
The search box sits at the far left of the header. Use it to jump straight to any record without clicking through lists.
- Click the Search... box, or press Cmd + K (Mac) or Ctrl + K (Windows) from anywhere in the dashboard.
- A search panel opens. Before you type, it shows a Suggestions list of quick links to your main areas (Contacts, Matters, Leads, Tasks, Events, Activities, Invoices, Documents, and Notes).
- Start typing a name, title, or number. Esqase searches across contacts, matters, tasks, leads, activities, events, notes, communication logs, invoices, and documents at once.
- Results appear grouped by type (for example, Contacts, then Matters). Click any result, or use the arrow keys and press Enter, to open it.
- If nothing matches, you will see No results found. Press Esc to close the panel.
Tip: Search is the fastest way to open a specific matter or contact. You do not need to know which list it lives in, just start typing.
The running-time timer
The timer widget lets you track billable time while you work, from any screen. It shows a running clock in the header.
- Click the timer button (it shows 00:00:00 when nothing is running) to start tracking time. The clock starts counting and the button turns into a pause control.
- Click it again to pause. When you pause, a time-entry dialog opens so you can describe and save the time you just tracked.
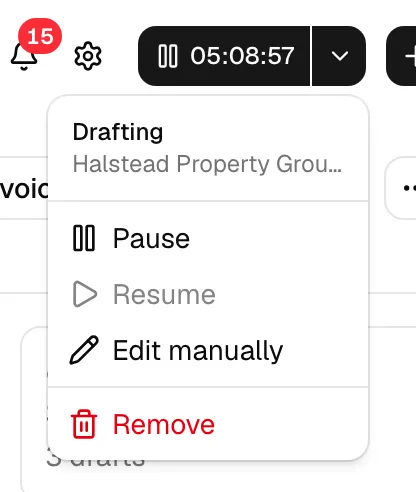
- Click the small arrow next to the timer to open its menu, where you can Pause, Resume, Edit manually, or Remove the running timer, or (when no timer is running) Start timer or Create time entry.
For the full workflow, including categories and rates, see Time and expense tracking.
Note: The timer only appears active when you are working inside a firm and your role can record time. If your role does not include create access for activities, the timer button shows but stays disabled.
The notifications bell
The bell icon shows you what needs your attention.
- When you have unread notifications, a red badge with a count appears on the bell. A count above 99 shows as 99+.
- Click the bell to open the notifications panel. Unread items are highlighted and show a small dot.
- Click any notification to mark it read and jump to the related record.
- Click Mark all read at the top of the panel to clear the unread badge in one step.
- Click View all notifications at the bottom to open the full notifications page.
To choose which events notify you, see Notifications.
The settings gear
Click the gear icon to open firm and account settings. From there you can reach your firm profile, members, billing settings, and your own profile. The exact settings pages you can open depend on your role.
The quick-create (+) menu
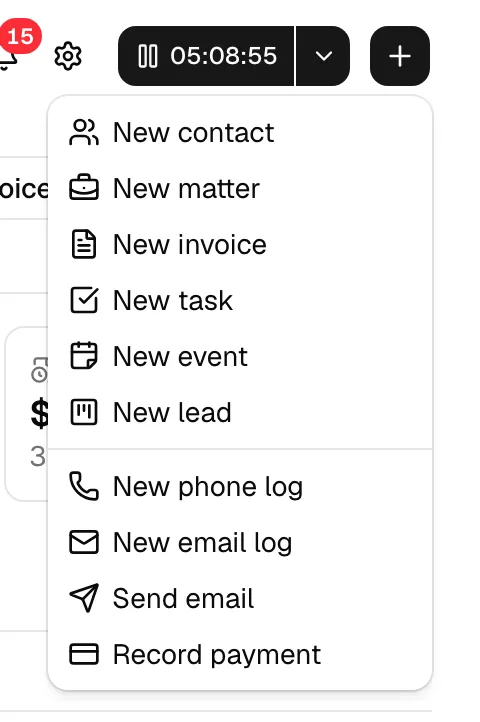
The + button on the right of the header is your fastest way to create something from anywhere in the dashboard. You do not have to navigate to a matter, a contact, or a list page first.
- Click the + button. A menu opens with the things you can create.
- Click an item to start it. Some items open a dialog right there over your current page; others take you to a full builder.
The menu is split into two groups:
Records (top group):
- New contact opens the contact dialog so you can add a person without leaving the page.
- New matter takes you to the full matter builder. See Creating a matter.
- New invoice takes you to the full invoice builder. See Creating and sending invoices.
- New task first asks for a title and a matter, then opens the task so you can fill in the rest. See Creating and managing tasks.
- New event opens the event dialog to schedule something. See Calendar and events.
- New lead opens the new-lead dialog. See Managing leads.
Communication and billing (below a divider):
- New phone log records a phone call. See Logging communications.
- New email log records an email exchange that happened elsewhere. See Logging communications.
- Send email composes a real email and sends it through your connected mailbox. See Sending email.
- Record payment opens the record-payment dialog. See Recording and managing payments.
Note: You only see an item if your role can create that kind of record. For example, if your role does not include create access for invoices, New invoice is hidden. The three communication items (New phone log, New email log, Send email) all appear together when your role can create communications. If you cannot create anything, the + button does not appear at all.
Important: When you create a phone log, an email log, or send an email from the + menu, the record is created firm-wide (it is not attached to a particular matter, lead, or contact). To file one of these on a specific matter, open that matter's Communications tab and create it there instead.
Important: Send email sends from your own connected Gmail or Outlook account. You do not have to connect one to use it: with no mailbox connected the composer still opens, and the send button reads Continue, which hands the finished message to your own mail app. See Sending email and Integrations overview.
The other button in this cluster, the help button (the speech-bubble-with-question-mark icon), is reserved for future in-app help.
Tip: The + on the Notes sidebar row is a separate quick-create just for notes: it resumes your latest draft or starts a fresh one. See Notes.
Set a dialog aside and pick it back up (minimize)
Some quick-create dialogs let you set them aside without losing your work, the same way you might minimize a chat window. This applies to the note dialog, the phone log and email log dialogs, and the Send email composer, wherever you open them from.
- While the dialog is open, click the minimize button (the - icon) next to the close (x) button in the top-right corner of the dialog.
- The dialog collapses into a small bar in the bottom-right corner of the screen, showing an icon and the dialog's name (for example, Send email).
- Keep working anywhere else in the dashboard. Everything you had typed stays exactly as you left it.
- Click the bar to bring the dialog back, with all your content still there. Click the x on the bar to discard it without restoring.
Note: You cannot minimize or close a dialog while it is saving. The minimize and close buttons are disabled until the save finishes, so a message in flight is never hidden or lost.
The Setup guide chip
When you first join a firm, an onboarding Setup guide card walks you through getting started. If you dismiss that card, a small Setup guide chip appears in the header with a progress ring showing how far along you are. Click it to reopen the guide. Once every step is complete, the chip goes away. See Using the Setup Guide.
Jump straight from a list to a record
Almost every screen in the dashboard is a list: a table of matters, tasks, invoices, documents, activities, contacts, and so on. Much of what a row shows is a link, so you can open the person or record you are looking at without first opening the row itself.
Member names link to that member
Wherever a list shows one of your firm's members, that name is a link to the member's page, where you can see their role, schedule, and billing rates. This covers columns such as Updated by, Created by, Member, Owner, Host, Sent by, Assigned to, Assignees, and Responsible, plus the Name column on the Members list itself. Where a column shows a small round photo (or initials) beside the name, the photo is part of the same link.
- Find the row you are interested in and point at the member's name. It underlines to show it is a link.
- Click the name to open that member's page. See Managing firm members.
- Use your browser's back button to return to the list where you left it.
Note: These links need view access for members. If your role does not include it, member names are not clickable anywhere in the dashboard: every one of them, in every column, shows as plain text. A name also stays plain text when that person is no longer a member of your firm, so past work is still readable and attributable. See Roles and permissions.
Important: Whether a name is clickable has nothing to do with what you are allowed to see. The names, records, and figures in a list are exactly the same either way. Only the shortcut changes.
Matter numbers and titles read the same everywhere
Wherever a matter appears in a list, it is labeled with its reference number and its title separated by a dash, for example MAT-0042 - Smith v. Acme Corp. The heading at the top of the matter workspace uses the same label, so the matter you click and the matter you land on read identically. To change how the number itself looks, see Document and record numbering.
Other records you can open from a row
Some lists link more than the member names:
- Matters: the Client name opens that contact. When a matter has more than one client, a small +1 (or +2, and so on) follows the primary name; point at that indicator to see who the others are. The Responsible photos and names open those members.
- Invoices: the Invoice no. opens the invoice, the Client opens the contact, and the Matter opens the matter.
- Payments: the Invoice opens the invoice, the Client opens the contact, and the Matter opens the matter.
- Accounts: the Account name opens that account's page.
- Transaction ledgers (an account's Transactions tab, and the Transactions tab on a matter or a contact): the Client opens the contact, the invoice number and the matter in the Invoice / Matter column each open that record, and the Account column opens the account.
- The Clients tab of a trust account: the client's Name opens that contact.
Tip: Clicking a link inside a row opens the record you clicked, not the row's own record. To open the row itself, click its View button or its main name column.

Recently-viewed records and pinned shortcuts
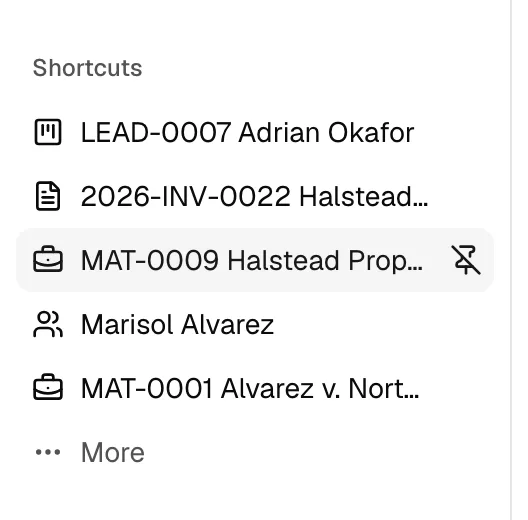
Below your navigation, the sidebar has a Shortcuts group that keeps the records you care about one click away. It combines two things: records you pinned (always at the top) and records you opened recently (filling the rest).
How shortcuts fill up
- Whenever you open a matter, contact, lead, invoice, task, note, event, document (whether you wrote it in Esqase or uploaded it), account, or workflow, Esqase remembers it. It shows up automatically under Shortcuts.
- The group shows up to five entries at a time: your pinned records first, then your most recently viewed ones.
- Each entry shows an icon for the record type and the record's name, so you can tell a matter from a contact at a glance.
- If a record is archived or deleted, it drops out of Shortcuts automatically, including the More dialog and any pin you had set on it. This keeps the list to records you can still open. Records in other states stay put: a lead marked Not hired or an invoice that is Canceled or Paid, for example, still appears.
Pin or unpin a record
Pinning keeps a record at the top of Shortcuts so it does not scroll out of view as you open other things.
- In the Shortcuts group, hover over a recently-viewed entry. A pin icon appears at the right of the row.
- Click the pin icon to pin that record. It moves to the top of the group and stays there.
- To unpin, hover over a pinned entry and click the unpin icon (the pin with a slash through it). The record returns to being a normal recently-viewed entry.
Note: Shortcuts are personal to you. Pinning a matter does not change anything for your colleagues.
See your full recent history
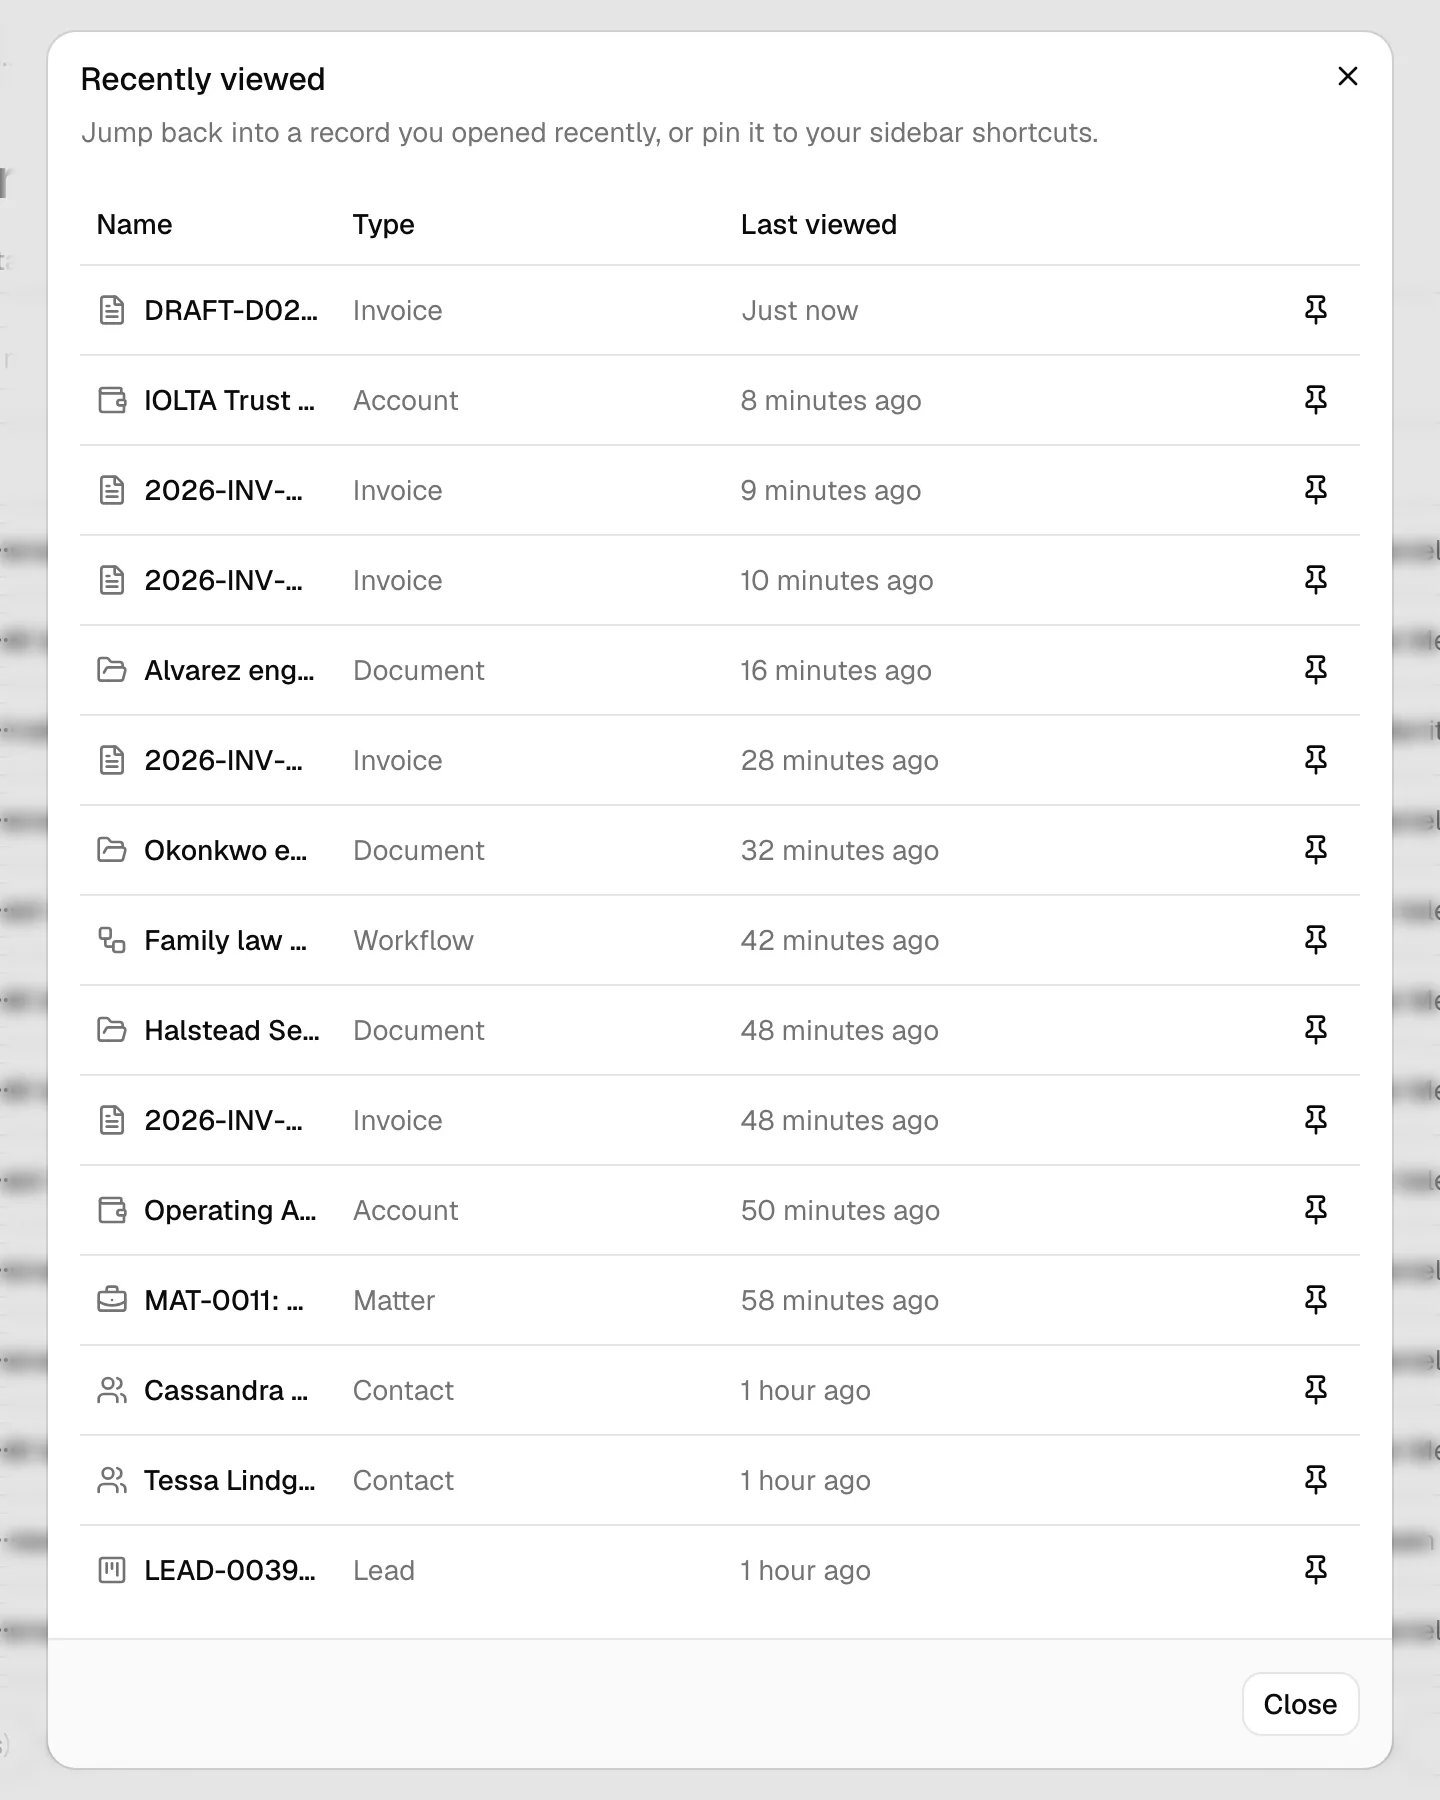
The sidebar only shows your top five shortcuts. To browse further back:
- Click More at the bottom of the Shortcuts group.
- The Recently viewed dialog opens with a table of records you opened recently, showing each record's Name, its Type, and when you Last viewed it.
- Click a record's name to open it, or click the pin icon in its row to pin it to your sidebar shortcuts.
Switch between firms (or add a new one)
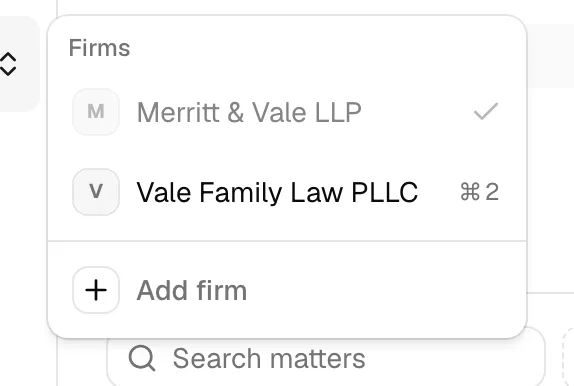
If you belong to more than one firm, the firm switcher at the very top of the sidebar lets you move between them. The button shows the current firm's name and username.
- Click the firm name at the top of the sidebar. A menu opens with a Firms heading listing every firm you belong to.
- The firm you are currently in has a check mark next to it. The others show a keyboard hint (such as ⌘1, ⌘2).
- Click another firm to switch to it. A spinner appears while Esqase loads that firm, then the whole dashboard reloads showing that firm's matters, contacts, and settings.
Important: Switching firms changes everything you see, including your shortcuts, notifications, and which navigation items appear (because your role can differ from firm to firm). Make sure you are in the right firm before you create or edit a record.
To start a brand-new firm:
- Click the firm name to open the switcher.
- Click Add firm at the bottom of the menu.
- Follow the prompts to set up the new firm. See Quickstart: set up your firm for the full walkthrough.
Your account menu and signing out
At the very bottom of the sidebar is your account button, showing your photo (or initials), name, and email.
- Click your name and photo at the bottom of the sidebar to open the account menu.
- Click Account to open your personal settings, where you can edit your profile, change your password, and connect Google. See Your profile and personal settings.
- Click Sign out to end your session and return to the sign-in screen.
Tip: Signing out fully clears your session on this device. Use it on any shared or public computer.
Common questions
Why can I not see Billing (or Intake, or Workflow) in my sidebar? Those areas only appear if your role includes view access for them. Ask a firm owner or administrator to adjust your role. See Roles and permissions.
I opened a record but it is not in my Shortcuts. Why? Shortcuts track the main record types (matters, contacts, leads, invoices, tasks, notes, events, documents, accounts, and workflows). Settings pages and list views are not tracked. If you just opened a record, the Shortcuts group refreshes shortly after; click More to confirm it is in your full recent history.
A record I had pinned (or recently viewed) disappeared from Shortcuts. If the record was archived or deleted, Esqase removes it from Shortcuts (and the More dialog) so the list only holds records you can still open. Restore the record from its own area and it returns to your recent history; you can pin it again if you want it back at the top.
A person's name in a list is not a link. Either your role does not include view access for members (in which case no member name is clickable anywhere), or that person is no longer a member of your firm. The name still appears so the record stays readable, it just does not link anywhere. See Roles and permissions.
The keyboard shortcut for search or the sidebar does not work. Make sure the dashboard window is focused (click anywhere in it first), then try Cmd + K / Ctrl + K for search or Cmd + B / Ctrl + B for the sidebar.
A list keeps loading and never finishes. If a table stays on its loading state for more than about 30 seconds, a Reload page link appears next to the spinner. Some screens also show the message "This is taking longer than usual." above it. Click Reload page to reload the tab and load the list again. Anything you already saved is unaffected.