Available lang sa Ingles ang dokumentasyon ng produkto.
How clients sign documents
When your firm sends a document for eSignature, the client receives a secure link that opens a clean, guided signing page. There is no account to create and nothing to install. This page explains exactly what your clients (and any external signers) see, so you can set expectations, answer questions, and reassure them that the process is simple and legally sound.
The signing experience runs on a separate, public signing site (the page address contains /sign/). Your client never logs in to your firm dashboard and never sees any of your internal records. They only see the one document they were asked to sign.
Before you begin
This page describes the client side of eSignature. To put it in motion from the firm side, see Requesting eSignatures and Managing signature requests.
A few things that shape what your client sees:
- The signer must be added to the request. Each person you add as a signer (a contact, a firm member, or an external email address) gets their own private link. The link is tied to that one signer, so it cannot be forwarded to someone else and used in their place.
- The signer's email must match. Security is built around the signer's verified email address. The client unlocks the document by proving they own the email address you have on file for them, so make sure the email on the signer is correct.
- Required fields must exist. When you place signature, initials, or other fields on the document, the client cannot finish until every field marked required has a value. Fields you mark optional can be left blank.
- Sequential vs. parallel order. If you set the request to sign in a specific order (sequential), a signer's link only becomes active when it is their turn. Until then, their link is not yet ready and they should wait for their notification.
What your client sees when asked to sign
Your client receives an email from your firm inviting them to review and sign a document. The email contains a button or link that opens the signing page in their web browser. Once they unlock the link (see below), they land on the signing surface:
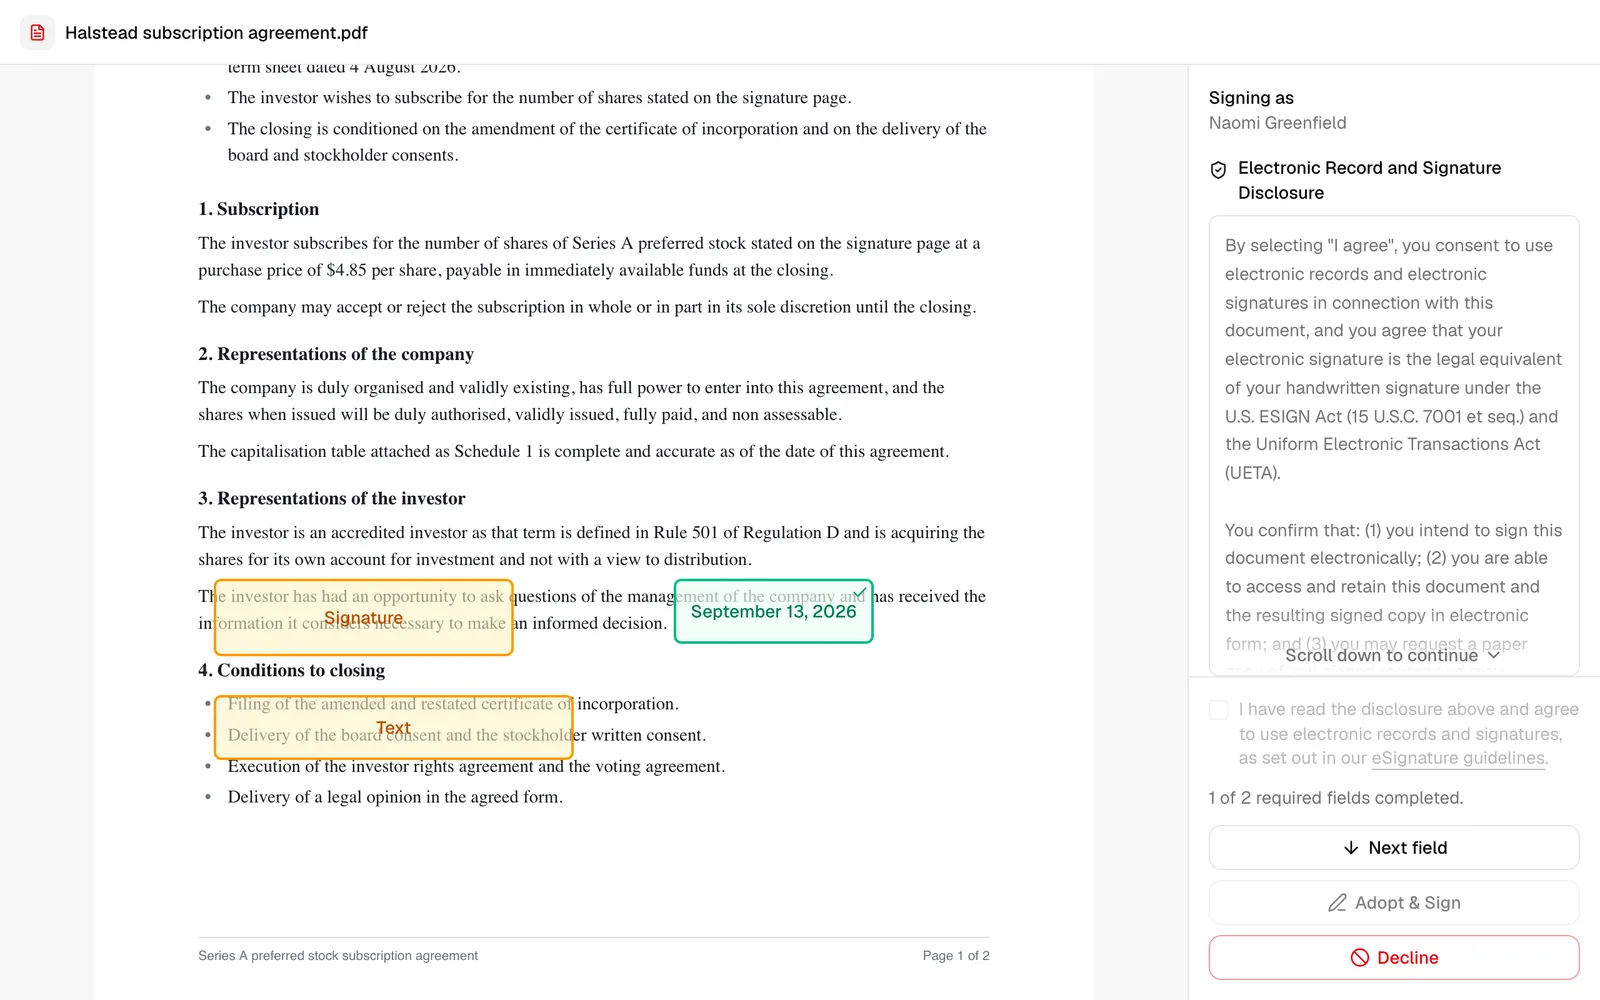
- The document fills most of the screen so the client can read every page before signing.
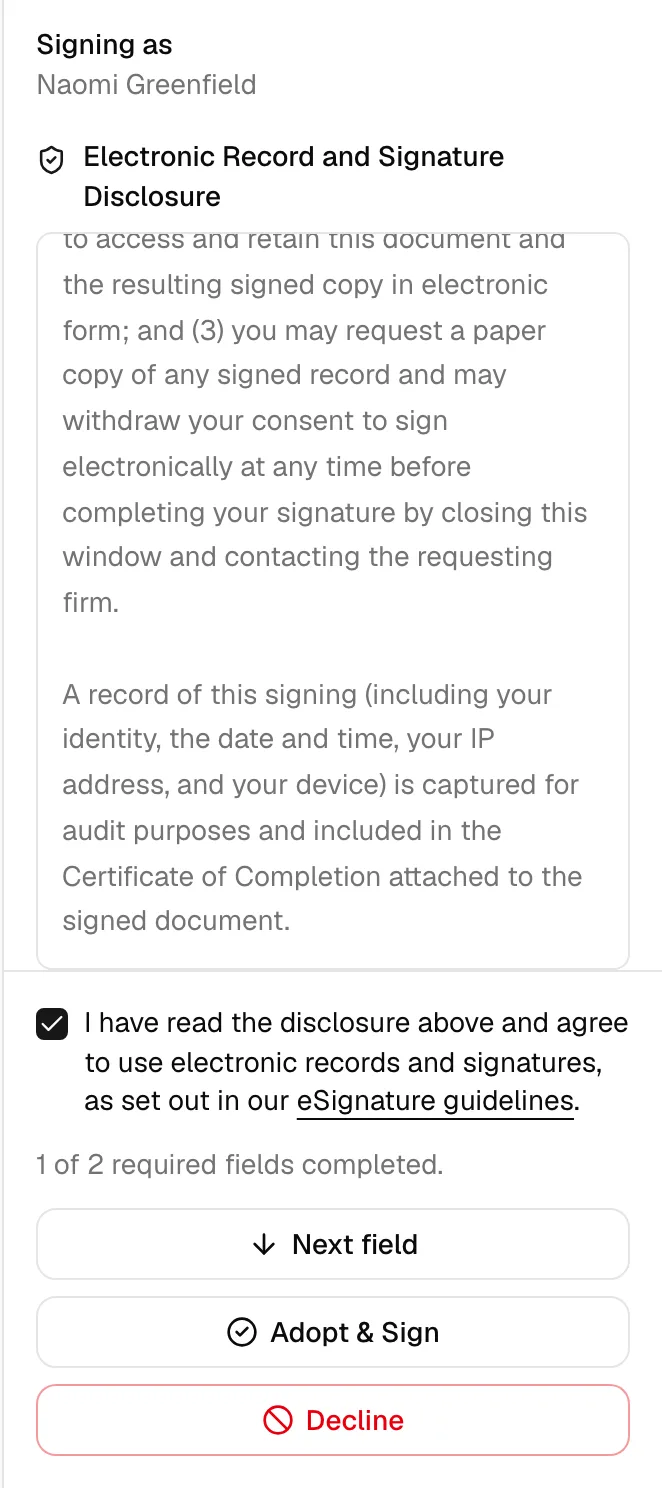
- A signing panel on the right (or below, on a phone) shows who they are signing as and the Electronic Record and Signature Disclosure. The consent checkbox and the two buttons, Adopt & Sign with Decline directly beneath it, stay pinned to the bottom of the panel so they are always in view.
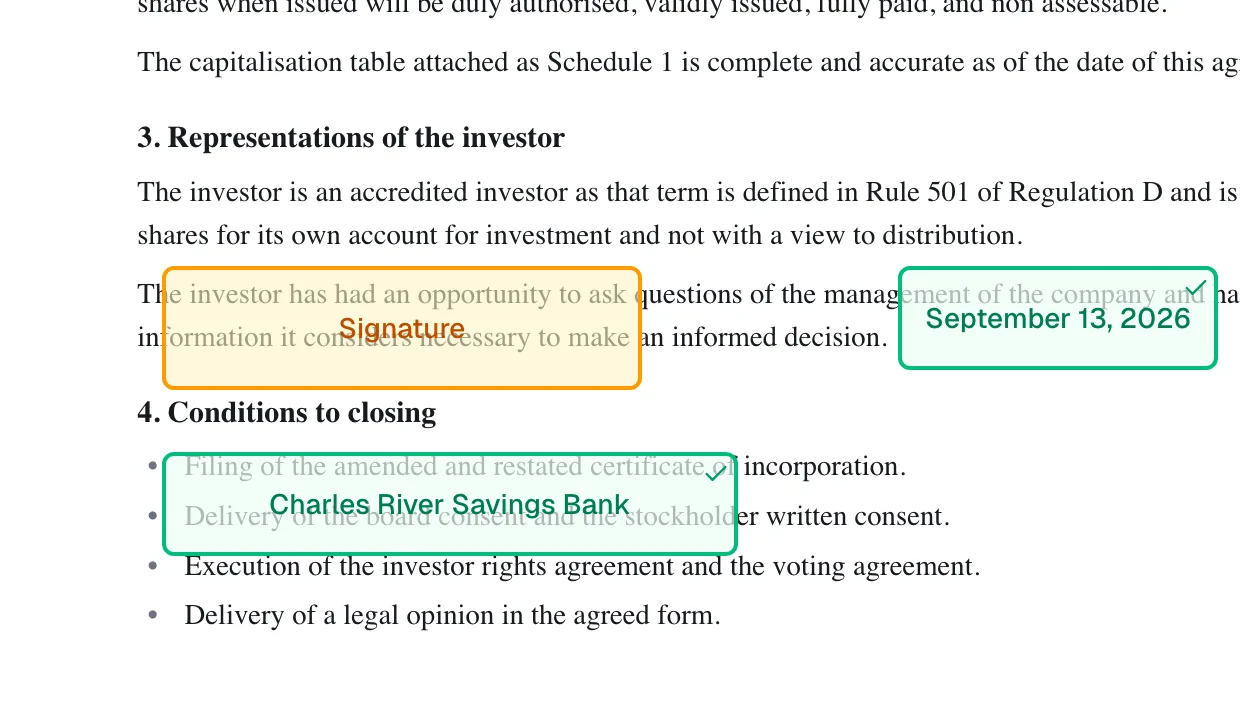
- Highlighted fields appear on the document itself. Every place that needs the client's input is marked with a colored, gently pulsing box. Boxes that still need attention are amber; once filled, they turn green.
- A progress line above the buttons keeps a running count, for example "3 of 7 required fields completed," so the client always knows how much is left, or "No fields to complete on this document" when there is nothing to fill in.
- A Next field button sits above Adopt & Sign while fields remain. Clicking it scrolls straight to, and highlights, the next field the client still needs to fill, so they never have to hunt for it on a long document.
- A reminder line appears just above the buttons whenever a field on the document still needs the client's attention: "Complete the highlighted fields in the document to continue." It disappears once nothing is outstanding.
The client signs entirely in the browser. Nothing downloads to their computer until the document is complete.
Tip: Tell clients to use the same device and browser where they opened the email link. The unlock that grants access is tied to that browser session, so opening the link on one device and trying to sign on another means signing in again.
Opening and unlocking the signing link
Before anyone can see the document, they must unlock the link. Esqase supports two ways to do this, and your firm's setup determines which one your client sees.
Unlocking with an email sign-in link (the default)
This is the standard, passwordless method. The client proves they own the signer email by receiving a one-time secure link.
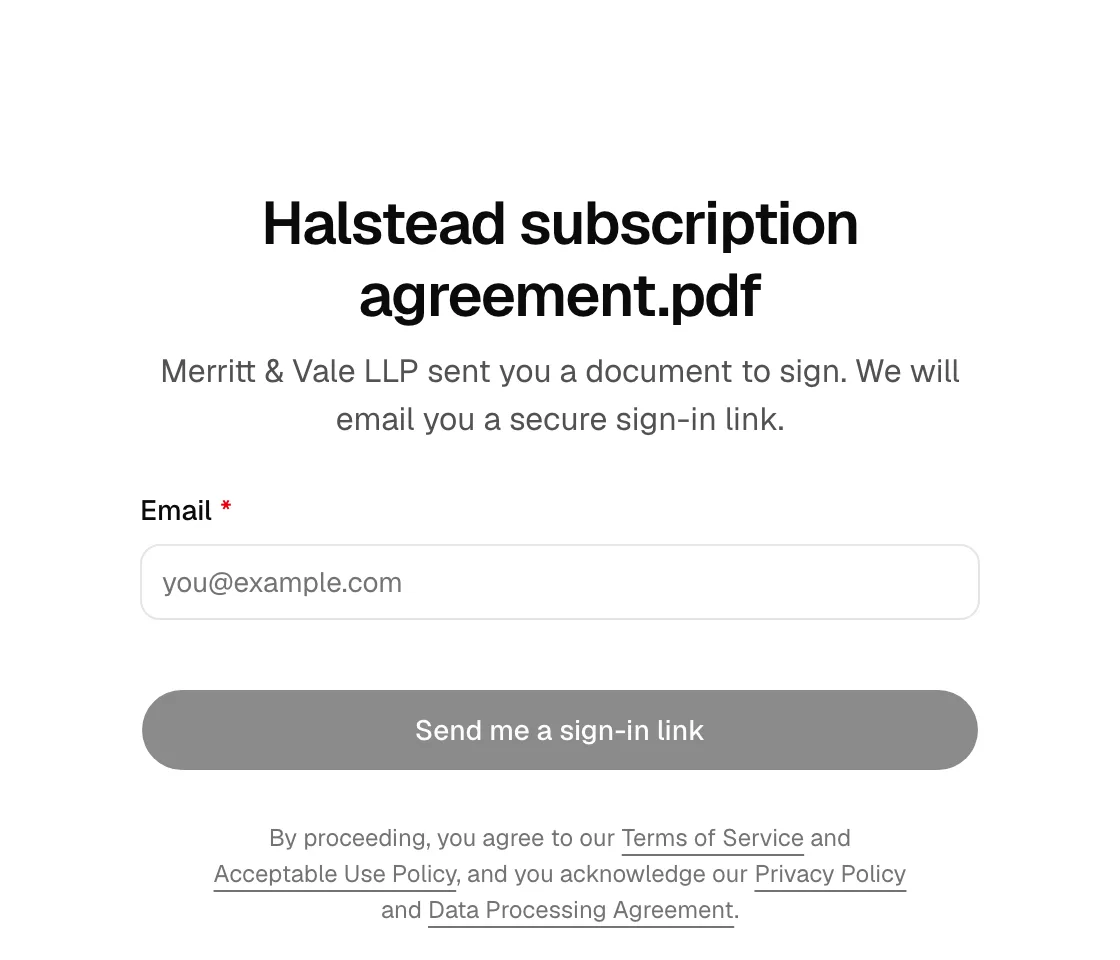
- The client clicks the link in your firm's invitation email. The signing page opens to a panel titled with the document name, asking them to enter the email address your firm has on file.
- The client enters that email and clicks Email me a sign-in link.
- The page confirms with Check your email, telling them a secure sign-in link has been sent and to open it on the same device.
- The client opens the second email and clicks its sign-in link. The page briefly shows Signing you in while it verifies, then opens the document, ready to sign.
Note: For privacy, the confirmation always says the link was sent "if that email is on this document," even when the address entered is not a signer. This prevents anyone from probing which emails are attached to a document. If a client never receives the email, the most common cause is a typo or using a different address than the one on the signer. Ask them to click Use a different email and try the exact address your firm has on file.
Unlocking with a password
Some firms protect a signing link with a password instead. In that case, the client sees a panel titled with the document name that reads "Enter the password from [your firm]'s email to review and sign this document."
- The client enters the password your firm provided.
- They click Open document. The button shows Unlocking... while it checks the password, then opens the document.
If the password is wrong, the client sees "That password and link do not match. Check your email and try again."
Important: Both unlock methods are rate-limited to protect the document. After several failed attempts in a short window, the client sees "Too many attempts have been made recently. Please wait a few minutes before trying again." The block clears on its own after about ten minutes. If a client is locked out, ask them to wait and retry, or send them a fresh link.
Requesting a new sign-in link
Email sign-in links are single-use and time-limited, so a client may need a new one. This is normal and quick.
- If the link has expired or was already used, the page returns the client to the unlock panel and shows "We could not sign you in," with a note that the link is invalid or has expired and to request a new one.
- The client simply re-enters their email and clicks Email me a sign-in link again to receive a fresh link.
- On the Check your email screen, if they used the wrong address, they can click Use a different email to start over.
Tip: Sign-in links expire for security. If a client lets the email sit for a while before clicking it, they may need to request a new one. Reassure them that requesting another link does not affect the document or anything they have already done.
If a client tells you the page says "Signing link unavailable" (with the note "That signing link is not active. Check the URL from your email, or contact the firm to request a new link."), the link itself is no longer valid. This happens when the request was already completed, declined, canceled (voided) by your firm, or the link was mistyped. In that case, send the client a new signing request from your dashboard. See Managing signature requests.
Reviewing the document and completing fields
Once the document is open, the client works through it field by field. Esqase makes the required spots obvious so nothing gets missed.
- The client scrolls through the document. Every place that needs input is marked with a highlighted box. Amber boxes still need attention; green boxes are done.
- The client clicks a box to fill it. What happens next depends on the field type:
- Signature and Initials open a capture window (see the next section).
- Full name is pre-filled with the signer's name; clicking it lets the client edit the value in an Enter value dialog.
- Date signed is pre-filled with today's date; clicking it opens a calendar so the client can pick a different date instead of typing one.
- Text opens the Enter value dialog so the client can type whatever the field asks for.
- Checkbox toggles on or off with a single click (a checked box shows an X).
- As the client fills fields, each amber box turns green, so the remaining work is always visible on the document itself.
The client does not have to fill the signature box this way. Leaving it and using Adopt & Sign in the panel collects the signature and submits the document in one step, which is the shorter path for most documents.
Placing a signature or initials
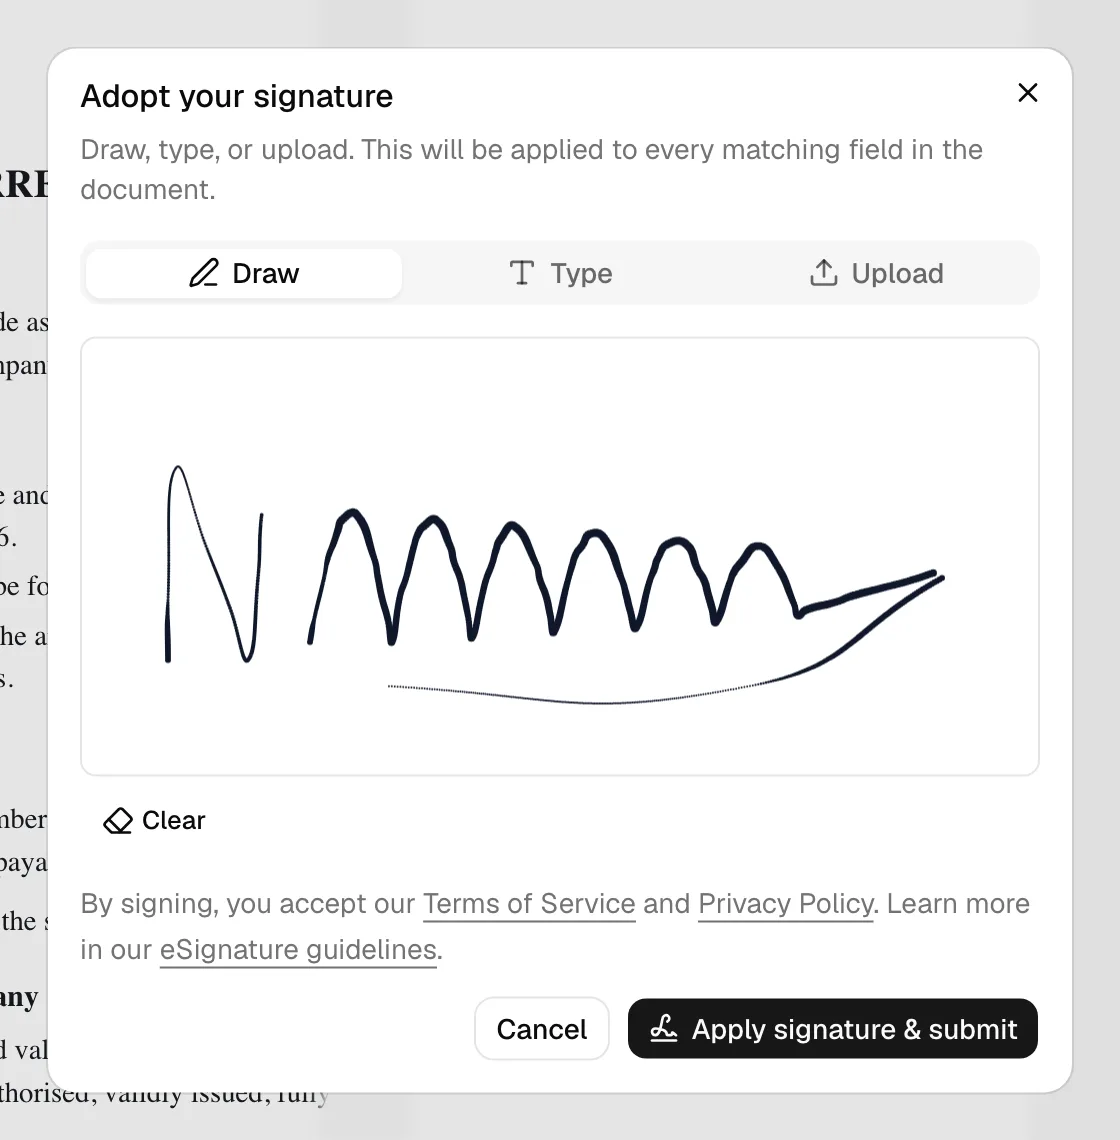
A window titled "Adopt your signature" (or "Adopt your initials") is where the client creates their mark. It opens in two ways: by clicking a Signature or Initials box on the document, or by clicking Adopt & Sign in the panel once that button is available.
The window offers three ways to create the mark, on tabs:
- Draw: The client signs with a mouse, trackpad, or finger on a touchscreen, in a large, clearly bordered signing area with a crisp stroke that stays sharp on any screen. A Clear button lets them start over.
- Type: The client types their name and it is rendered in a handwriting-style font, shown in a live preview.
- Upload: The client uploads an image of their signature (any standard image file). A preview appears once it loads.
The button that closes the window depends on how the client got there:
- Opened from a box on the document, it reads Apply signature (or Apply initials) and only places the mark. The client still signs afterwards from the panel.
- Opened from Adopt & Sign, it reads Apply signature & submit and does both at once: it places the mark and submits the signed document.
Note: A signature or initials are adopted once and reused everywhere. If the document has several signature boxes for the same signer, applying the mark fills all matching boxes at once. The window itself notes: "This will be applied to every matching field in the document."
Note: If the client already adopted a mark by clicking a box on the document, the window shows that signature as a preview and confirms it will be used, so there is no need to draw it again. They can still draw, type, or upload a new one to replace it.
Note: If a document asks the same person for both a signature and initials, one adoption cannot cover both. The client fills one of them by clicking its box on the document, and Adopt & Sign then collects the other.
Accepting consent and signing
Before the client can sign, they must agree to use electronic records and signatures. Esqase records the client's agreement, and the exact disclosure text they agreed to is kept with their signature and shown on the Certificate of Completion.
- In the signing panel, the client reviews the Electronic Record and Signature Disclosure. The full text sits in a scrollable box that stretches to fill the panel, and the client must scroll all the way to the bottom before they can agree to it. Until they reach the end, a "Scroll down to continue" hint appears at the foot of the box and the consent checkbox is greyed out and cannot be ticked.
- Once the client has scrolled to the end of the disclosure, the checkbox becomes available. They tick the box that reads "I have read the disclosure above and agree to use electronic records and signatures."
- Adopt & Sign becomes available. Clicking it opens the "Adopt your signature" window rather than signing straight away, so the client always confirms their signature as the last step.
- In that window the client draws, types, or uploads their signature and clicks Apply signature & submit. That single click applies the signature to every matching box on the document and submits it. The window also carries the line "By signing, you accept our Terms of Service and Privacy Policy. Learn more in our eSignature guidelines."
- A brief overlay shows Signing... and then Opening... while the signature is recorded, after which the client is taken to a confirmation page.
Note: Nothing is submitted until the client clicks Apply signature & submit. Closing that window with Cancel leaves the document exactly as it was, and the client can reopen it whenever they are ready.
Note: If Adopt & Sign looks inactive, one of two things is missing. Either the client has not yet scrolled the disclosure to the end and ticked the consent box, or a field on the document still needs filling, in which case the line "Complete the highlighted fields in the document to continue" appears just above the button.
Note: On a large screen the whole disclosure may already fit in the box with nothing to scroll. In that case there is no "Scroll down to continue" hint and the consent checkbox is available right away.
Note: The wording of the disclosure reflects your firm's country, which is set in your firm details. Firms in the Philippines and the United States see a statement written for the law of that country (for example, the Philippine Electronic Commerce Act for Philippine firms, and the ESIGN Act and UETA for U.S. firms). Firms in any other country, or a firm with no country set, see a neutral statement that the electronic signature is legally binding and is the legal equivalent of a handwritten signature to the fullest extent permitted by applicable law. Whatever the client sees, the exact text they agreed to is recorded with their signature and appears on the Certificate of Completion.
Declining to sign
A client is never forced to sign. They can decline at any time, with an optional reason.
- In the signing panel, the client clicks Decline, the red outlined button directly below Adopt & Sign. It is available at any time, including before they have read the disclosure.
- A window titled "Decline to sign?" opens, explaining that this stops the signing request. It includes an optional Reason box.
- The client may type a reason (or leave it blank) and then clicks Decline to confirm, or Cancel to go back.
- After declining, the client is taken to the confirmation page.
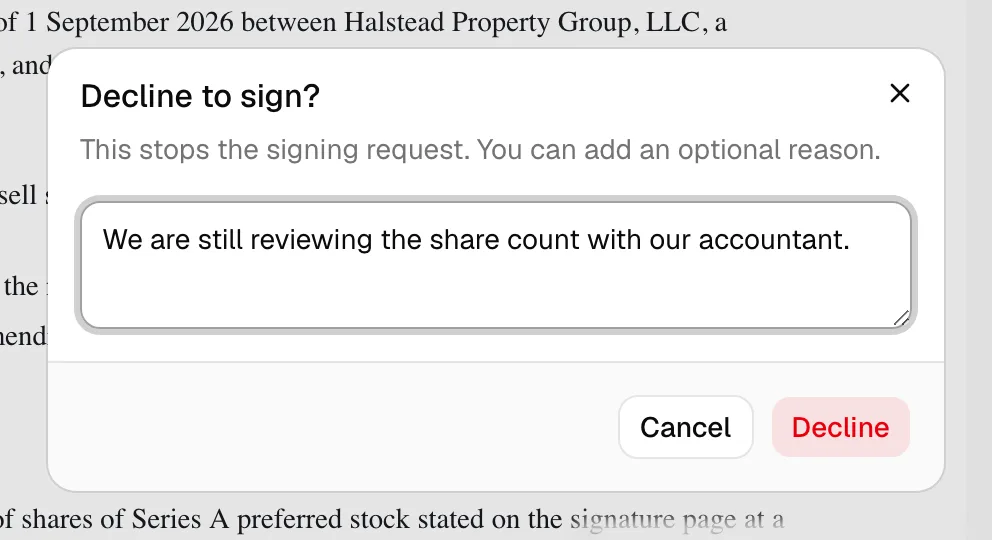
Important: When a signer declines, the whole request is stopped, and your firm is notified. If you still need the document signed, you will need to send a new request. The reason the client provides (if any) is recorded so you can follow up. See Managing signature requests.
The signing confirmation page
After the client signs or declines, they land on a simple confirmation page so they know the action went through. There are two versions.
After signing
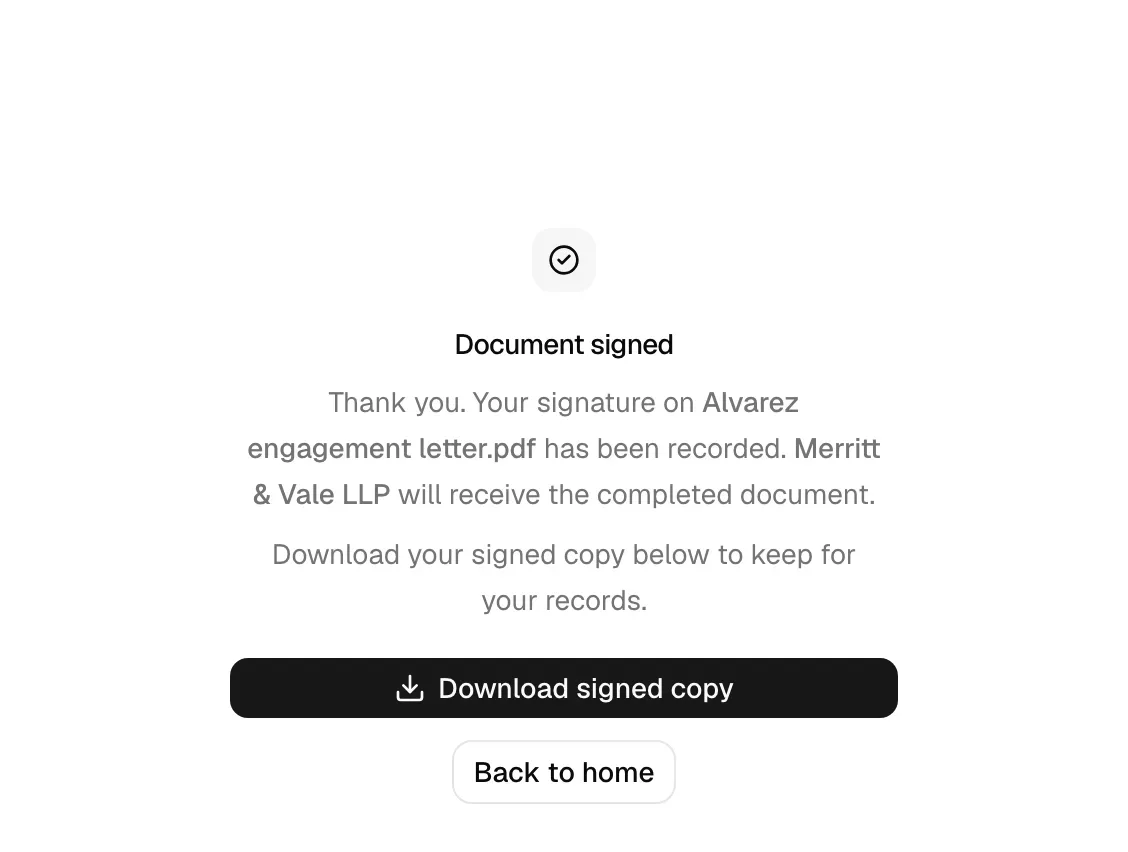
The page shows a checkmark and the title "Document signed," with the message "Thank you. Your signature on [document] has been recorded. [Your firm] will receive the completed document." Underneath, a line reads "A copy is on its way to [signer's email]." A Back to home button takes the client to the Esqase home page.
Once every signer on the request has finished (not just this one, if there is more than one), a Download signed copy button also appears on this page, so the client can grab the completed, signed document right there rather than waiting to be sent one. If the sealed copy is not ready yet, the button briefly reads Preparing your copy... while it becomes available. This is the most reliable way for a client to get their copy the moment signing finishes.
After declining
The page shows a "Signing declined" title with the message "You declined to sign [document]. [Your firm] has been notified." A Back to home button is also shown.
If the client returns to their original signing link after finishing, Esqase recognizes the request is complete and sends them straight back to this confirmation page rather than reopening the document. There is nothing left for them to do.
What happens after signing
The client does not have to do anything else once they sign, but it helps to know what happens behind the scenes so you can answer their questions.
- The document is sealed. When the last required signer has signed, Esqase finalizes a single, completed copy of the document with every signature and field in place. The finished file is tamper-evident: it carries a digital seal so any later change to it can be detected.
- A Certificate of Completion is attached. Alongside the signed document, Esqase generates a Certificate of Completion, an audit record headed with your firm's name that lists each signer, their email, when they viewed the document, when they consented, when they signed, the signing method they used (drawn, typed, or uploaded), and technical details such as IP address and device. It also reproduces the consent disclosure the signers agreed to and includes verification hashes of both the original and signed files. One small difference is worth knowing: the certificate is both appended to the signed document and available on its own, and only the standalone copy prints the signed file's hash, because a file cannot contain its own fingerprint. Everything else reads the same on both.
- Your firm receives the completed document. The signed file becomes the newest version of the document you sent out, so it is right where you left it in your documents area rather than in a second, separate file. If the request was tied to a matter, it appears with that matter as well. See The documents workspace and The matter workspace.
Tip: The Certificate of Completion is the document you rely on if anyone ever questions whether a signature was valid. It is generated automatically and travels with the signed file, so you do not need to assemble proof by hand.
Note: Clients sign on the public signing site, not in your firm dashboard. Once the whole request is complete, their confirmation page offers a Download signed copy button so they can grab their copy right there. If a client asks you for it separately, or needs it before the whole request finishes, you can share it with them yourself. See Sharing documents.
Tip: For the copy you send a client, Download clean copy on the completed request gives you the signed document without the SIGNED watermark or the certificate pages. Keep the full signed document, watermark and certificate included, for your own file. See Managing signature requests.
Common questions
Does the client need an Esqase account to sign? No. The signing link plus a verified email (or a password, if your firm uses one) is all they need. There is nothing to install and no account to create.
Can the client sign on a phone? Yes. The signing page works on phones and tablets, and the Draw tab lets them sign with a finger. Remind them to open the email link and finish signing on the same device.
Can a client forward their link to a colleague to sign instead? No. Each link is tied to one signer and unlocks only for the email (or password) on that signer. To let someone else sign, add that person as a signer from the firm side.
What if the client filled the wrong value in a field? Until they click Apply signature & submit, they can click any field again to change it, including reopening the signature window. Once they submit, the document is final and they should contact your firm.
The client says the page won't let them sign. What's wrong? The Adopt & Sign button stays disabled until the client has scrolled the Electronic Record and Signature Disclosure to the bottom and ticked the consent box. The checkbox itself only becomes available after that scroll, so if it looks greyed out, ask them to read through the disclosure first. If the consent box is ticked and the button is still inactive, a field on the document is still empty, and the line "Complete the highlighted fields in the document to continue" appears above the button. Ask them to look for the amber boxes on the document.
Troubleshooting
- The client never got the sign-in email. Confirm they entered the exact email on the signer, ask them to check spam, and have them request the link again. Remember the page shows the same "Check your email" message whether or not the address matches, so verifying the signer email on your side is the reliable check.
- The link says "Signing link unavailable." The request was completed, declined, canceled, or the URL was altered. Send a new request.
- The client is locked out after several tries. They hit the attempt limit. They should wait a few minutes, then try again, or you can issue a new link.
- The client signed but says nothing happened. Ask whether they reached the Document signed confirmation page. If they did, the signature was recorded and the completed document will appear on your side; check the request status in Managing signature requests.