Available lang sa Ingles ang dokumentasyon ng produkto.
Time and expense tracking
In Esqase, every piece of billable work and every reimbursable cost is an activity. A time entry records hours worked (quantity multiplied by an hourly rate), and an expense entry records a cost (a quantity multiplied by a unit rate, plus tax). The Activities page is where these entries live, and it is the source that feeds your invoices. Track time accurately here and billing becomes a matter of selecting entries, not retyping them.
Before you begin
- You reach the activities list from the sidebar under Activities.
- To see this area at all, your role must include View access for activities. If it does not, you will see a no-access message instead of the list.
- To add or edit entries you need Create and Update access. Without Create, the New time entry and New expense buttons are hidden. Without Update, the edit and timer controls do not appear on rows.
- An activity becomes billing-ready only once it is attached to both a matter and a member (more on this in Understand the billing-status lifecycle). Make sure the matter you are billing against already exists. See Creating a matter.
- Categories supply default rates and (for expenses) help organize work. Set these up once on the Activity categories and rates page.
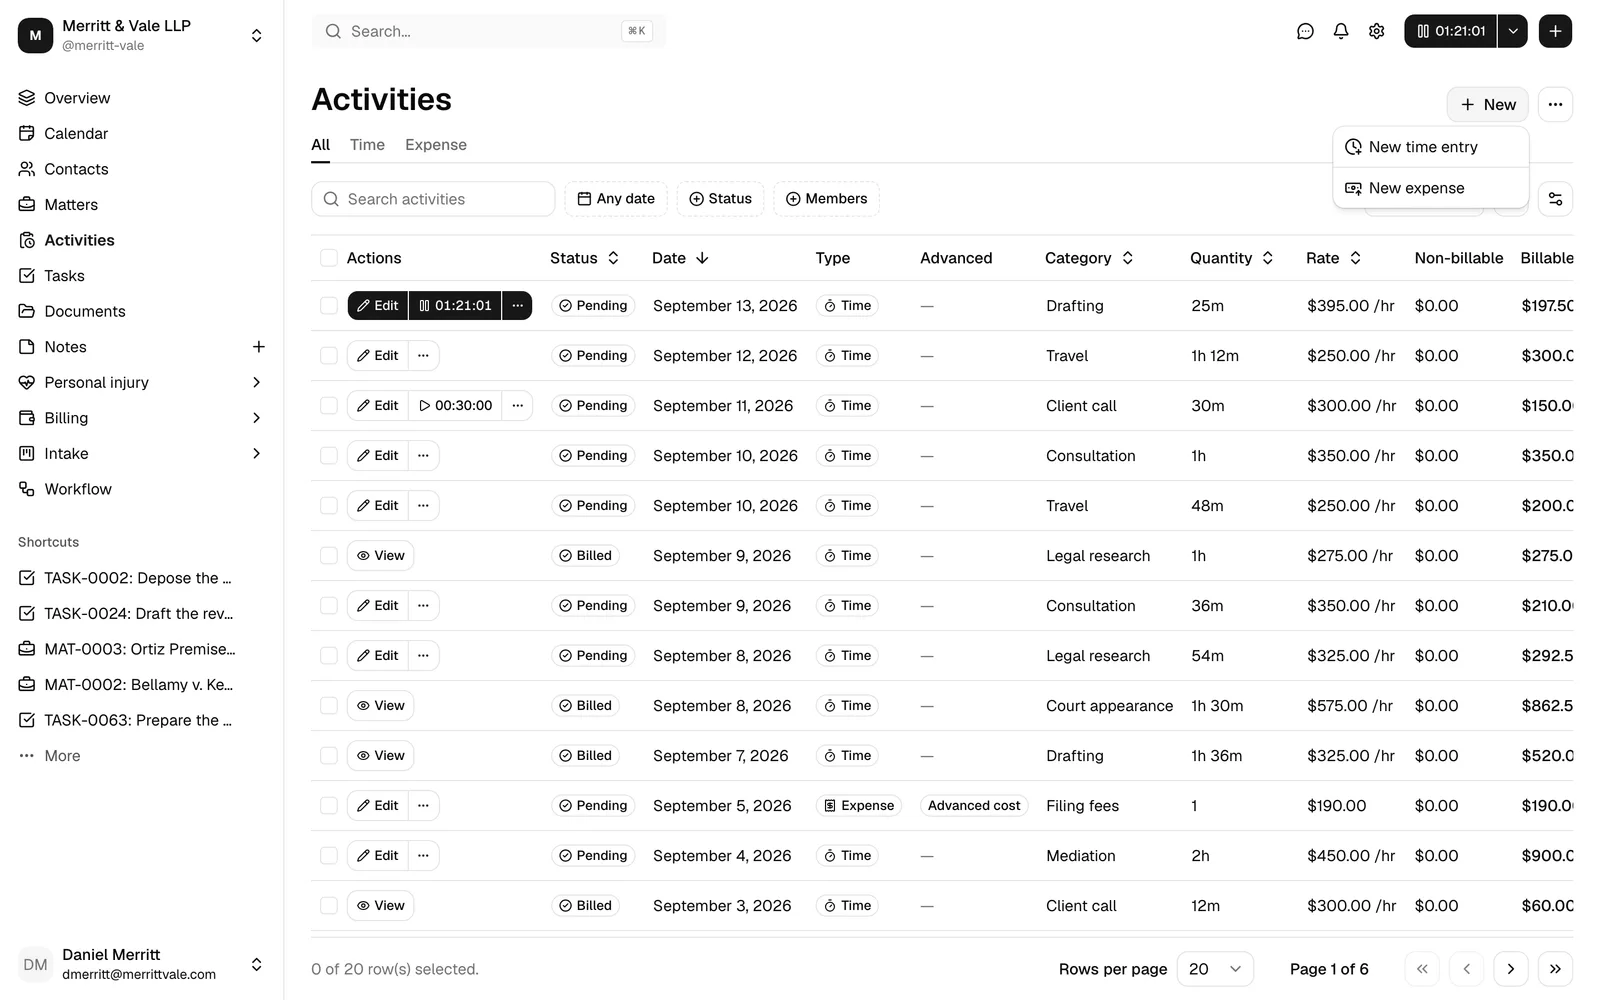
Record a time entry
A time entry captures hours worked on a matter. You can type the duration directly or run a live timer (see Use the play/pause activity timer).
- In the sidebar, click Activities.
- Click New time entry. The New time entry dialog opens.
- In the Duration field, type how long you worked. The field accepts several formats:
- Shorthand like
1h 30m(hours, minutes, seconds). - A plain number, which is read as minutes (so
45means 45 minutes). - A clock format like
1:30or1:30:00. You can also click the play button to start a live timer instead of typing.
- Shorthand like
- In Time category, pick an existing category from the list or type a new name to create one on the fly. Categories are grouped by Member, Matter, Client, and Firm, and each option shows its rate. Choosing a category fills in the Rate for you.
- Check the Rate (Hourly) field. It defaults from the category you picked. You can override it. The Total below it is calculated automatically and cannot be edited. When your firm rounds time, the Total field explains itself, for example "Billed as 0.2 h in 6 minute increments", so you can see what the client will be charged before you save.
- Set the billing flags:
- Billable (on by default) means the entry can be charged to the client. When it is on, the entry is automatically shown on the bill.
- Show this entry on the bill lets a non-billable entry still appear on the invoice (for context) without being charged. This option only applies when Billable is off.
- In Member, pick who performed the work. This defaults to you.
- Set the Date the work was done. It defaults to today.
- In Matter, pick the matter this time belongs to. The list shows your active matters, each as its reference number followed by its title (for example,
MAT-0042 Smith v. Acme Corp), so you can search by either. A matter is optional for a time entry, but an entry with no matter stays a draft and cannot be invoiced. - Add a Description explaining the work. This text appears on the invoice line item, so write it for the client.
- Click Save. You will see a "Time entry saved" confirmation and the new row appears at the top of the list.
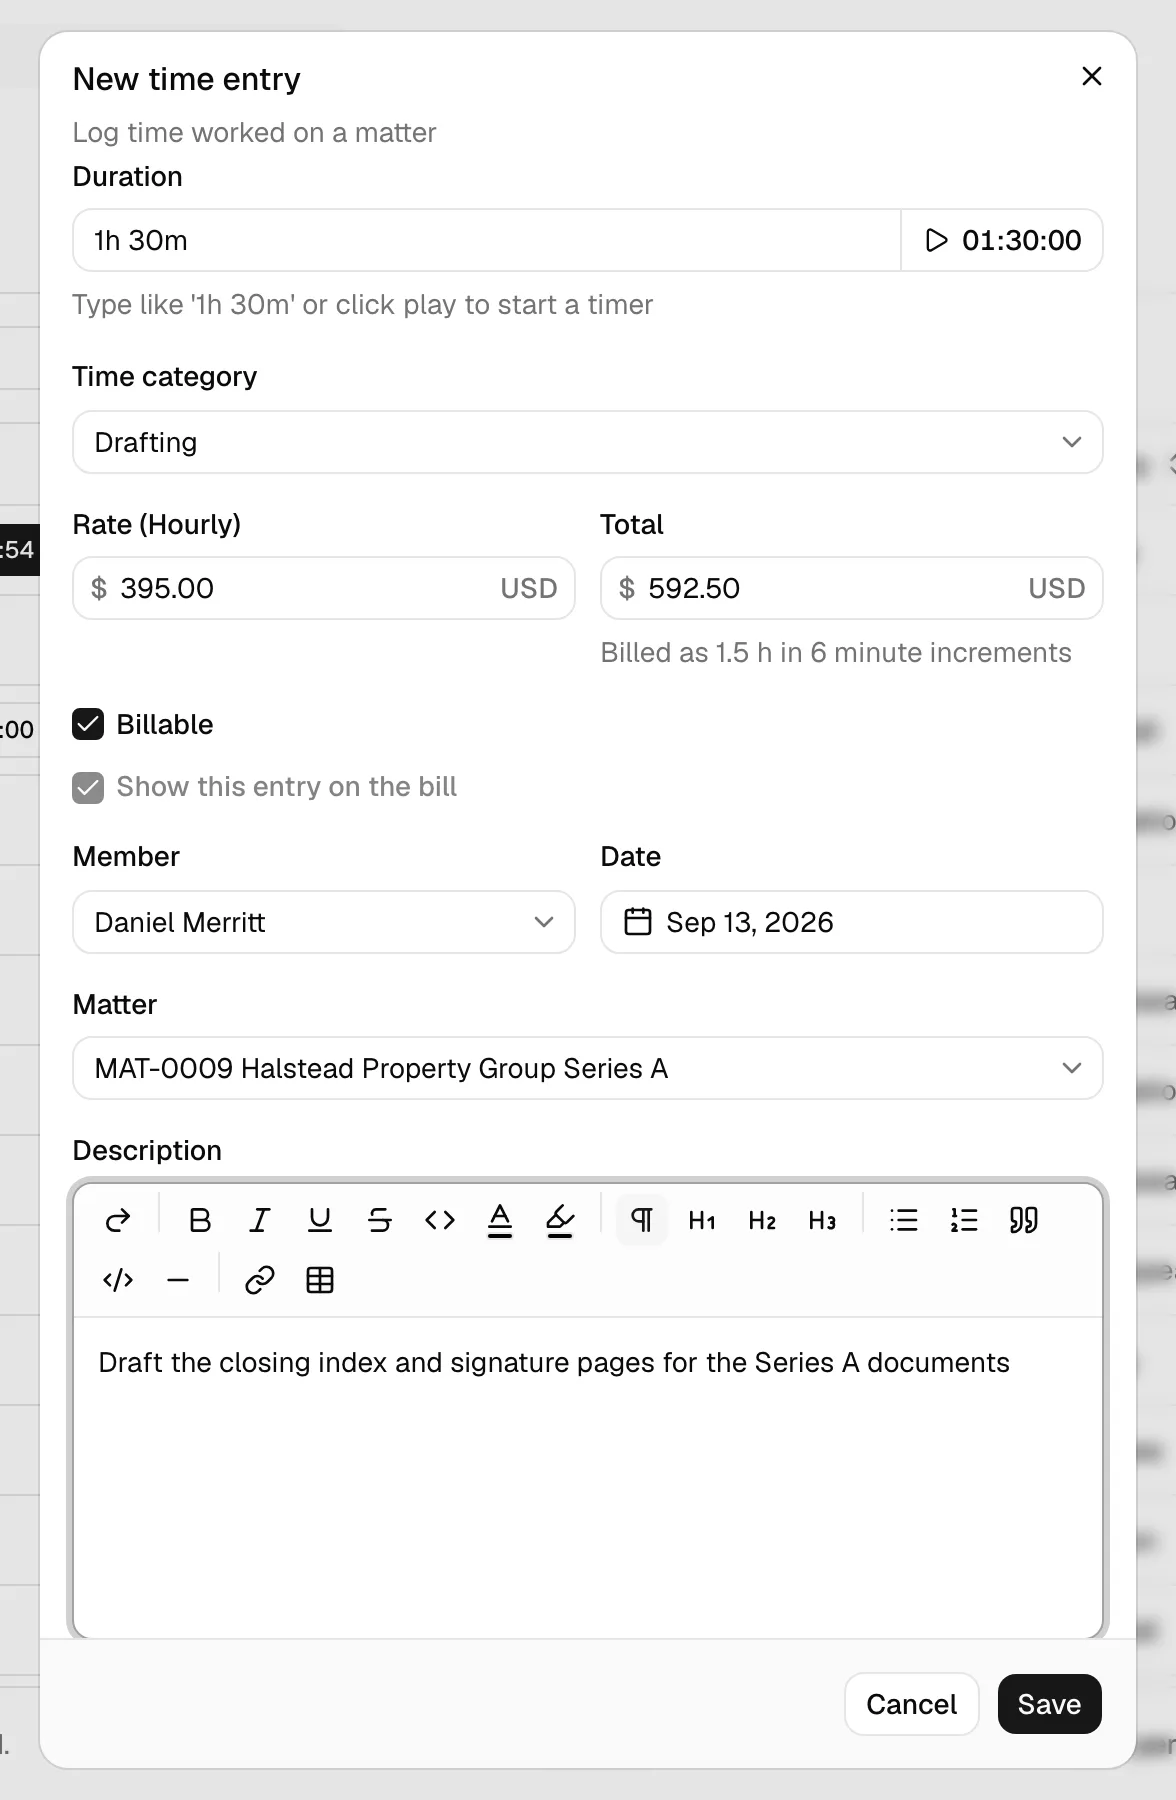
Tip: The play button next to Duration starts a timer for this exact entry. If you start a timer before saving, Esqase creates the entry immediately so the clock has somewhere to accumulate. You can keep editing the other fields while it runs.
How worked time becomes billable hours
Two firm settings sit between the clock and the money.
- Time rounding. If your firm has set a billing increment, worked time is rounded up to it when the entry is saved or the timer is paused. A 3 minute entry under a 6 minute increment still reads 3m in the Duration field and bills 0.1 hour. The Total field says so while you work.
- Fixed pricing. A category priced as Fixed charges its rate once, whatever the clock says. Hours never enter the calculation, and rounding does not apply.
The recorded duration is always the true worked time. Rounding shapes only what is billed, so your own time records stay honest. Your firm sets the increment at Settings > Firm > Invoices; see Invoice and billing settings.
Record an expense entry
An expense entry captures a reimbursable cost, such as a filing fee or courier charge, that you want to put on the client's bill. Unlike time, an expense always requires a matter.
- In the sidebar, click Activities.
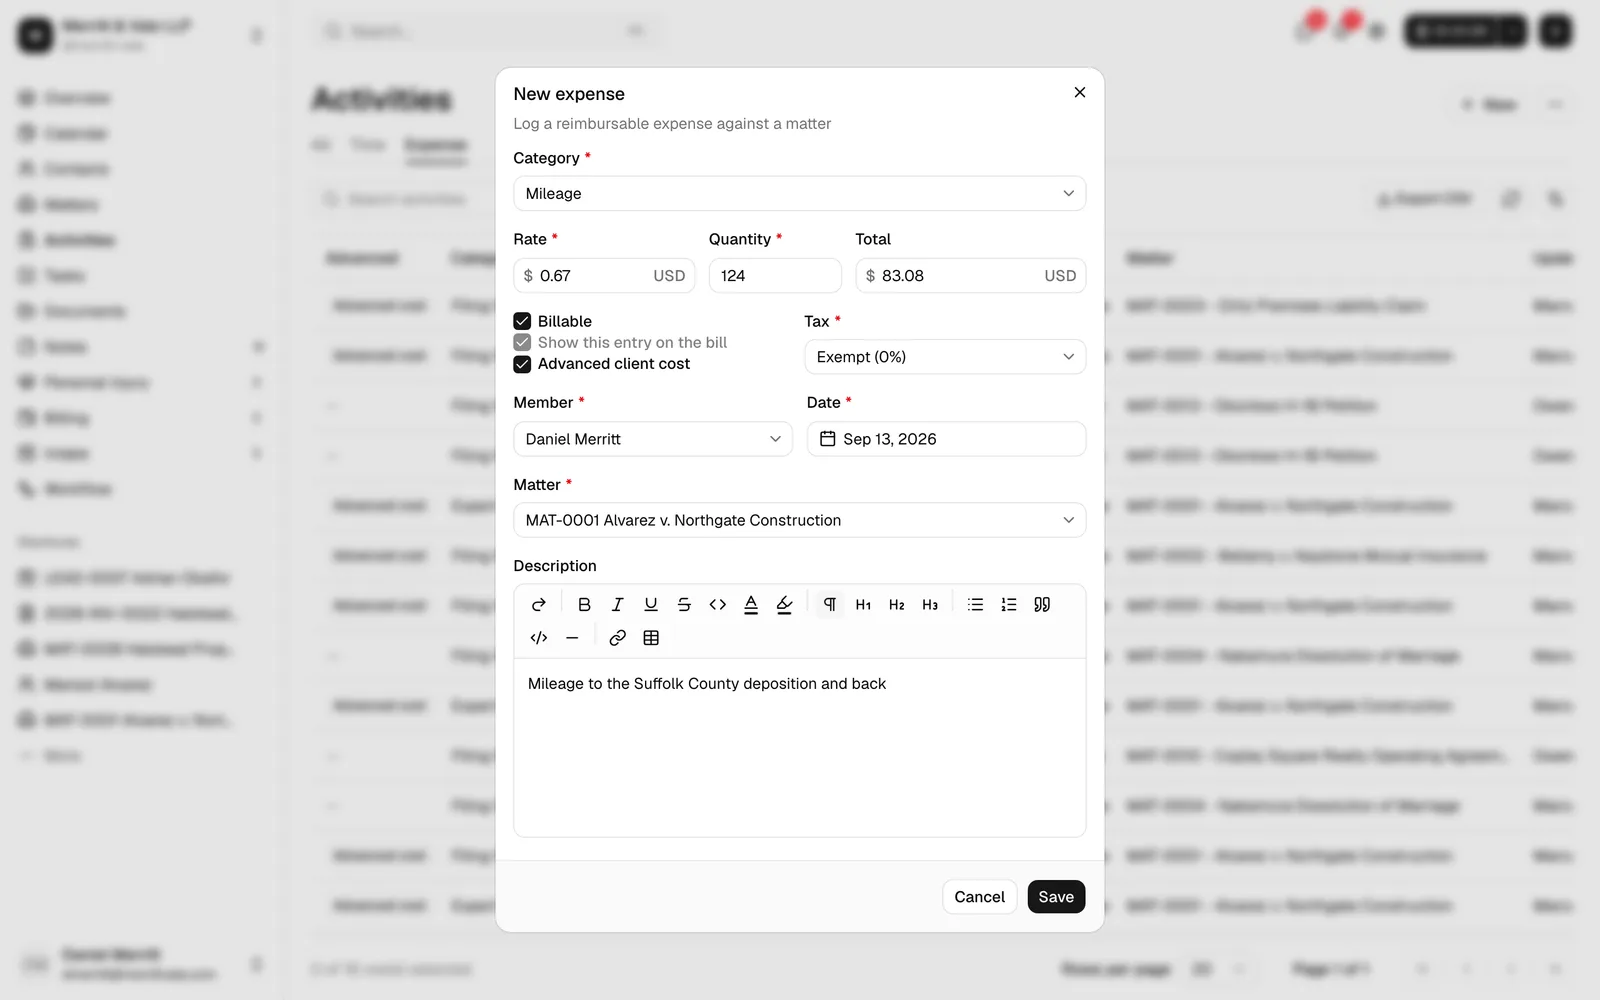
- Click New expense. The New expense dialog opens.
- In Category, pick an existing category or type a new name. This field is required. As with time, choosing a category fills in the Rate.
- Fill in the cost:
- Rate is the cost per unit (required).
- Quantity is how many units (required, must be greater than zero).
- Total is calculated for you (rate multiplied by quantity) and is read-only.
- Set the billing flags:
- Billable (on by default) charges the cost to the client.
- Show this entry on the bill displays a non-billable expense on the invoice without charging it (only applies when Billable is off).
- Advanced client cost marks the expense as money your firm laid out on the client's behalf, to be reimbursed from a settlement rather than billed. See Flag an expense as an advanced client cost below.
- In Tax, choose the tax rate that applies to this expense. This is required. The list shows each tax name and its percentage. Manage these on the Tax rates page.
- In Member, pick who incurred the expense (defaults to you). Member is required.
- Set the Date of the expense (required, defaults to today).
- In Matter, pick the matter the expense belongs to. This is required for an expense. As with a time entry, each matter is listed as its reference number followed by its title, so you can search by either.
- Add a Description of the expense. This appears on the invoice.
- Click Save.
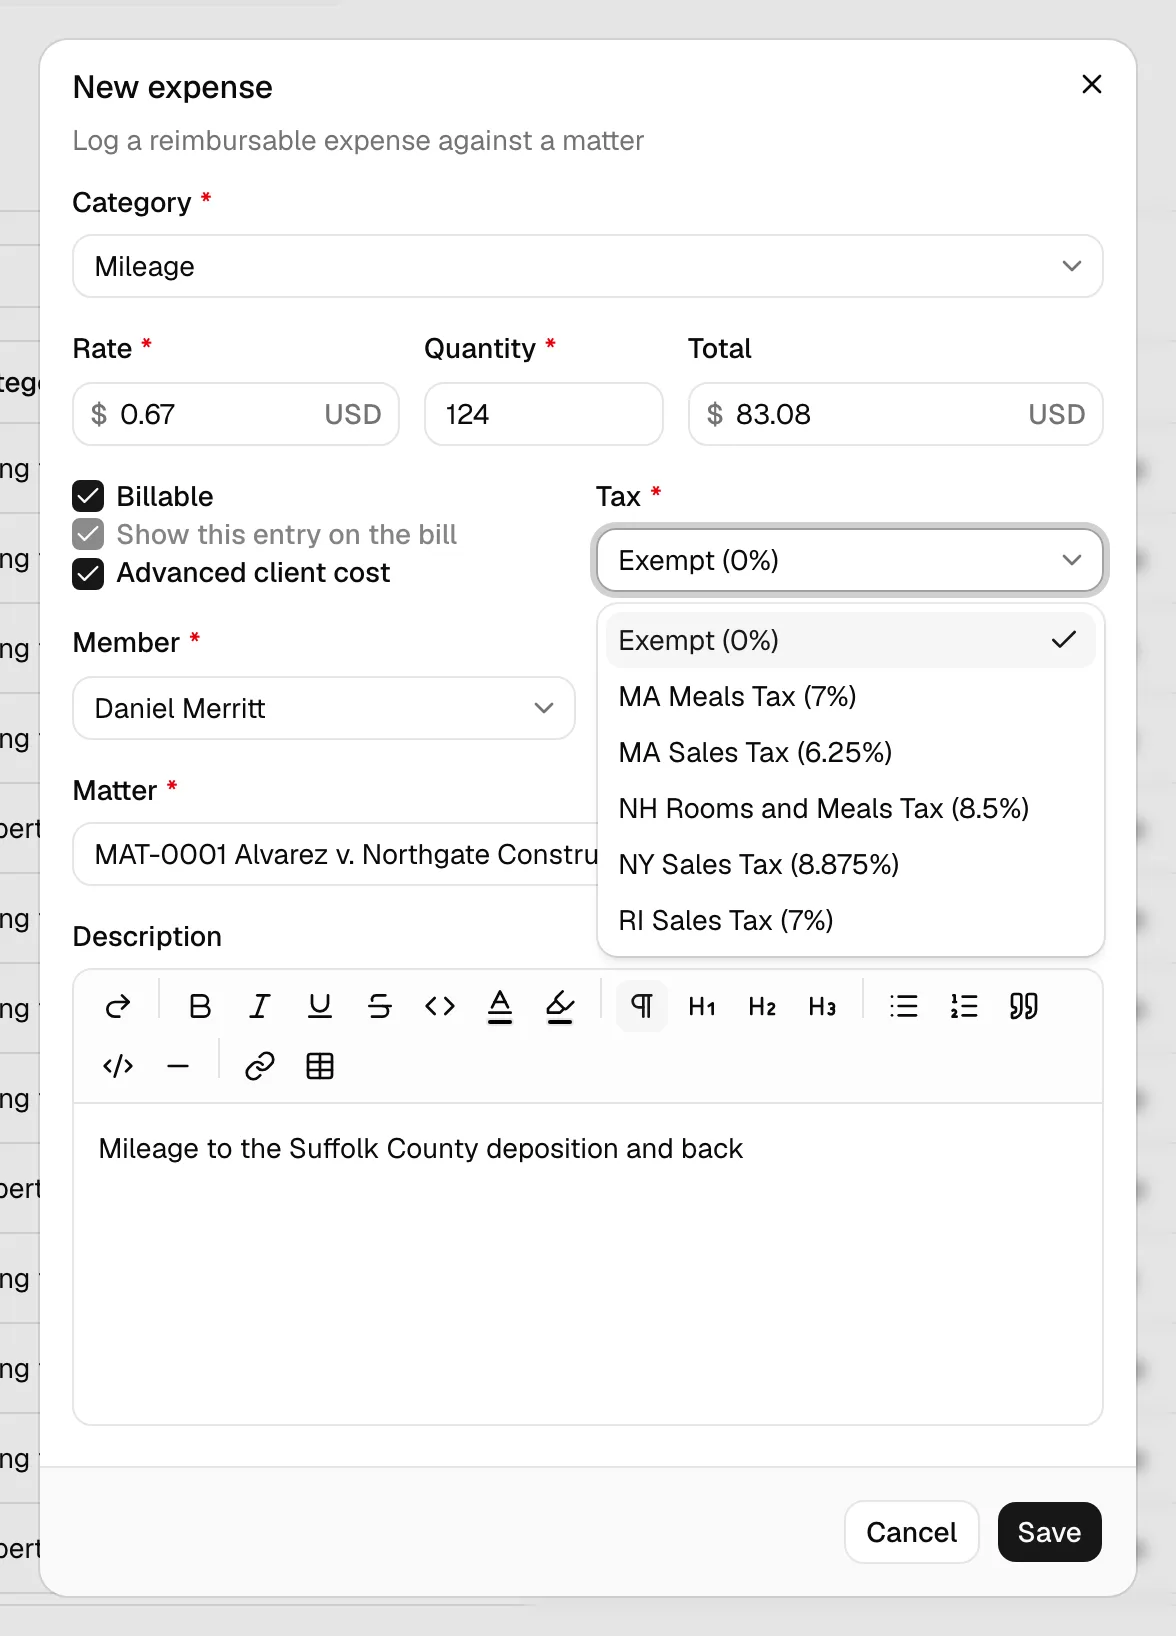
Note: Expenses do not have a timer. Time entries measure duration; expenses measure a fixed cost.
Flag an expense as an advanced client cost
An advanced client cost is money your firm pays out on the client's behalf and gets back later, out of a settlement, rather than billing it on an invoice. Filing fees, records charges, court reporter fees, and expert retainers are the usual examples. It matters most on contingency work, where the client pays nothing up front and the firm carries the case's costs until it resolves.
To mark one, tick Advanced client cost on the New expense dialog (or when editing an existing expense). It is the third tick box, below Billable and Show this entry on the bill, and it works independently of both. The checkbox is on expenses only; time entries do not have it.
Once flagged, the expense is picked up by the personal injury settlement on the same matter, where it is grouped by category under Advanced case costs and reimbursed to the firm as one of the deductions on the settlement statement. You do not have to add it there by hand, and you cannot edit it there either: the expense recorded here is the single record. See Settlement and disbursement.
On the Activities list and on a matter's Activities tab, an Advanced column shows an Advanced cost chip on each flagged row, so you can see at a glance what the firm is carrying.
Note: The Advanced column is shown only to members whose role includes View access for Personal injury. The tick box itself is not restricted, so anyone who can record an expense can set the flag even if they cannot see the column afterwards.
Use the play/pause activity timer
The timer turns elapsed real time into a duration. Start it, do the work, pause it when you stop, and the entry's duration and total update to match. The timer lives on time entries only.
Start a timer
You can start a timer in two places:
- From a new entry. Open New time entry, fill in the category and other fields, then click the play button beside the Duration field. The button turns into a running clock, the entry is created behind the scenes, and time starts counting up.
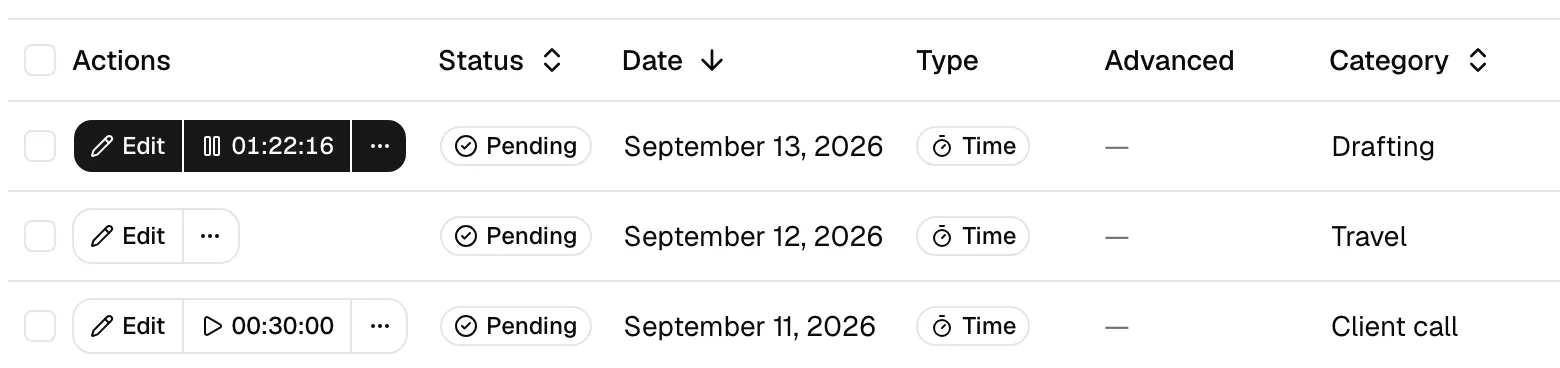
- From an existing entry. On any time-entry row in the table, click the timer button in the Actions column. It shows the running clock and a pause icon while active.
Pause and resume a timer
- To pause, click the same timer button (now showing a pause icon). Esqase stamps the elapsed time onto the entry, recalculates the total, and the button switches back to a play icon. You will see a "Timer paused" confirmation.
- To resume later, click the play button on that row again. The clock picks up from where it left off, adding new time on top of what was already recorded. You will see "Timer resumed".
You can pause and resume as many times as you like. Each session adds to the running total, so the recorded duration always reflects the sum of every session.
Edit a running or paused timer
You do not have to stop a timer to fix its details. Open the entry (click Edit on the row, or Edit manually from the timer widget menu) and change the category, rate, member, matter, date, or description. While a timer is actively running, the Duration field is locked and shows the live clock. Pause first if you need to type a different duration by hand.
Delete or remove a timer
How you remove a timer depends on where you started it:
- For an entry you intend to keep, pause the timer and then archive or delete the row using the More menu in the Actions column (see Edit a time or expense entry).
- For a quick timer you started from the header widget or an embedded control and now want to discard, use Remove in that control's menu. This unlinks and removes the timer entry entirely.
Important: Once an entry has been put on an invoice (status Billed or Paid), its timer is locked. You cannot start, pause, edit, or delete a billed entry. Remove it from the invoice first if you need to change it.
Record time from the header timer widget
A compact timer sits in the dashboard header so you can track time without leaving whatever page you are on. It always shows your single active timer, and it stays in sync across browser tabs.
- Find the timer button in the top header bar. When nothing is running it shows
00:00:00with a play icon. - Click the play button to start a fresh timer right away. A blank time entry is created and the clock starts. You will see "Timer started".
- Click the chevron (down arrow) next to it to open the menu. When no timer is running you can choose:
- Start timer to begin counting immediately on a new blank entry.
- Create time entry to open the full New time entry dialog and fill in details before starting.
- While a timer is running, the header shows the live clock and a pause icon. The menu now shows the entry's category and matter, plus:
- Pause to stop the clock.
- Resume to continue a paused timer.
- Edit manually to open the entry and set its category, matter, rate, and description.
- Remove to discard the timer entry.
- Clicking the running header button directly pauses the timer and opens the entry so you can finish filling in its details.
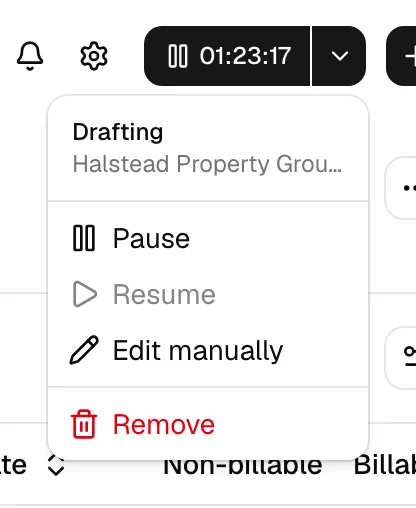
Tip: Because the header widget tracks one active timer at a time, starting a new timer while another runs keeps your time tidy. Pause the current one before you switch tasks.
Record time from an embedded control
Many records in Esqase let you log time against them without opening the Activities page. You will see a Record time control on tasks, events, notes, documents, and communication logs. Time logged this way is linked back to that specific record and its matter.
You can record time from:
- A task, from the Record time column on the tasks table (the Tasks page, a matter's Tasks tab, or a contact's Tasks tab) or the Time tracking timer at the bottom of an open task editor. See Creating and managing tasks.
- An event, from the Record time column on the events table (a matter's Events tab or a contact's Events tab). See Calendar and events.
- A note, from the Record time column or the inline control in the note dialog. See Notes.
- A document, from the Record time control in the documents table. See The documents workspace.
- A communication log, from the Record time column on a matter's Communications tab. See Logging communications.
- Open the list or page that shows the record. For example, a matter's Notes tab, the Communications tab, the Events tab, or a task list. Look for the Record time column or button.
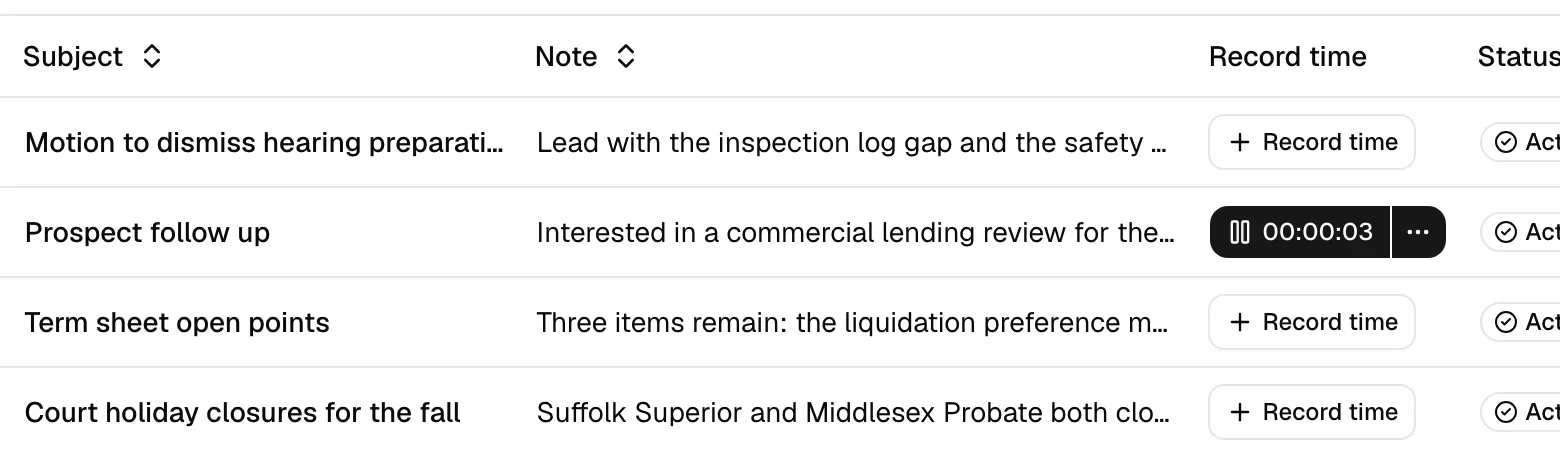
- If no time has been logged yet, click Record time. Esqase starts a timer immediately and seeds the entry's category from the record's subject. You will see "Timer started".
- The control now shows a running clock with a pause icon. Click it to pause; pausing also opens the time-entry dialog so you can finish the details (category, rate, matter, member, description).
- Click the play icon again to resume the timer later.
- Use the More menu (the three dots) on the control for:
- Edit manually to open the full time-entry dialog.
- Remove to delete the linked timer entry.
Note: Expenses cannot be recorded from these embedded controls. They are for time only. To add an expense, use New expense on the Activities page.
You can only run a timer on your own entry
A timer belongs to the member named on the entry. On a colleague's entry the play control is replaced by the same read-only view button a billed entry gets, so you can open the entry and read it but not add time to it. Record your own work on your own entry.
When a time entry is locked (Billed or Paid)
Once a time entry has been added to an invoice (Billed) or paid (Paid), it is locked and can no longer be changed. The Record time control reflects this everywhere it appears:
- The play/pause timer button is replaced by an eye (view) icon button. It still shows the recorded duration in HH:MM:SS, but it no longer times the entry.
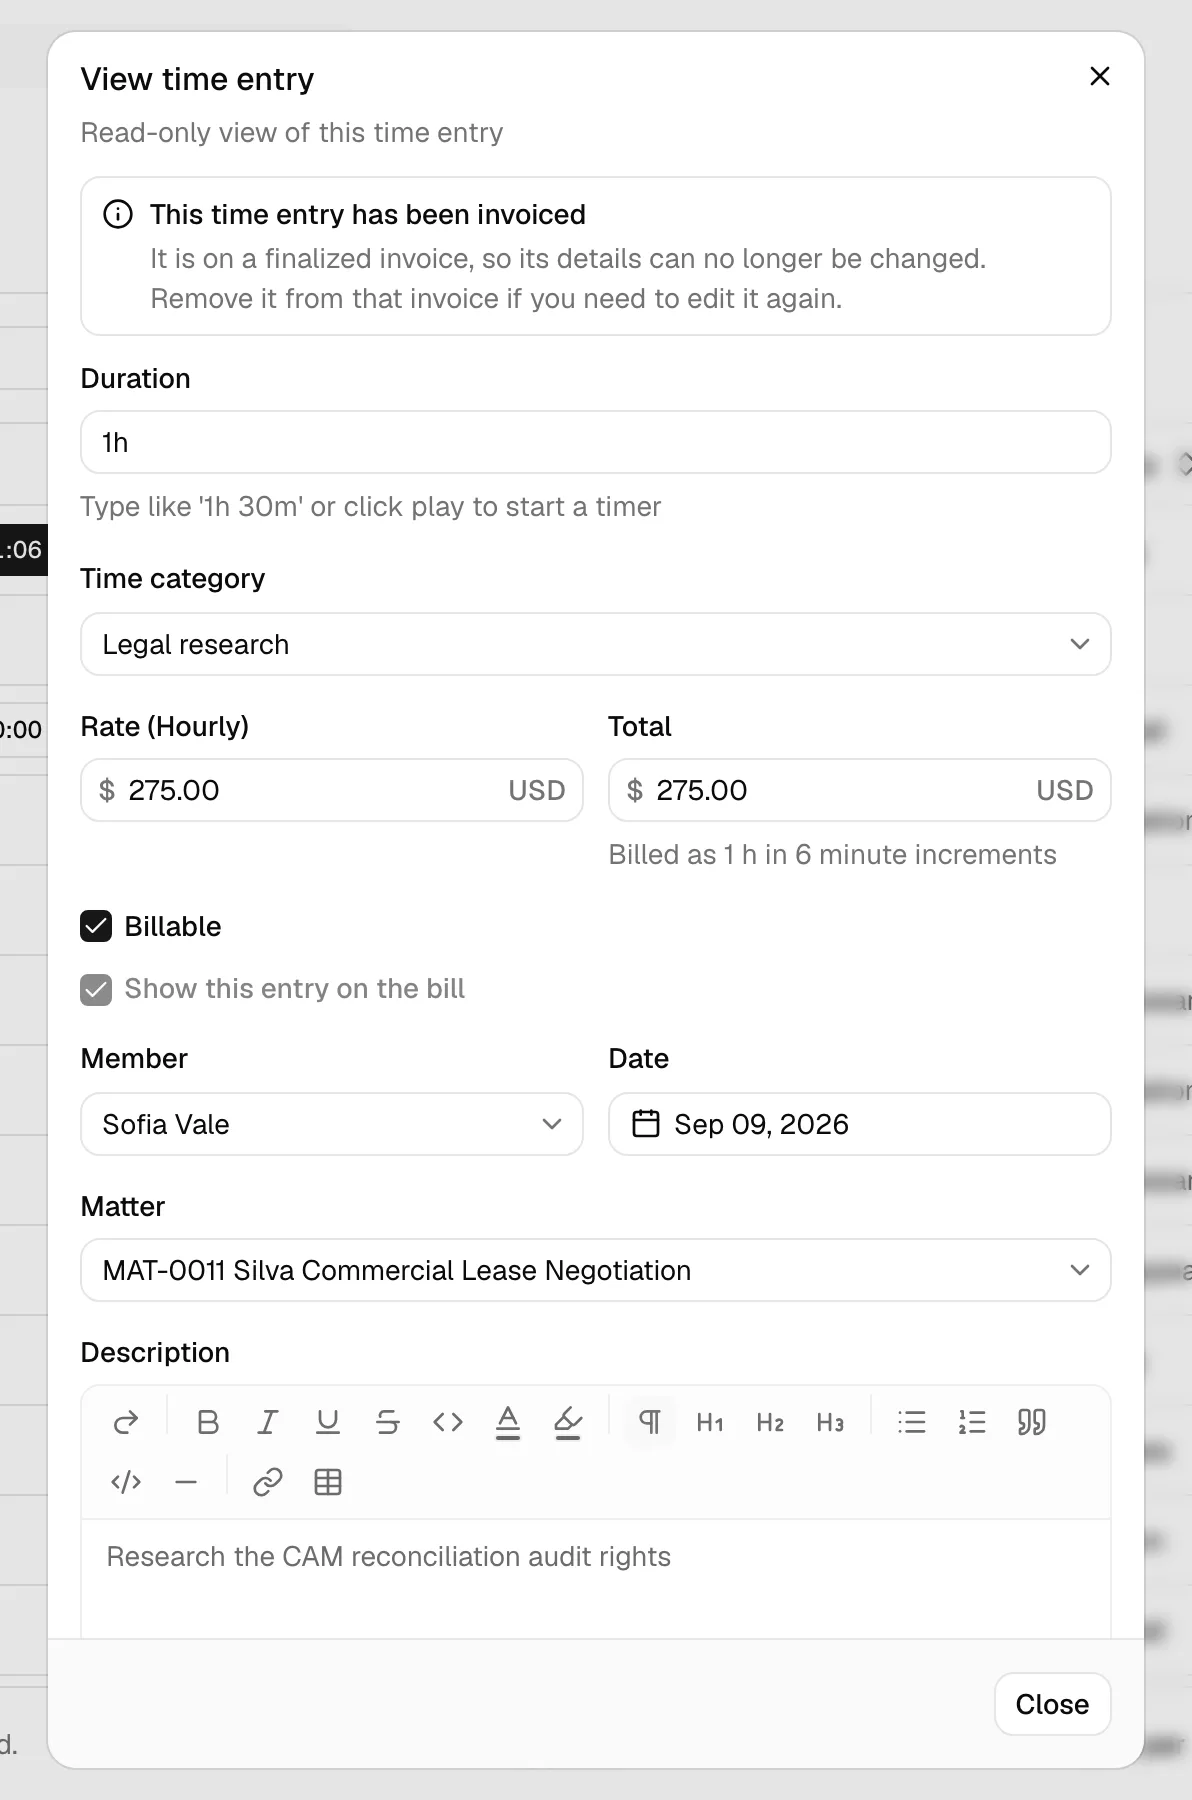
- Clicking it opens the entry in a read-only View time entry dialog, so you can review the details without changing them. A note at the top of that dialog tells you why it is read-only, so you never have to guess.
- The More (three-dots) options menu is hidden, so Edit manually and Remove are not offered.
This means a billed or paid time entry can only be viewed from these embedded controls, not timed, edited, or removed. To make a change, first remove the entry from its invoice. See Understand the billing-status lifecycle.
Edit a time or expense entry
You can change any entry until it has been billed.
- On the Activities page, find the row you want to change.
- In the Actions column, click Edit. The time-entry or expense dialog opens with the entry's current values.
- Update any field, then click Save changes. You will see an "updated" confirmation.
The More menu (three dots) in the Actions column also lets you tidy up entries you do not need right now:
- Archive hides an active entry from the default list without deleting it. Archived entries can be restored. (Archiving is not allowed on billed or paid entries.)
- Restore brings an archived entry back to active.
- Delete permanently removes an archived entry. This cannot be undone, so an entry must be archived first.
You can also act on several rows at once: select their checkboxes, then use the batch Archive, Restore, or Delete actions that appear above the table.
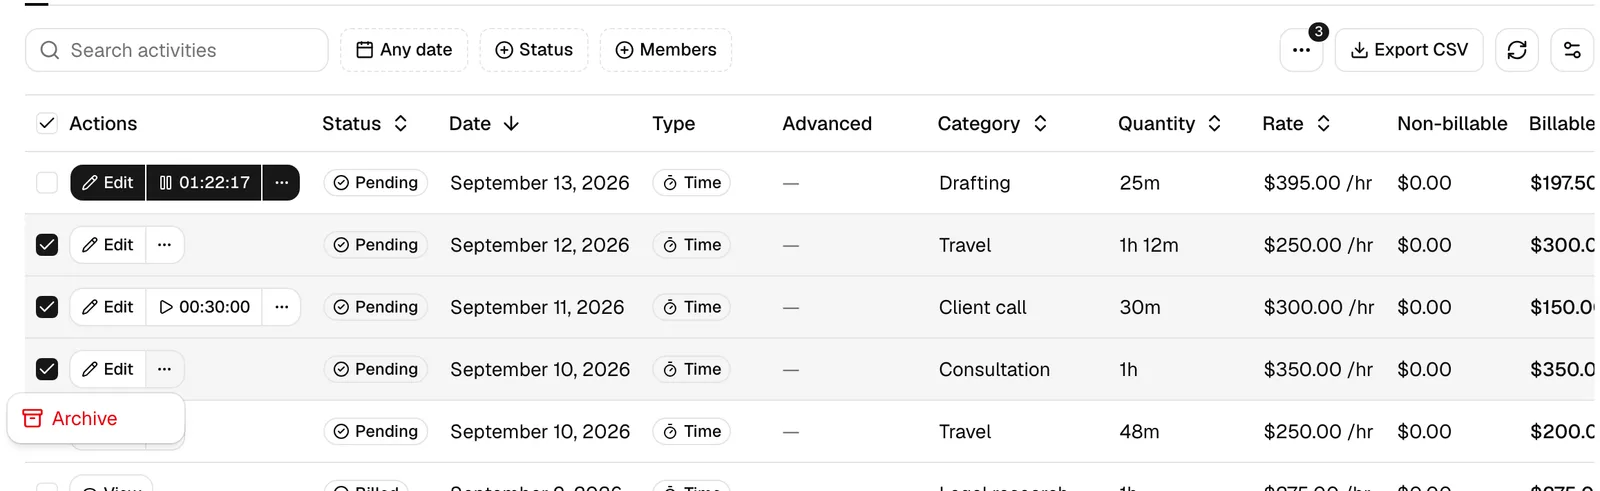
Important: Billed and paid entries are read-only. On those rows the Edit button is replaced with a View button, and the archive, restore, and delete options are hidden. To change a billed entry, first remove it from its invoice.
Why an entry opens read-only
When an entry opens as View time entry or View expense instead of an editable form, a note at the top of the dialog explains the reason, so you know what to do next:
- This time entry has been invoiced. The entry is on a finalized invoice, so its details can no longer be changed. Remove it from that invoice if you need to edit it again.
- This time entry has been invoiced and paid. The invoice containing the entry has already been paid, so its details are final.
- You can view this time entry but not edit it. Your role does not include permission to change activities. Ask a firm administrator if you need an update made.
The same notes appear on expenses, worded for an expense. In every case you can still read every field, and the Close button replaces Save changes.
Mark an activity billable and set tax
Whether an entry is charged to the client is controlled by two checkboxes, and expenses additionally carry a tax rate.
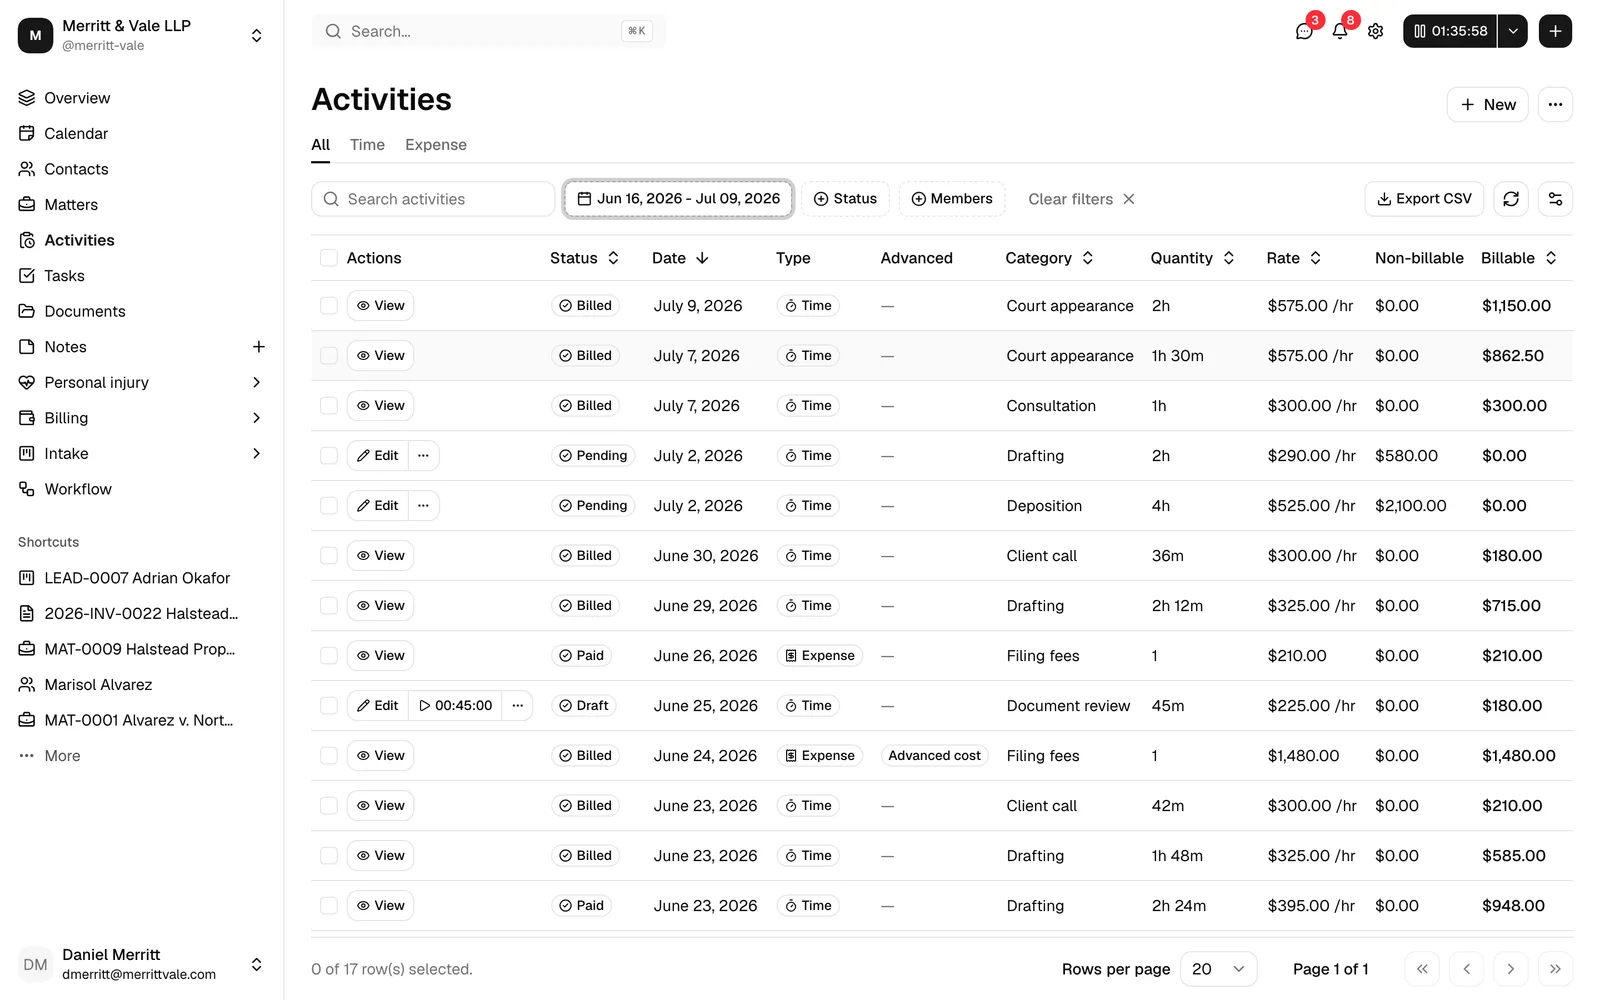
- Billable decides whether the entry's total is charged. When Billable is on, the entry counts toward the client's bill and automatically shows on it. The activities table reflects this in two columns: the Billable column shows the chargeable amount, and the Non-billable column shows the amount for entries marked not billable.
- Show this entry on the bill only matters when Billable is off. Turn it on to display a non-billable entry on the invoice (for transparency) without charging for it.
- Tax (expenses only) sets the tax rate applied to the cost. Pick from your firm's tax rates. Time entries do not carry a tax rate.
To change billable status or tax, open the entry, adjust the checkboxes (or the Tax picker on an expense), and click Save changes.
Tip: Only billable activities are eligible to be added to an invoice. If an entry you expect to bill is not showing up when you build an invoice, confirm Billable is on and the entry is attached to the matter and a member.
Filter, search, and sort the activities list
The Activities page can hold a lot of entries. Use the toolbar to narrow it down.
- Switch by type. Use the All, Time, and Expense tabs at the top to show every activity, only time entries, or only expenses.
- Search. Type in the Search activities box to match on category name and description.
- Filter by date. Click the date-range filter and choose a start and end date to show entries within a window.
- Filter by status. Click Status and tick any of Draft, Pending, Billed, or Paid to show only entries at those billing stages.
- Filter by member. Click Member and pick one or more people to show only their entries.
- Clear filters. When any filter is active, a Clear filters button appears. Click it to reset everything.
- Sort. Click a column header (for example Date, Total, or Last updated) to sort by that column. Click again to reverse the order.
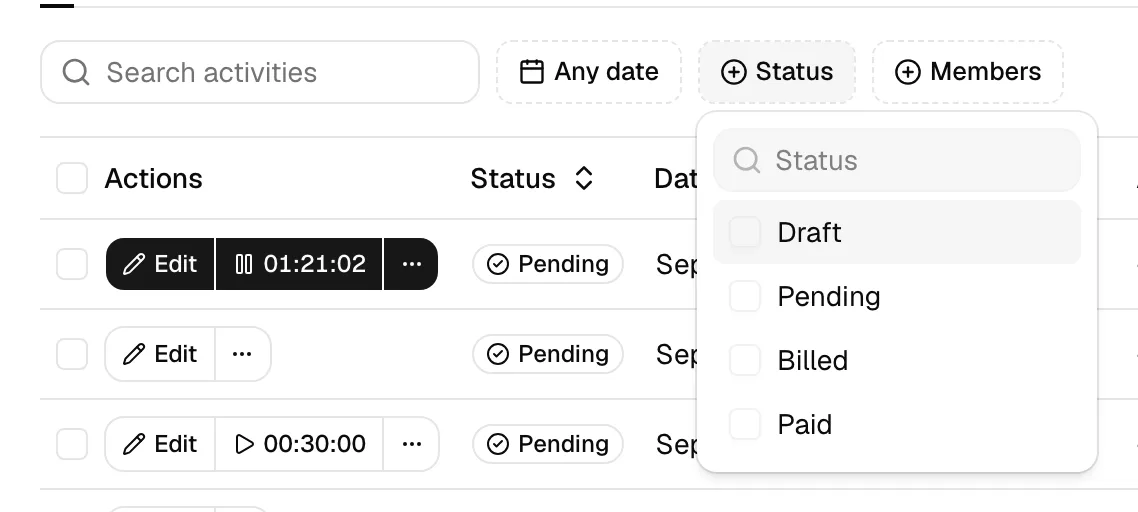
Note: By default the list shows only active entries. Archived entries are hidden until you change the status filters.
Understand the billing-status lifecycle
Every activity carries a billing status that tracks where it is on the way to being paid. You can see it in the Status column and filter by it.
- Draft. The entry is not yet ready to bill. An entry stays a draft when it has no matter or no member assigned. Drafts are most common for quick timers you started before filling in details.
- Pending. The entry is attached to both a matter and a member, so it is ready to be added to an invoice. This is the state you want for billable work waiting to be invoiced.
- Billed. The entry has been added to an invoice. At this point the entry is locked: you cannot edit, time, archive, or delete it. The row's button changes from Edit to View, and any Record time control elsewhere (on a task, event, note, document, or communication log) switches to a view-only eye icon that opens the entry read-only. See When a time entry is locked (Billed or Paid).
- Paid. The invoice that contains this entry has been paid. The entry remains locked.
Tip: If an entry you meant to bill is stuck on Draft, open it and make sure both a Matter and a Member are set. As soon as both are present, it moves to Pending and becomes invoiceable.
Add unbilled activities to an invoice
Pending (and draft, if newly created) activities become invoice line items when you build an invoice. You do this from the invoice, not from the Activities page.
- Create or open an invoice for the matter. See Creating and sending invoices.
- In the invoice, choose to add line items. The Select time entries or Select expenses dialog opens, titled Add line items.
- The dialog lists the matter's unbilled activities (each with its date, category, description, quantity, rate, and total). Tick the checkbox on each activity you want to bill. You can also click New time entry or New expense here to create one on the spot.
- Click Add. The selected activities become line items on the invoice, and their descriptions and amounts carry over.
- When you finalize the invoice, those activities flip to Billed and lock. When the invoice is later paid, they move to Paid.
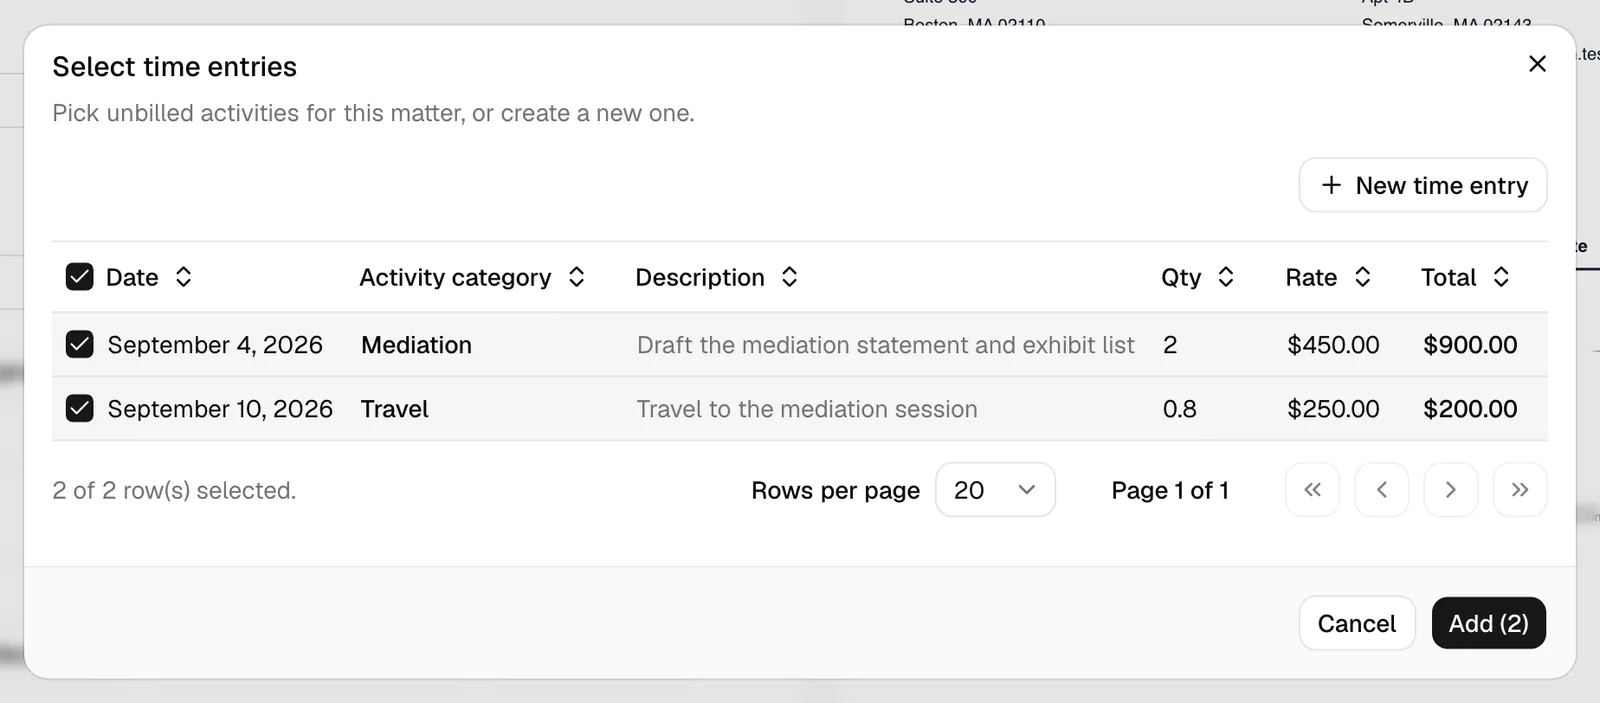
Note: Only billable, active, unbilled activities for the chosen matter appear here. Entries already on another invoice, or marked not billable, will not be listed.
View a matter's activities from the matter Activities tab
Every matter has its own activities view, scoped to that matter, so you can see and add time and expenses in context.
- Open the matter. See The matter workspace.
- Click the Activities tab.
- You will see the same table, search, filters, and All / Time / Expense tabs as the main Activities page, but limited to this matter's entries.
- Use New time entry and New expense here to add entries that are already attached to this matter (the matter is pre-filled and locked for you).
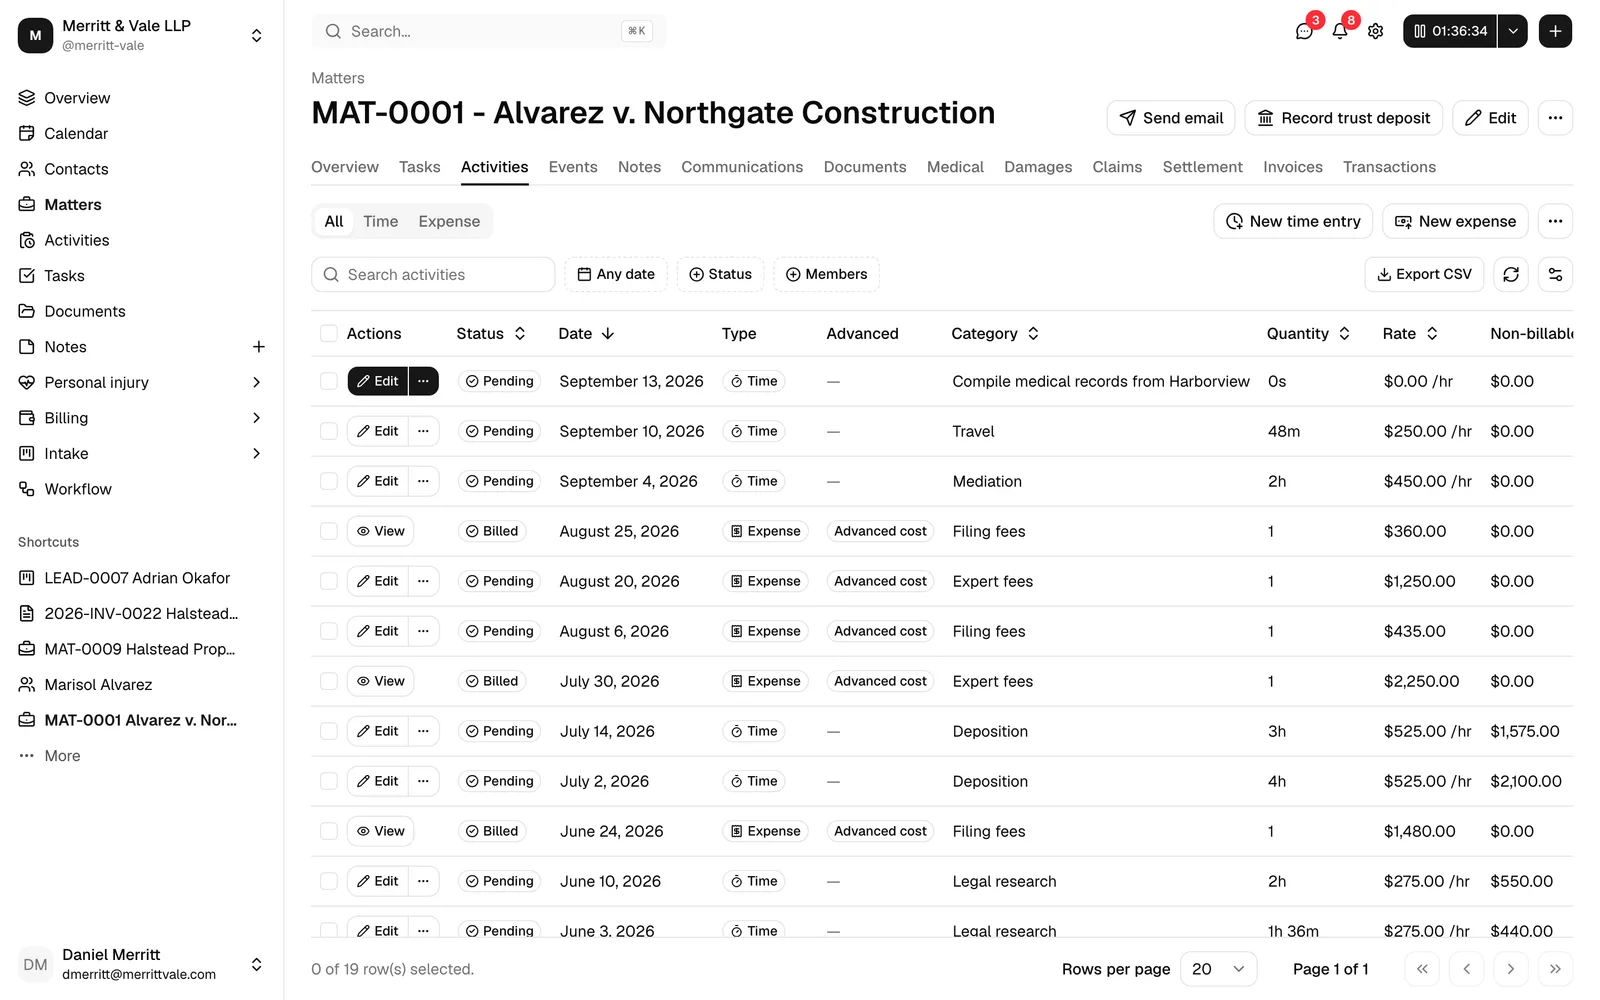
Tip: Logging time from inside the matter saves a step. Because the matter is set for you, those entries land as Pending straight away (as long as a member is assigned) and are ready to invoice.
Common questions
Why is my entry still a Draft? A draft is missing a matter, a member, or both. Open the entry and set both fields. It will move to Pending automatically.
Why can't I edit an entry anymore? It has been billed or paid, which locks it. The button shows View instead of Edit. Open it and read the note at the top of the dialog: it tells you whether the entry is on an invoice, on a paid invoice, or beyond your role's permissions. See Why an entry opens read-only.
Can I record time on something other than a matter? Yes, you can start a time entry with no matter (for example a quick header-widget timer), but it stays a Draft and cannot be invoiced until you assign it to a matter and member.
How does the total get calculated? For time, it is the recorded hours multiplied by the hourly rate. For expenses, it is the quantity multiplied by the unit rate. The Total field is always read-only and updates as you change the inputs.