Available lang sa Ingles ang dokumentasyon ng produkto.
The matter workspace
When you open a matter, you land in its workspace: a single page that gathers everything about the case in one place. From here you can see the financial picture at a glance, work through every task and document, log time, send email, and track the firm's progress on the matter. This page explains every part of the matter workspace and how to use it.
A "matter" is a single legal case or file you are handling for a client (for example, a personal-injury claim or an estate matter). Each matter has its own number, its own clients, and its own workspace.
Before you begin
- You reach the matter workspace by opening a matter from the matters list. See Browsing matters for how to find and open a matter.
- You need View access for matters to open the workspace at all. If your role does not include it, you will see a "no access" message instead of the matter.
- What you can change inside the workspace depends on your role. Many actions (editing the matter, recording a trust deposit, working the workflow, creating tasks or invoices) require the matching permission. Firm owners can do everything. Where an action is hidden because of your role, this page says so.
- Some features in the workspace use a connected account (a Gmail or Outlook mailbox for sending email, and Google or Outlook Calendar for scheduling). See Integrations overview.
A tour of the page
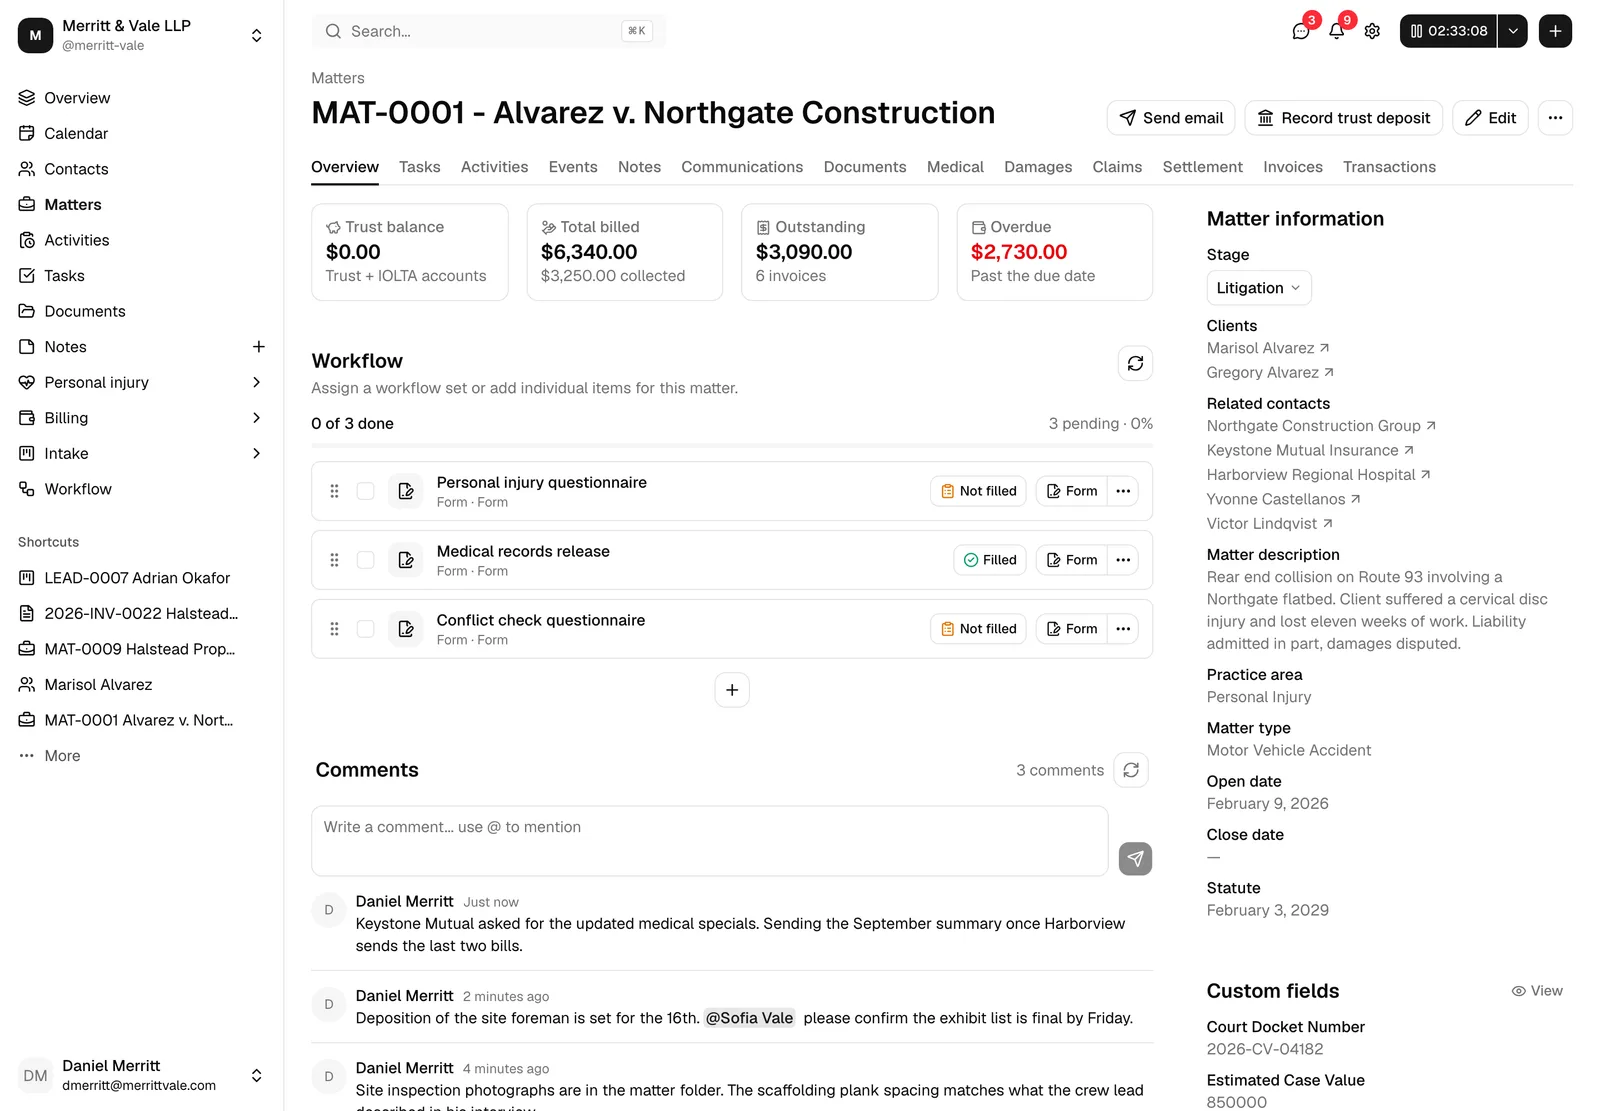
The workspace has three parts: a header at the top, a row of tabs below it, and (on the Overview tab) a sidebar on the right.
- The header shows a breadcrumb (Matters, which takes you back to the list), the matter's number and title together in large text, separated by a dash (for example, MAT-1042 - Smith v. Jones), the same label used wherever the matter appears in a list, and the action buttons on the right. The title stays on a single line, so a long one is cut off with "..." rather than crowding the buttons. Point at the title, or tab to it, and a small chevron appears at the end of it. Click the chevron to expand the title and read the full number and title across as many lines as it needs, then click it again to collapse it back to one line. The chevron appears only when the title is actually cut off, and it stays in view while the title is expanded.
- The tab bar lets you switch between the different aspects of the matter: Overview, Tasks, Activities, Events, Notes, Communications, Documents, Invoices, and Transactions. A matter tracked as a personal injury case shows four more, Medical, Damages, Claims, and Settlement, between Documents and Invoices. The tab you choose is remembered in the page address, so you can bookmark or share a link straight to a specific tab.
- The sidebar appears only on the Overview tab. It holds the matter's key details, its custom fields, its assignees, and record information. On the other tabs the content uses the full width of the page.
Tip: Because the active tab is stored in the page link, you can copy the address bar to point a colleague at, say, this matter's Documents or Invoices directly.
There is also a short, read-only summary of the same matter on its own page, listing its events, its issued invoices, and the forms shared with the client. See The matter summary page.
The Overview tab
The Overview tab is the home base for the matter. It has three stacked sections: the stat cards at the top (with a Budget bar below them when the matter has a budget), the Workflow section in the middle, and the Recent activities timeline at the bottom. The sidebar on the right rounds out the picture with the matter's details.
The stat cards
Four cards across the top give you the matter's money picture at a glance. Each card shows a number and a short hint, and most are clickable.
- Trust balance shows the total held for this matter across your trust and IOLTA accounts. A "trust account" (also called an IOLTA account) holds client money you have not yet earned, kept separate from the firm's own funds. The hint reads "Trust + IOLTA accounts." A positive balance is highlighted. Clicking the card opens the related trust account, or the Accounts page if the matter touches more than one. See Accounts, trust, and transactions.
- Total billed shows the total amount invoiced on this matter, with the amount already collected in the hint (for example, "$1,200.00 collected"). Clicking the card switches to the Invoices tab.
- Outstanding shows the unpaid balance across this matter's invoices, with the invoice count in the hint. Clicking it switches to the Invoices tab.
- Overdue shows the amount past its due date. If anything is overdue the number is shown in red and the hint reads "Past the due date"; otherwise it reads "Nothing past due." Clicking it switches to the Invoices tab. Red is used only on this card, so a red figure on the Overview always means "past due".
Note: The Total billed, Outstanding, and Overdue cards switch tabs only if your role includes View access for invoices. Without it the cards still show the totals but are not clickable.
If your firm has not set up a trust account yet, the Trust balance card is not a link. Clicking it opens a short Trust balance message titled "No trust account yet", explaining that trust deposits are recorded against a Trust or IOLTA account. Use Go to accounts to open the Accounts page and add one, or Close to stay on the matter. Once a trust account exists, the card starts linking to it as described above.

The Budget bar
If the matter has a budget, a Budget bar sits directly below the stat cards. It shows at a glance how much of the budget the matter has used so far, so you can tell whether the case is tracking on plan.
The bar shows three things:
- The percent spent of the budget.
- The amount spent so far.
- Either how much budget is left, or, once the matter goes over budget, how much it is over. When the matter is over budget, the bar turns red.
"Spent" is the total billed across this matter's invoices that are Pending, Partially paid, or Paid. Invoices that are Draft, In review, Declined, Refunded, Canceled, or Archived do not count toward it. Because it counts the invoiced amount, a Pending invoice adds to the spend as soon as it is issued, before the client has paid.
You set a matter's budget when you create or edit it. On the Billing step, with the Hourly billing method, check Set a budget for this matter and enter a Matter budget amount. See Creating a matter.
Note: The Budget bar appears only when a budget has been set on the matter and your role includes View access for invoices. If no budget is set, or you cannot see the matter's invoices, the bar is hidden.

The customers and related contacts
The matter's people live in the sidebar on the right, under Matter information:
- Clients lists the contacts the matter is being handled for. Each name is a link straight to that contact's record.
- Related contacts lists other people connected to the matter who are not the client (for example, an opposing party, a witness, or an expert). Each name links to the contact.
If a section has no one in it, it shows a dash. To add or change clients and related contacts, edit the matter (see Header actions below). For more on contacts, see Working with contacts.
The firm members working the matter are listed separately, further down the sidebar in the Assignees block described below.
Recent activity
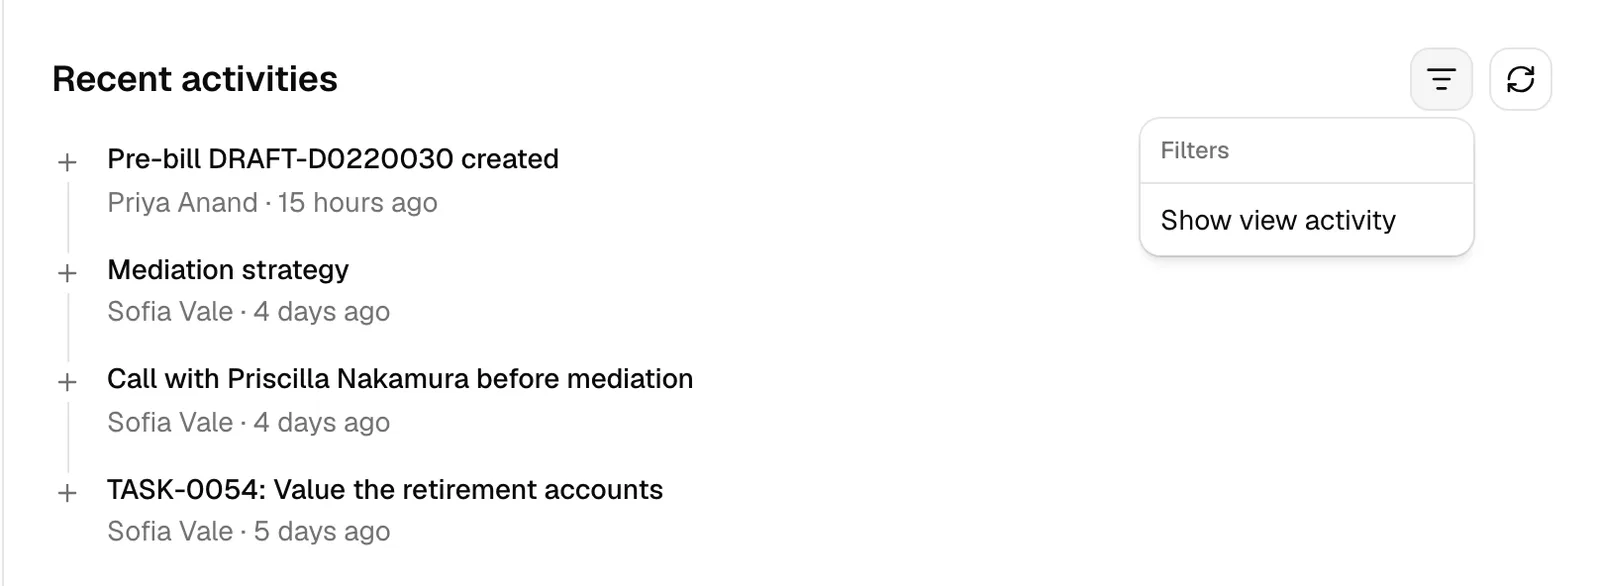
At the bottom of the Overview tab, the Recent activities timeline records what has happened on the matter, newest first. It covers the matter record itself (created or edited, stage changes, customers and contacts added or removed, billing changes) and the work filed under it: tasks, notes, events, time entries, communications, invoices, payments, and documents. This is covered in detail under The matter activity timeline below.
The tabs
Each tab opens a focused view of one part of the matter. Below is what each one is for. Most actions inside a tab are gated by the matching permission, so a button may be hidden if your role does not include it.
Tasks
The Tasks tab lists the to-do items for this matter and lets you add, edit, complete, and remove them. It is the same task experience used elsewhere in Esqase, scoped to this matter. See Creating and managing tasks.
Two sub-tabs split the tab: Tasks is a sortable list, and Stages is the matter's kanban board. The controls on the right add work to the matter: New task creates a single task, and Assign task list copies a whole saved list of tasks (with their sub-tasks, assignees, and scheduling) onto the matter in one go. Both appear only if your role includes Create access for matter tasks. See Assign a task list to an existing matter and Task kanban, stages, and types.
Activities
The Activities tab is where you track billable time and expenses on the matter. Each activity is a time entry or an expense that can later go onto an invoice. See Time and expense tracking.
Events
The Events tab shows the meetings and appointments tied to this matter and lets you create new ones. Events can sync to your connected Google Calendar. See Calendar and events.
Notes
The Notes tab holds the matter's internal notes: research, call summaries, and reminders for the team. You can also record time against a note. Several of the matter tabs (Tasks, Events, Notes, Communications, and Documents) carry a Record time control for billing time against an item; once that time entry has been billed or paid, the control becomes a view-only eye icon that opens the entry read-only. See Notes and Time and expense tracking.
Communications
The Communications tab logs the calls and emails exchanged about the matter, so the whole team can see the history of client contact. See Logging communications.
Documents
The Documents tab is the matter's file folder. It carries the same tabs as the main Documents workspace (Recent, My documents, For signature, Shared with me, Starred, Trash), scoped to this matter. For signature lists this matter's documents that have an eSignature request on them, with the same four stat cards (Draft, Awaiting signature, Completed, Declined or cancelled) and the same Status filter as the firm-wide For signature tab, so you can track this matter's signing activity without the rest of the firm's requests in the way. Open, create, and edit documents, then share them or send them for signature. Every document opens on its own page, and closing it brings you back to this tab in the folder you were browsing. The folder you are in is part of the page address as well, so your browser's Back and Forward buttons step through the folders you opened, and refreshing keeps you where you were. See The documents workspace and Managing signature requests.
Medical, Damages, Claims, and Settlement
These four tabs appear only on a matter that is tracked as a personal injury case, and only if your role includes View access for Personal injury. They run an injury claim end to end:
- Medical holds the incident record, the treating providers, the records and bills you have requested from each one, and the bills with whatever has been paid against them.
- Damages is the ledger of losses you are claiming, with the medical totals behind it.
- Claims holds the insurance policies in play, the negotiation log, and the case's deadlines.
- Settlement works out the fee, the liens, and the client's net, then plans and pays the disbursements and produces the settlement statement.
Note: On a matter that is not a personal injury case, or for a member without that permission, the four tabs are simply not there, and a link pointing at one of them (for example ?tab=settlement) opens the Overview tab instead.
Invoices
The Invoices tab lists the matter's invoices and lets you create and send new ones. The Overview stat cards summarize these. See Creating and sending invoices.
Transactions
The Transactions tab shows the payments, trust deposits, and other money movements recorded against the matter. This is where a trust deposit you record (below) shows up. See Accounts, trust, and transactions and Recording and managing payments.

The page sidebar
On the Overview tab, the sidebar on the right summarizes the matter. It is grouped into four blocks.
Matter information
This block holds the matter's core details:
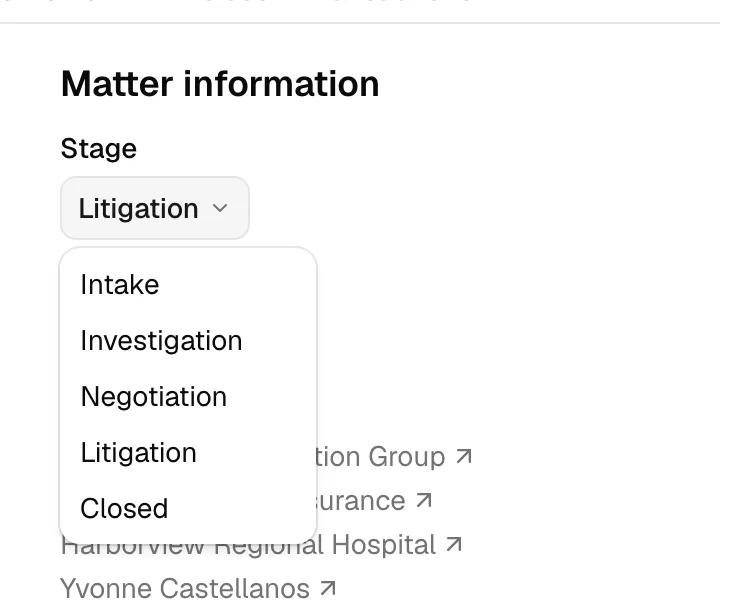
- Stage shows where the matter sits in its pipeline (for example, Intake, In progress, or Closed). If your role includes Update access for matters, the stage is a dropdown: click it and pick a new stage from the menu to move the matter. A spinner shows while it saves, and the change is recorded in the timeline. Without update access, the stage is shown as a read-only badge. Stages come from the matter's practice area, see Practice areas and stages.
- Clients and Related contacts (described above) link to the people on the matter.
- Matter description shows the plain-text summary of the case.
- Practice area shows the area of law the matter belongs to (for example, Family Law).
- Matter type shows the specific type or types within that practice area.
- Open date and Close date show when the matter was opened and, if set, closed.
- Statute shows the statute-of-limitations date, if one was set. The statute of limitations is the legal deadline for filing the case; missing it can bar the claim. If the deadline has been met, the date is followed by "(satisfied)."
Tip: To change any of these details, use Edit in the header (see below). The Stage dropdown is the one field you can change directly from the sidebar.
Custom field values
Below Matter information is the Custom fields block. Custom fields are extra fields your firm defines to capture information Esqase does not track out of the box (for example, "Court file number" or "Insurance carrier"). Any custom fields set on this matter appear here with their values. If none are set, the block reads "Not set."
Values are written out in plain reading form rather than the way they were typed in: a name field reads Dr. Jane A. Smith, Esq., an address reads as a postal address with the state and country spelled out, an amount reads as $1,200.00, dates are formatted in your time zone, a dropdown or checklist shows the option's label, and a tick box reads Yes or No. A field you have not filled in shows a dash. See Field sets and using custom fields for the full list.
To manage them, click View in the block's header. This opens the Custom fields dialog described next.
The Custom fields manage dialog
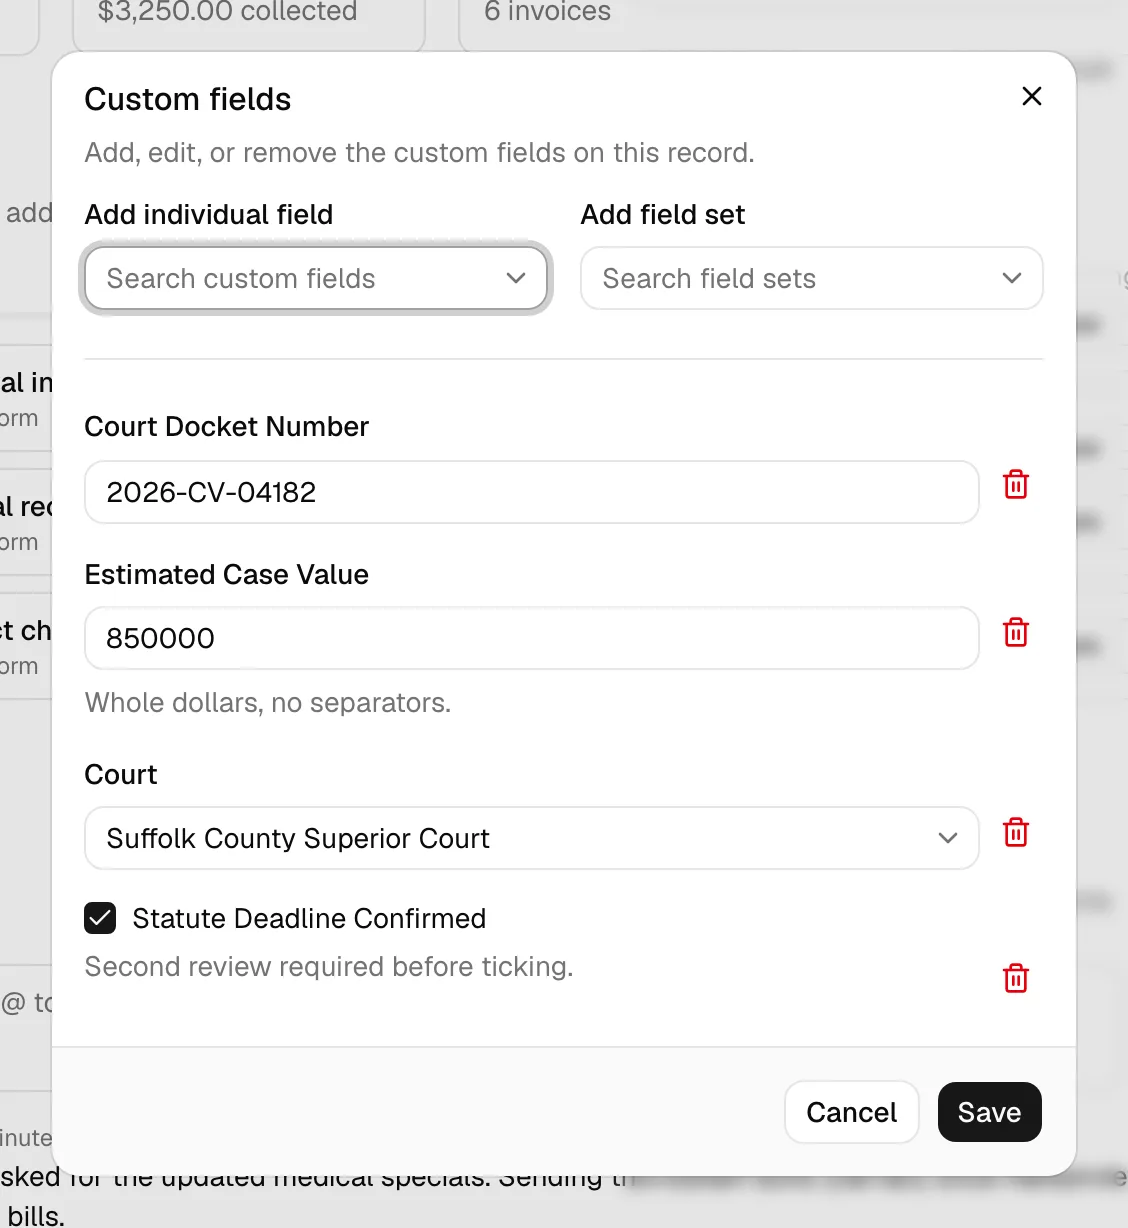
The Custom fields dialog lets you add, fill in, and remove the matter's custom fields.
- In the sidebar, in the Custom fields block, click View.
- If you have Update access for matters, you can:
- Use Add individual field to search for and add a single custom field.
- Use Add field set to add a predefined group of fields at once. A "field set" is a saved bundle of custom fields you add together. See Field sets and using custom fields.
- Create a brand-new field on the spot with the New custom field option inside the Add individual field menu, or a new set with New field set.
- Fill in or change each field's value. Required fields must be completed before you can save. Phone and address fields start on your firm's country, which you can change on any individual field. See How your firm's country sets phone and address defaults.
- Remove a field from the matter with the trash-can button next to it. This removes the value from this matter; it does not delete the field definition for your firm.
- Click Save. You will see a confirmation, and the values update in the sidebar.
Note: If your role does not include Update access for matters, the dialog opens in read-only mode: you can review the custom fields but the add, remove, and Save controls are hidden, and the button reads Close instead of Cancel.
For more on creating and configuring these fields, see Custom fields.
Assignees
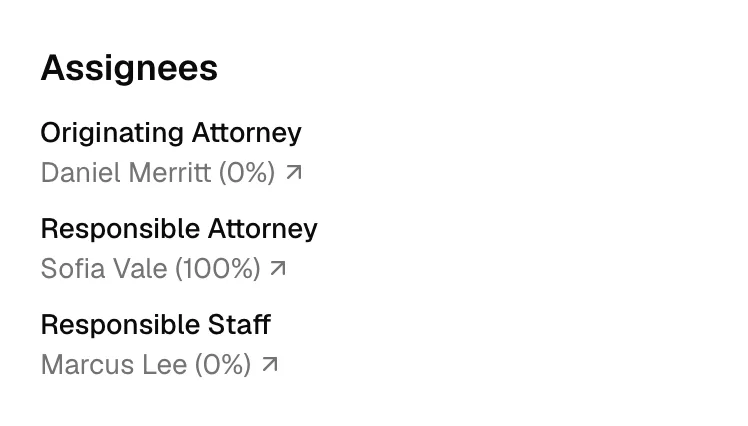
Below Custom fields is the Assignees block. It lists the firm members assigned to this matter, so you can see at a glance who is responsible for it.
Each member gets one line. The label is the role they hold on the matter, and below it is their name, which links to their member page in your firm settings.
- The roles are Originating Attorney (the member who brought in the matter), Responsible Attorney (the attorney accountable for the work), and Responsible Staff (supporting staff). Members are listed in that order.
- If a member holds more than one role, they still appear on a single line and both roles are shown together, for example "Responsible Attorney, Responsible Staff".
- The percentage in parentheses after a member's name is their revenue allocation, the share of the matter's revenue that is credited to them. Allocations across the assignees always add up to 100%. A member holding two roles shows one combined percentage.
- A member who has been invited to the firm but has not yet accepted appears as "Member" until they set up their account.
- If no one is assigned yet, the block reads "Not set."
This block is read only. To add, remove, or change assignments and allocations, edit the matter and use the Assignees step, see Creating a matter. For more on firm members and their roles, see Managing firm members.
Other information
The last sidebar block, Other information, shows record details:
- Matter ID is the internal identifier, with a copy button next to it.
- Created at and Created by show when and by whom the matter was created.
- Updated at and Updated by show the most recent change.
Header actions
The buttons in the top-right of the header act on the whole matter. Which buttons you see depends on your role.
Send email
Click Send email to compose an email tied to this matter. The composer is pre-linked to the matter, so the message is logged against it. You can pull in a saved template and your email signature. See Sending email.
Note: With Gmail or Outlook connected, Esqase sends the email for you and logs it on the matter. With no mailbox connected, the composer still opens and hands the finished message to your own mail app instead. See Sending email.
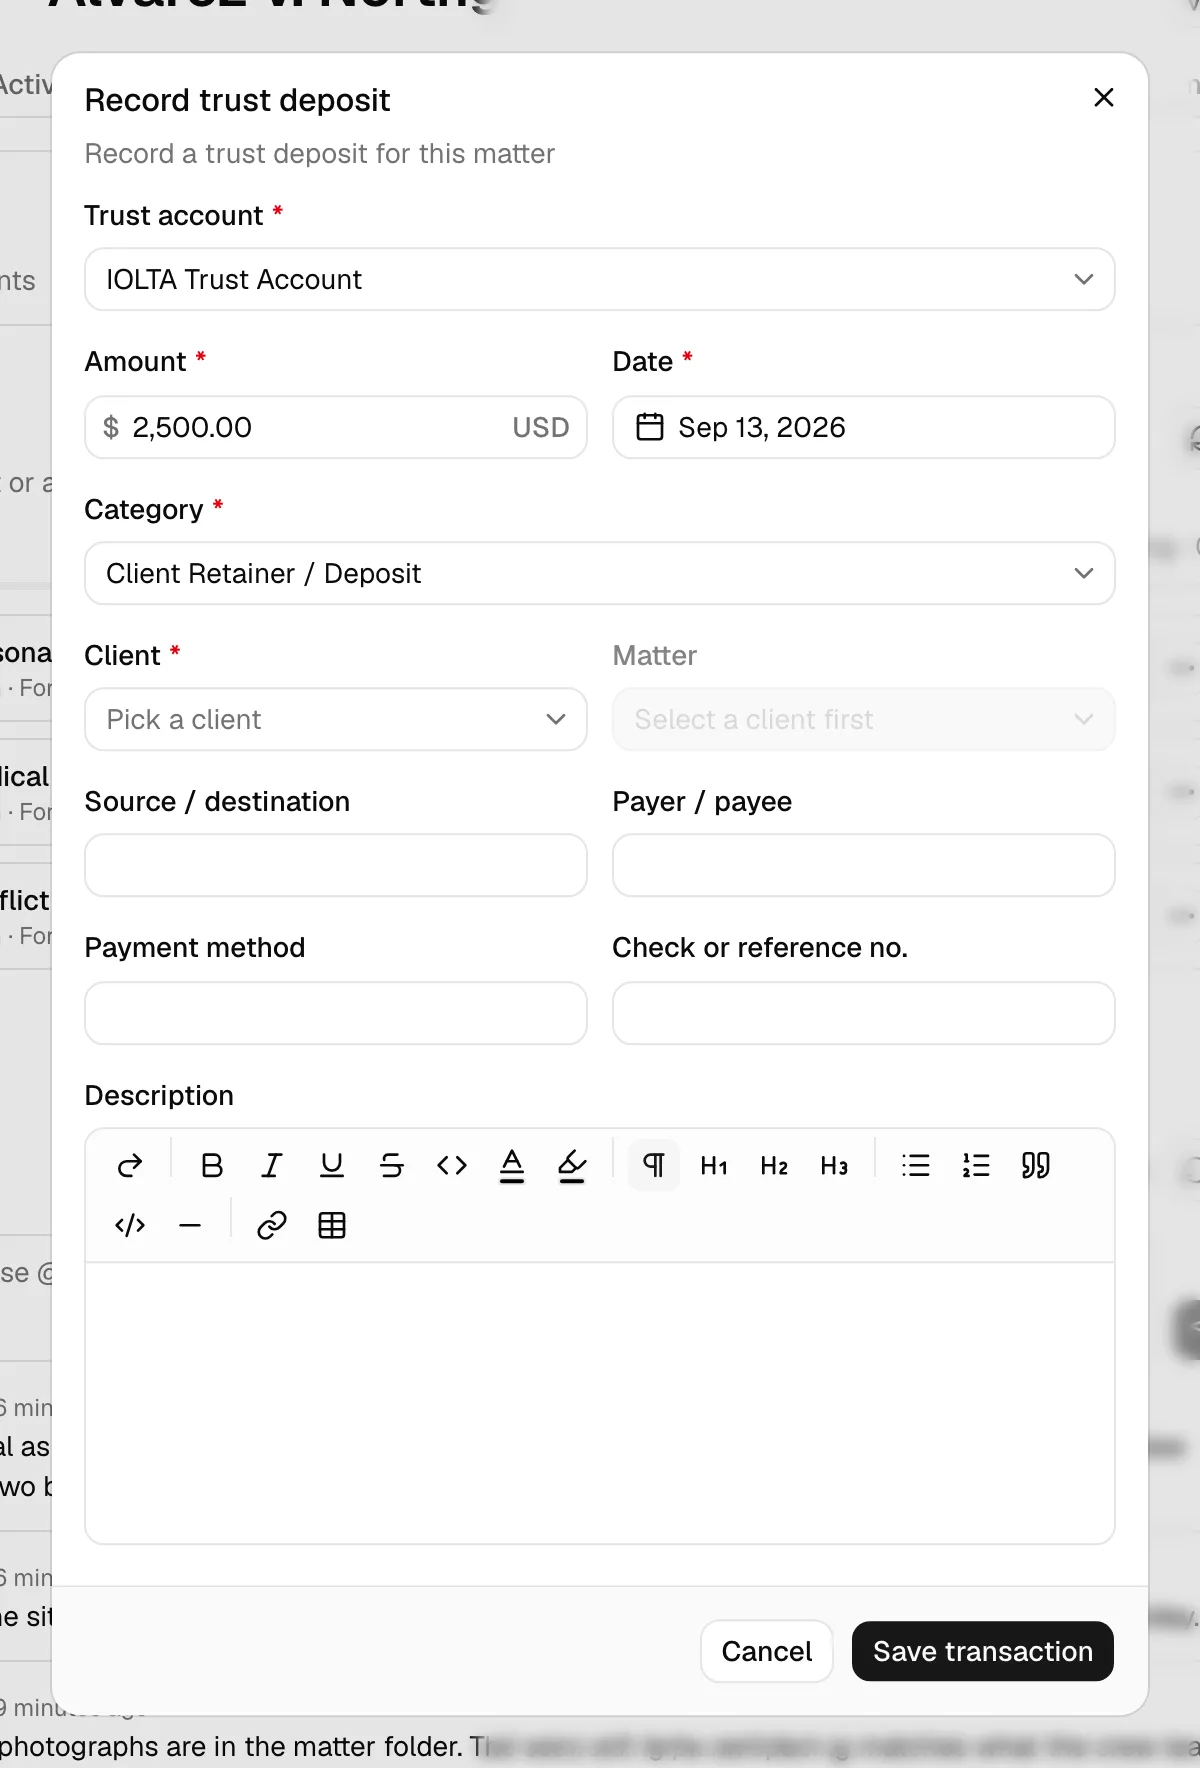
Record trust deposit
Use Record trust deposit to log money received into trust for this matter (for example, a retainer paid up front). A retainer is an advance payment held in trust until you earn it.
- In the header, click Record trust deposit. (This button appears only if your role includes Create access for transactions.)
- The Record trust deposit dialog opens, already pointed at this matter and pre-set to a client-retainer deposit.
- Pick the Trust account that receives the money. This is the first field in the dialog. Only trust-type accounts (Trust Account, IOLTA, Client Trust Account, and Escrow) are listed, so a deposit here can never land in your operating account by mistake. If your firm keeps only one trust account, it is already chosen for you.
- Enter the amount and date, confirm the client and the category, and add any optional details.
- Click Save transaction. The deposit appears on the Transactions tab and updates the Trust balance card on the Overview tab.
For the fuller flow and how trust accounting works, see Accounts, trust, and transactions.
Note: If your firm has no trust account yet, the dialog does not show the form. It shows a short notice titled "No trust account yet", explaining that trust deposits are recorded against a Trust or IOLTA account. Click Go to accounts to add one, then come back and record the deposit. Adding an account needs Create access for accounts, so ask your firm owner or administrator if you do not have it.
Edit
Click Edit to change the matter's details. This opens the matter in the editing wizard, where you can update its title, description, clients, related contacts, practice area and type, dates, assignees, billing, and more, step by step. See Creating a matter for the wizard, which is the same flow used here in edit mode.
Note: The Edit button appears only if your role includes Update access for matters.
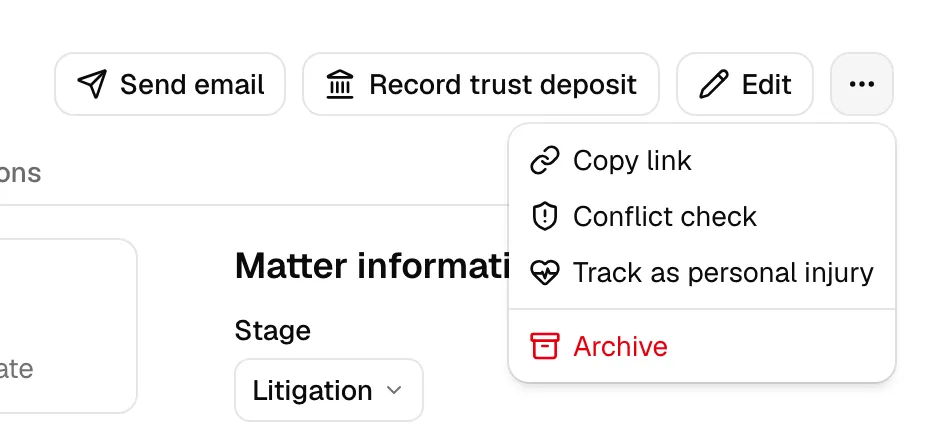
Copy link
The More actions button (the "..." icon) holds Copy link. Click it to copy a direct link to this matter to your clipboard, so you can paste it into a chat or email for a colleague. You will see a confirmation when the link is copied.
Conflict check
The same More actions menu holds Conflict check, for members whose role can view matters. It opens a dialog that screens this matter's clients and related parties against the rest of your firm's records, and the screening starts on its own. The matter itself is excluded, so it never flags itself.
Under the results is a Previous conflict checks list showing every screening already run for this matter: when it ran, who ran it, which parties it covered, and how many matches it found. Conflict checks also appear in the matter's activity timeline on the Overview tab.
Run it again when a new party joins the matter or when a client's circumstances change. See Running a conflict check.
Track as personal injury
The More actions menu also holds Track as personal injury, below Conflict check. Click it to turn the matter into a personal injury case: the four extra tabs appear straight away, and you will see a short Matter tracked as personal injury confirmation. There is no confirmation step to click through.
Tracking a matter adds the injury case record and changes nothing else about the matter. The case starts with a type of Other, liability Unknown, and the settlement defaults set under Settings > Personal injury, all of which you can change on the Medical tab.
Note: Track as personal injury appears only if your role includes Create access for Personal injury, and only while the matter is open and not already tracked. There is no matching "untrack" action: to stop working a case, use Close case on the Medical tab instead. See Personal injury overview.
Managing workflow items on a matter
The Workflow section sits in the middle of the Overview tab. A "workflow" is a checklist of steps for moving the matter forward (sending an email, scheduling an event, creating tasks, drafting an invoice, advancing the stage, and so on). On a matter, those steps appear as a list of items you can check off, reorder, and act on.
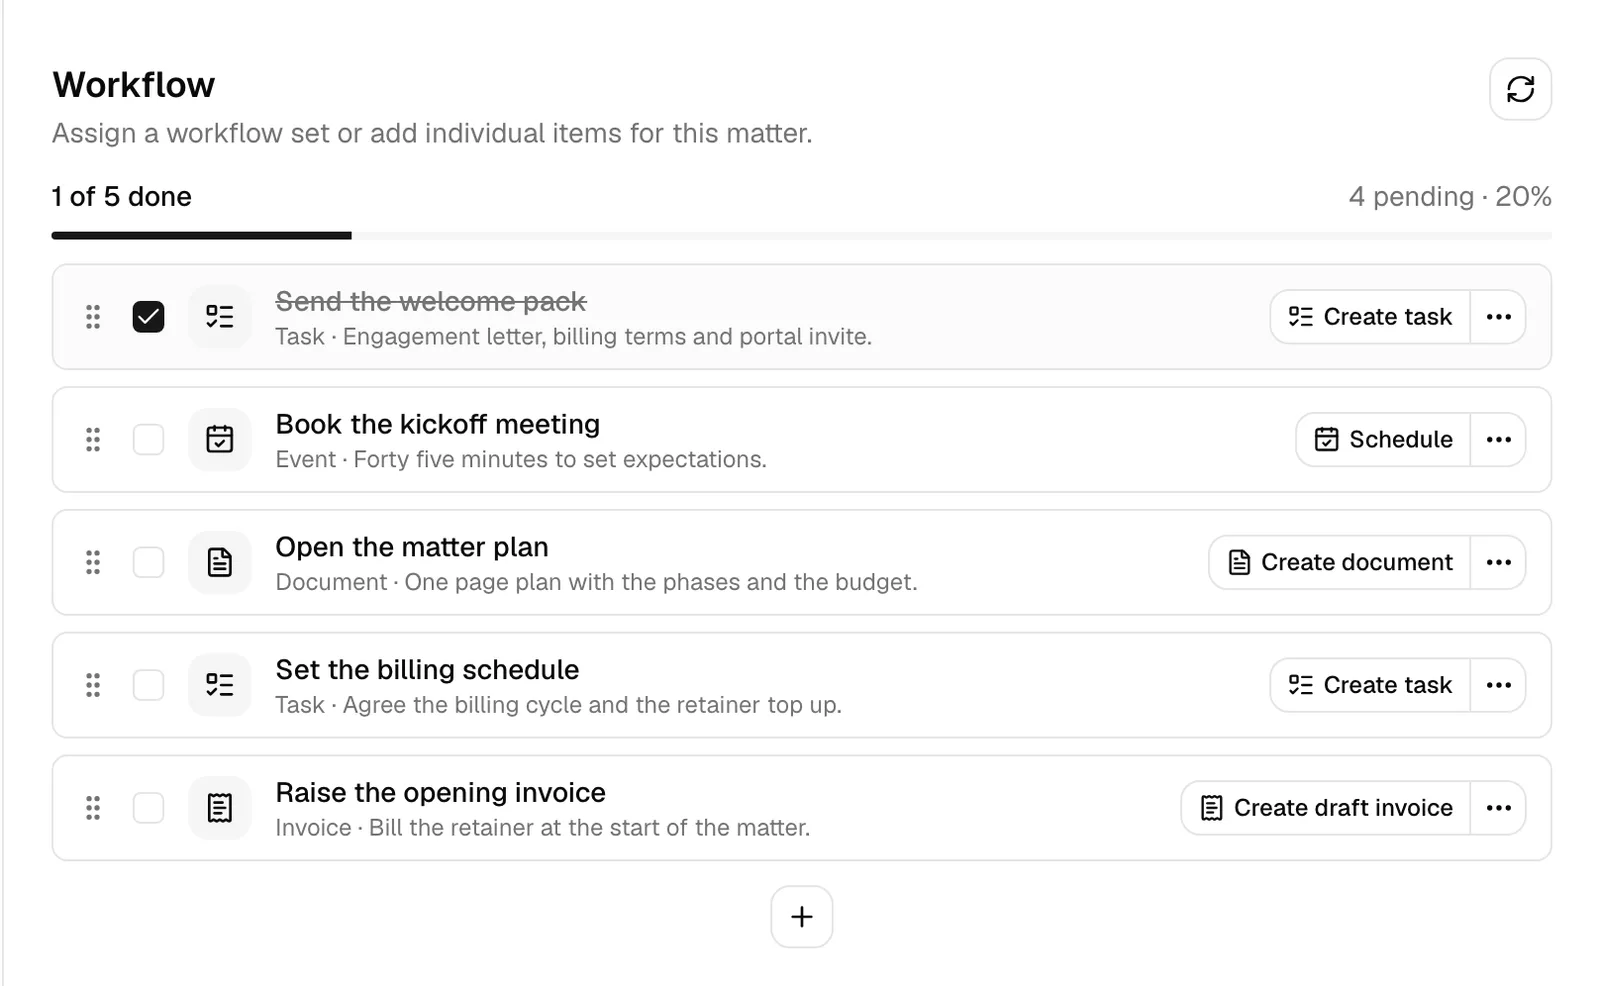
At the top of the section, a progress bar shows how many items are done out of the total (for example, "3 of 7 done" with "4 pending · 43%"). The refresh button reloads the list.
Note: Adding, completing, reordering, and removing workflow items all require Update access for workflows. Without it you can still see the items and open any records they are linked to, but the editing controls are hidden.
Adding workflow items
If the matter has no items yet, you will see a short empty state with two buttons. If it already has items, use the + button below the list, which offers the same two choices:
- Add workflow copies all the steps from a saved workflow onto this matter at once. In the Assign workflow set dialog, pick a workflow from the Workflow dropdown and click Import workflow. The steps are added and you can edit them afterward. (Only active workflows appear; if you have none, the dialog tells you to create one first under Workflows.)
- Workflow item adds a single step. In the Add workflow item dialog, pick the item type (such as Email, Task, Task list, Form, Event, Document, Invoice, or Status change), configure its details, and click Add to matter.
See Workflows and the builder and Workflow step types for how workflows are built.
Completing and uncompleting an item
Each item has a checkbox on the left.
- To complete an item, tick its checkbox. If the item has an action it has not run yet (for example, an Email that hasn't been sent or a Task that hasn't been created), Esqase asks whether to run the action first: choose Apply and mark done to do both, or Just mark done to only check it off. Completed items are struck through and shaded.
- To reopen an item, untick its checkbox. The item is marked not done again.
Some item types also have a direct action button next to them, for example Send on an email item, Create task on a task item, Create document on a document item, Create draft invoice on an invoice item, or Advance on a status-change item. Using the action runs that step and, where it makes sense, links the resulting record back to the item. The Advance button moves the matter to the next stage in its pipeline right away, with no confirmation to click through; if the matter is already at the final stage, nothing moves and the step is simply marked done.
Linking and unlinking records
Many items connect to a real record they create, a task, an event, a form submission, an invoice, or a document. When an item is linked, you will see a button to open that record (for example, View task, View invoice, or View document).
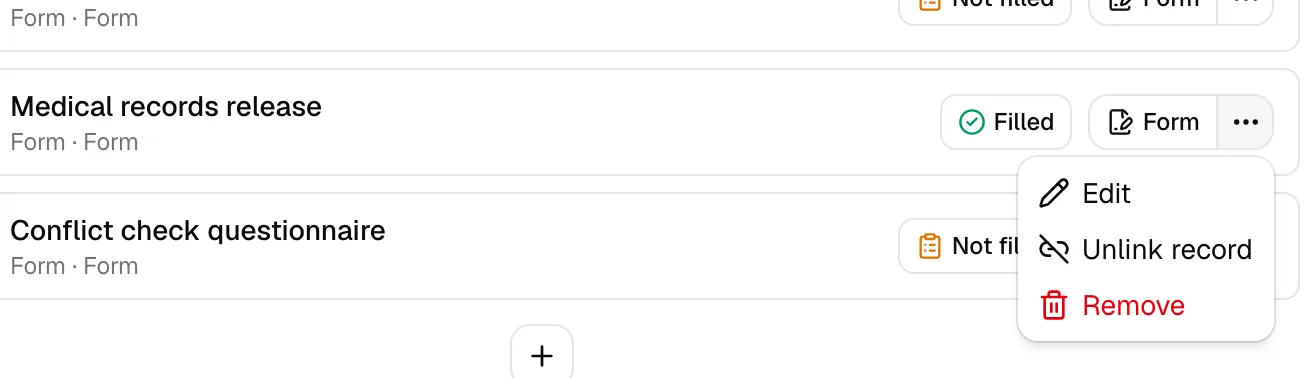
- To unlink a record from an item, open the item's "..." menu and choose Unlink record. The record itself stays; only the connection is removed.
- For event items, the scheduling menu offers its own unlink and delete choices; unlinking an event reverts the item to to-do so you can schedule again.
Sorting items
If you have update access, each item shows a drag handle on the left. Drag an item up or down to reorder the list. The new order is saved automatically.
Editing or removing an item
Open an item's "..." menu (the "More actions" button) to:
- Edit the item's configuration. (Editing is unavailable once an item is marked done.)
- Remove the item. Removing offers, where applicable, to also delete the record it created (its task, event, form, invoice, or document). A confirmation dialog lets you choose.
Comment on a matter
Every matter has its own discussion thread on the Overview tab, the same chat-style feed used on contacts, leads, tasks, documents, and invoices. Use it for case strategy notes, a question for the responsible attorney, or a handover summary that belongs with the case rather than in email.
- Open the matter and scroll to the Comments section on the Overview tab, which sits between the workflow checklist and Recent activities. A count next to the heading shows how many comments the matter has.
- Type your note in the Write a comment... use @ to mention box.
- Click the send button (or press Enter) to post. A Comment posted confirmation appears, and your comment shows in the list with your name and how long ago you posted it.
If there are no comments yet, the feed reads No comments yet. Start the discussion.
What you can do with a comment:
- Mention a colleague: type @ to bring up your firm's members, each with their profile photo (or initials), keep typing to search, and click the person you want. Their name is highlighted in the posted comment and they are notified.
- React: hover a comment, click the add reaction (smiley) button, and pick one of 👍, ❤️, 😂, 😮, 😢, or 🙏. Reactions gather into counters beneath the comment; click a counter to add or remove your own.
- Reply: hover a comment and click the reply button. A Replying to banner naming the author appears above the box, and the posted reply carries a short quote of the comment you answered.
- Edit or delete your own: hover a comment you wrote and use the edit (pencil) or delete (trash) button. An edited comment shows an edited marker next to its time; deleting asks you to confirm and removes it for everyone.
- Read older comments: the feed shows the 20 newest comments first, with Page 1 of N and back/next buttons beneath it. Use those to walk back through a long discussion. The refresh control on the Comments heading pulls the conversation by hand at any time.
The feed updates on its own while you have the matter open, so a colleague's comment, edit, deletion, or reaction appears without a refresh.
Commenting on a matter notifies the person who created it, everyone on the matter's team, and anyone who has already commented; anyone you @mention is notified too. You control those under Settings > Notifications (the Comment on my matter and Mentioned in a matter comment events). See Notifications.
Matter comments are part of the case record: posting, editing, and deleting one is logged on the matter's own timeline, described next.
Note: You need Update access for matters to post, reply, react, edit, or delete. With View access only, you can read the conversation but the comment box and those actions are hidden.
The matter activity timeline
At the bottom of the Overview tab, the Recent activities timeline is the matter's history: a dated, ordered list of everything that has happened on the case. It is not limited to the matter record itself. The timeline gathers the whole matter, so you do not have to open each task, invoice, or document to find out what changed on it.
What the timeline covers
Alongside the matter record, the timeline picks up the work filed under it:
- The matter: created, edited, moved between stages, archived, or restored, plus clients and related contacts added or removed, assignees changed, and billing changes.
- Tasks: created, edited, re-prioritized, moved to another stage, assigned, commented on, archived, or restored, along with changes to the matter's task stage columns.
- Notes added to the matter.
- Events, their guests, and the scheduling requests and proposed times exchanged with a client.
- Communications: logged phone calls, and emails you send, draft, or receive as a reply.
- Time and expenses recorded on the matter, including starting and pausing the timer.
- Invoices, along with their line items, payment links, and installment plans.
- Payments and their attachments, including a payment the client makes through a payment link you sent them.
- Trust and operating transactions recorded against the matter.
- Documents in the matter's document folder: files and folders created, renamed, moved, re-versioned, commented on, or tagged, plus document shares and requests for signature and their signers.
- Form submissions filed on the matter, its workflow items, and the lead the matter was converted from.
Only work filed under this matter appears. A task raised on a lead, or a note kept on a contact, is not part of this matter's history. Each individual record also keeps its own Recent activities timeline, so you can still open a single task, invoice, or document to read its history on its own.
Reading and filtering the timeline
- The list shows the most recent entries first, ten at a time, with Page controls at the bottom to move through older entries.
- Each entry names the record it is about, so a feed that mixes tasks, invoices, and documents stays readable without opening every line. A task entry reads Task stage updated · TSK-0012 Draft complaint · Stage: In progress → Done. Where a record carries an ID of its own (a task, a matter, an invoice, or a lead), the entry shows that ID beside the name. Work filed under one of those records is named the same way, so adding a line to an invoice reads Invoice item added · INV-00042 · Legal research, and putting someone on a task reads Jane Doe assigned to task · TSK-0012 Draft complaint.
- An edit says what it changed. One or two fields are shown with their old and new values; three or more are listed by name, for example Activity updated · Client consultation · Quantity, Rate, Total updated.
- Each entry also shows who did it and when. Click an entry to open its details, including the previous and new value of anything that changed.
- The refresh button reloads the timeline.
- The filter button (the funnel icon) opens a small Filters menu with Show view activity. By default, simple "viewed" events are hidden to keep the timeline focused on real changes. Turn this on to also show who opened the matter and who opened the records under it, for example a document previewed, a task or invoice opened, or a signing link viewed.
Note: The timeline follows your role. If your role does not include View access for invoices, payments, documents, or tasks, entries about those records are left out of your feed altogether. Two colleagues looking at the same matter can therefore see a different amount of history.
This history is part of how Esqase keeps a complete, tamper-evident record of activity for compliance. For the bigger picture across your firm, see Activity timelines and audit logs.
Common questions
Why don't I see the Edit or Record trust deposit button? Those buttons appear only if your role grants the matching permission (Update access for matters, and Create access for transactions, respectively). Ask a firm owner or administrator to adjust your role if you need them. See Roles and permissions.
The Record trust deposit dialog says "No trust account yet". What now? Trust deposits are always recorded against a trust account, so there is nothing to deposit into until your firm has one. Click Go to accounts, add a Trust Account, IOLTA, Client Trust Account, or Escrow account, then reopen the dialog. See Accounts, trust, and transactions.
Why can't I click the Trust balance card? The card links to an account only once your firm has a trust account. Before that, clicking it opens the same "No trust account yet" message with a Go to accounts button.
The matter's name at the top is cut off. How do I read the whole thing? The header keeps the number and title on one line so the action buttons always stay in reach, and cuts off anything that does not fit with "...". Point at the title and click the chevron that appears at the end of it to expand the full name over several lines. Click the chevron again to collapse it.
Why is the sidebar missing? The sidebar shows only on the Overview tab. Switch back to Overview and it returns on the right.
I changed the stage but the matter didn't move on the kanban. Why? Changing the Stage dropdown moves the matter to the chosen stage immediately and records it in the timeline. If the board looks stale, refresh the matters list. See Browsing matters.
A workflow item won't let me edit it. Editing is disabled once an item is marked done. Untick its checkbox to reopen it, then edit.
A colleague sees timeline entries I don't. Why? The Recent activities timeline only shows you entries for record types your role can view. If your role has no View access for invoices, payments, documents, or tasks, those entries are left out for you. See Roles and permissions.
Someone opened a document on this matter but I see nothing in the timeline. Simple "viewed" events are hidden by default, for the matter and for everything under it. Open the filter menu and turn on Show view activity to include them.