Available lang sa Ingles ang dokumentasyon ng produkto.
Task lists and templates
A task list is a reusable bundle of pre-written tasks (a template) that you build once and clone onto a matter when you open it. Instead of typing the same checklist for every new personal-injury case or estate plan, you set it up here, including each task's priority, assignees, sub-tasks, and a scheduling rule that turns the matter's open date into real start and due dates. This keeps your team's process consistent and saves you from re-creating the same work item by item.
Note: "Task list" and "task template" describe the same thing. The list is the named container (for example, Onboarding tasks), and the tasks inside it are templates because they have not been attached to a real matter yet.
Before you begin
- Task lists live in firm settings, not on any single matter. The tasks inside them are blueprints, not live work. Nothing happens to a real matter until you apply a list to it, either while creating the matter or later from the matter's Tasks tab.
- Your role controls what you can do here. The page checks for Task list access:
- View lets you open the Task lists page and a list's detail page.
- Create lets you add a list and add tasks to it.
- Update lets you edit, archive, and restore lists and tasks.
- Delete lets you permanently remove archived lists and tasks.
- Firm owners always have full access. If your role does not include View for task lists, you will see a "no access" message instead of the page.
- Task types and members referenced inside templates come from elsewhere in the app. To use a task type in the Task type field, create it first (see Task kanban, stages, and types).
What a task list (template) is
A task list is a saved checklist you reuse across matters. Each list has a Name and a Status, and contains one or more task templates. Each task template carries the same details a real task does:
- Title and a rich-text Description.
- A Task type label and Story points (an optional effort estimate).
- A Priority (Lowest, Low, Medium, High, or Highest).
- Default Assignees (firm members or contacts).
- A Private flag, so only assignees and owners can see the task.
- Optional sub-tasks that break a task into smaller steps.
- Relative date rules for the start date and due date, so the dates compute themselves from the matter's timeline rather than being typed in by hand.
When you apply a task list to a matter, Esqase copies every task in the list onto that matter's task board as a real, working task. You can do this while creating the matter, or at any time afterwards from the matter's Tasks tab. Either way, the blueprint stays untouched and ready for the next matter.
Create and manage a task list
You manage task lists from the Task lists page.
- In the sidebar, click Tasks.
- On the Tasks page, click Manage task list in the top right. This opens the Task lists page. (You can also reach it from the Tasks breadcrumb on related pages.)
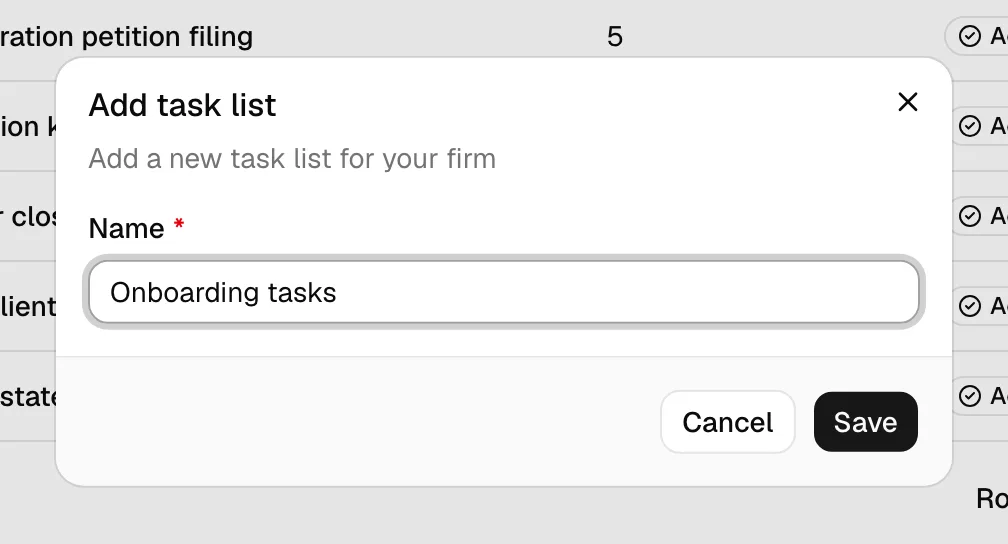
- Click Add task list in the top right. The Add task list dialog opens.
- In the Name field, type a short, descriptive name (for example,
Onboarding tasksorDiscovery checklist). The name is required and can be up to 64 characters. - Click the save button. Esqase shows a "Task list created" confirmation and takes you straight to the new list's detail page, where you add tasks.
Tip: Name your lists after the situation they apply to (a practice area, a matter stage, or a recurring process) so the right one is easy to spot when you create a matter.
The task list table
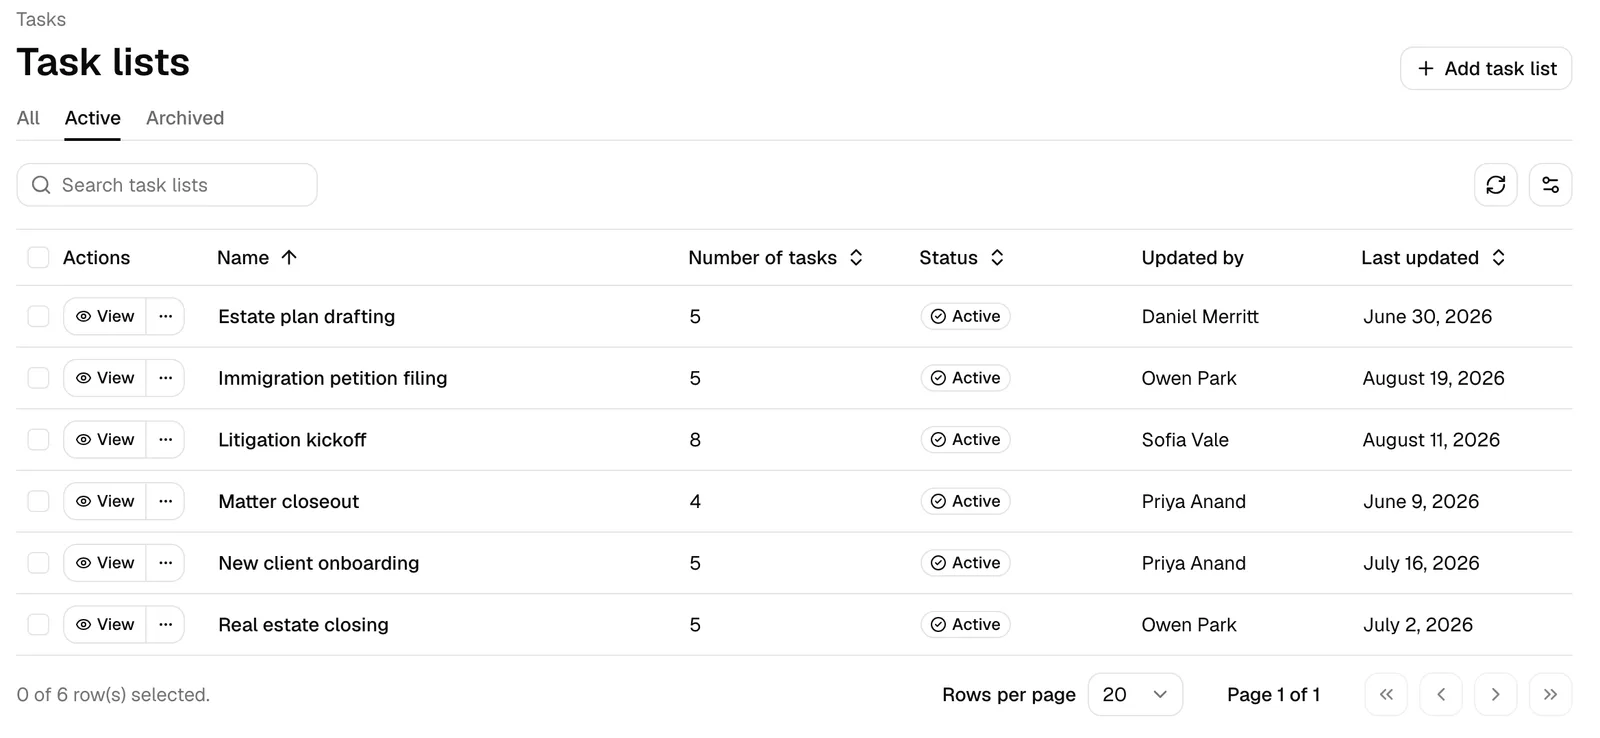
The Task lists table gives you the tools to find and manage your lists:
- Status tabs at the top: All, Active, and Archived. The table opens on Active.
- A Search task lists box to filter by name.
- Sortable columns for Name, Number of tasks, Status, Updated by, and Last updated.
- A checkbox on each row for selecting several lists at once, plus a batch action bar that appears when rows are selected (covered under archive, delete, and restore below).
Rename or edit a task list
- On the Task lists page, click a list's Name (or use its row actions) to open the list's detail page.
- Click Edit in the top right. The edit dialog opens with the current Name.
- Change the Name, then save. Esqase confirms with "Task list updated".
Add task templates and sub-task templates
You add tasks from inside a list's detail page. Adding a task happens in two quick parts: name it, then fill in the details.
Add a top-level task
- Open the task list from the Task lists page.
- In the Tasks table on the detail page, click Add task. The Add task dialog opens.
- In the Title field, type the task name (for example,
Draft initial complaint). The title is required (up to 255 characters). - Click Continue. Esqase creates the task and immediately opens the full task editor so you can flesh it out.
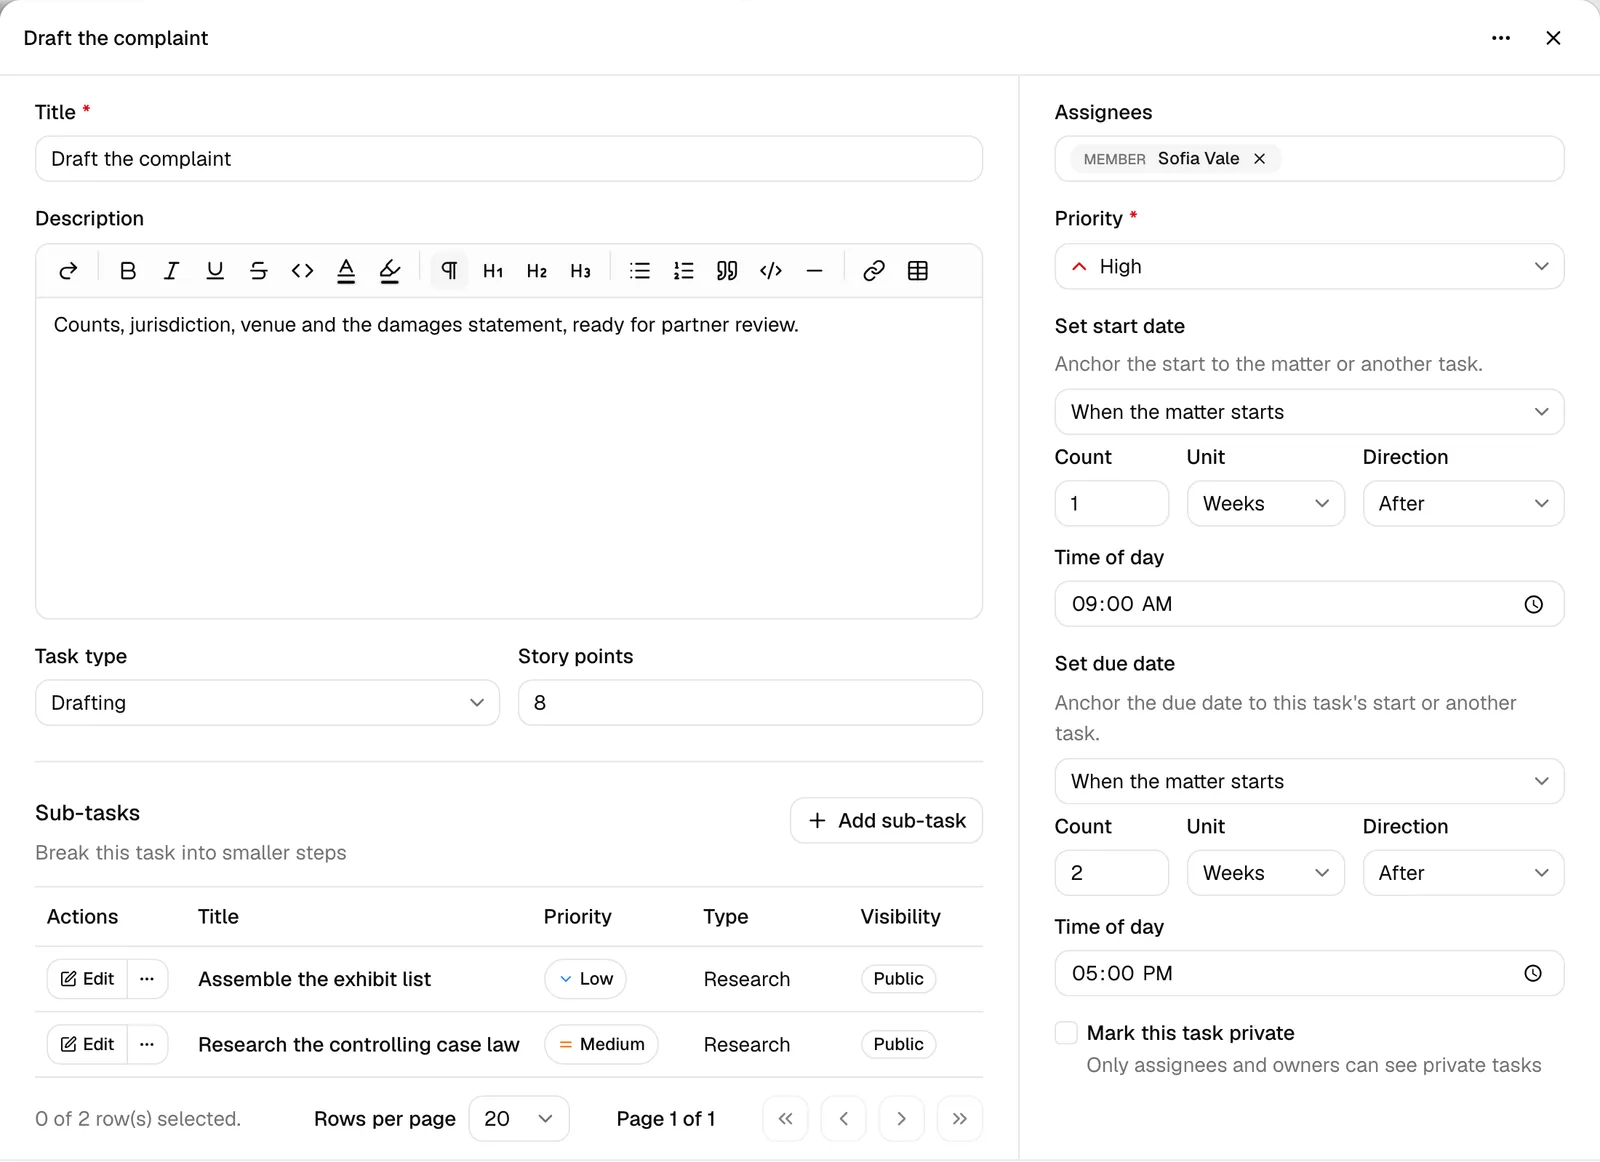
- In the editor, fill in any of these (all optional except where noted):
- Description (rich text).
- Task type (choose from your active task types).
- Story points (a number, 0 or higher).
- Assignees (members or contacts; see below).
- Priority (required; defaults to Medium).
- Set start date and Set due date scheduling rules (see the next section).
- Mark this task private to hide it from everyone except its assignees and owners.
- Click Save. Esqase confirms with "Task updated".
Note: You can reopen and change any of these later. Click the task's title in the table, or use the Edit button on its row, to reopen the editor.
Add a sub-task
Sub-tasks break a task into smaller steps. They live under a top-level task and are cloned onto the matter alongside their parent.
There are two places to add a sub-task, and each one leaves you somewhere different once the sub-task is named.
From the Tasks table
- In the Tasks table on the list's detail page, find the top-level task and open its ... (more actions) menu.
- Click Add sub-task. The Add sub-task dialog opens.
- Type the Title and click Add sub-task. Esqase confirms with "Sub-task created" and opens the sub-task editor so you can add its details.
- Fill in the sub-task's fields the same way you would a top-level task, then click Save.
From inside the parent task's editor
- Open the top-level task's editor by clicking its title, or by clicking Edit on its row.
- Scroll to the Sub-tasks section and click Add sub-task. The Add sub-task dialog opens.
- Type the Title and click Add sub-task. Esqase confirms with "Sub-task created", the small dialog closes, and the new sub-task appears as a row in the Sub-tasks table. The sub-task editor does not open on its own here, so the task you were editing stays open and keeps anything you have already filled in.
- To add the sub-task's details, click Edit on its row in the Sub-tasks table, fill in its fields, then click Save. You return to the parent task's editor when you are done.
Tip: Use the editor route when you want to sketch out several sub-tasks quickly: name them one after another, then go back and fill in the details of each one.
Important: Sub-tasks attach to top-level tasks only. You cannot nest a sub-task under another sub-task. The Add sub-task option appears only on top-level tasks.
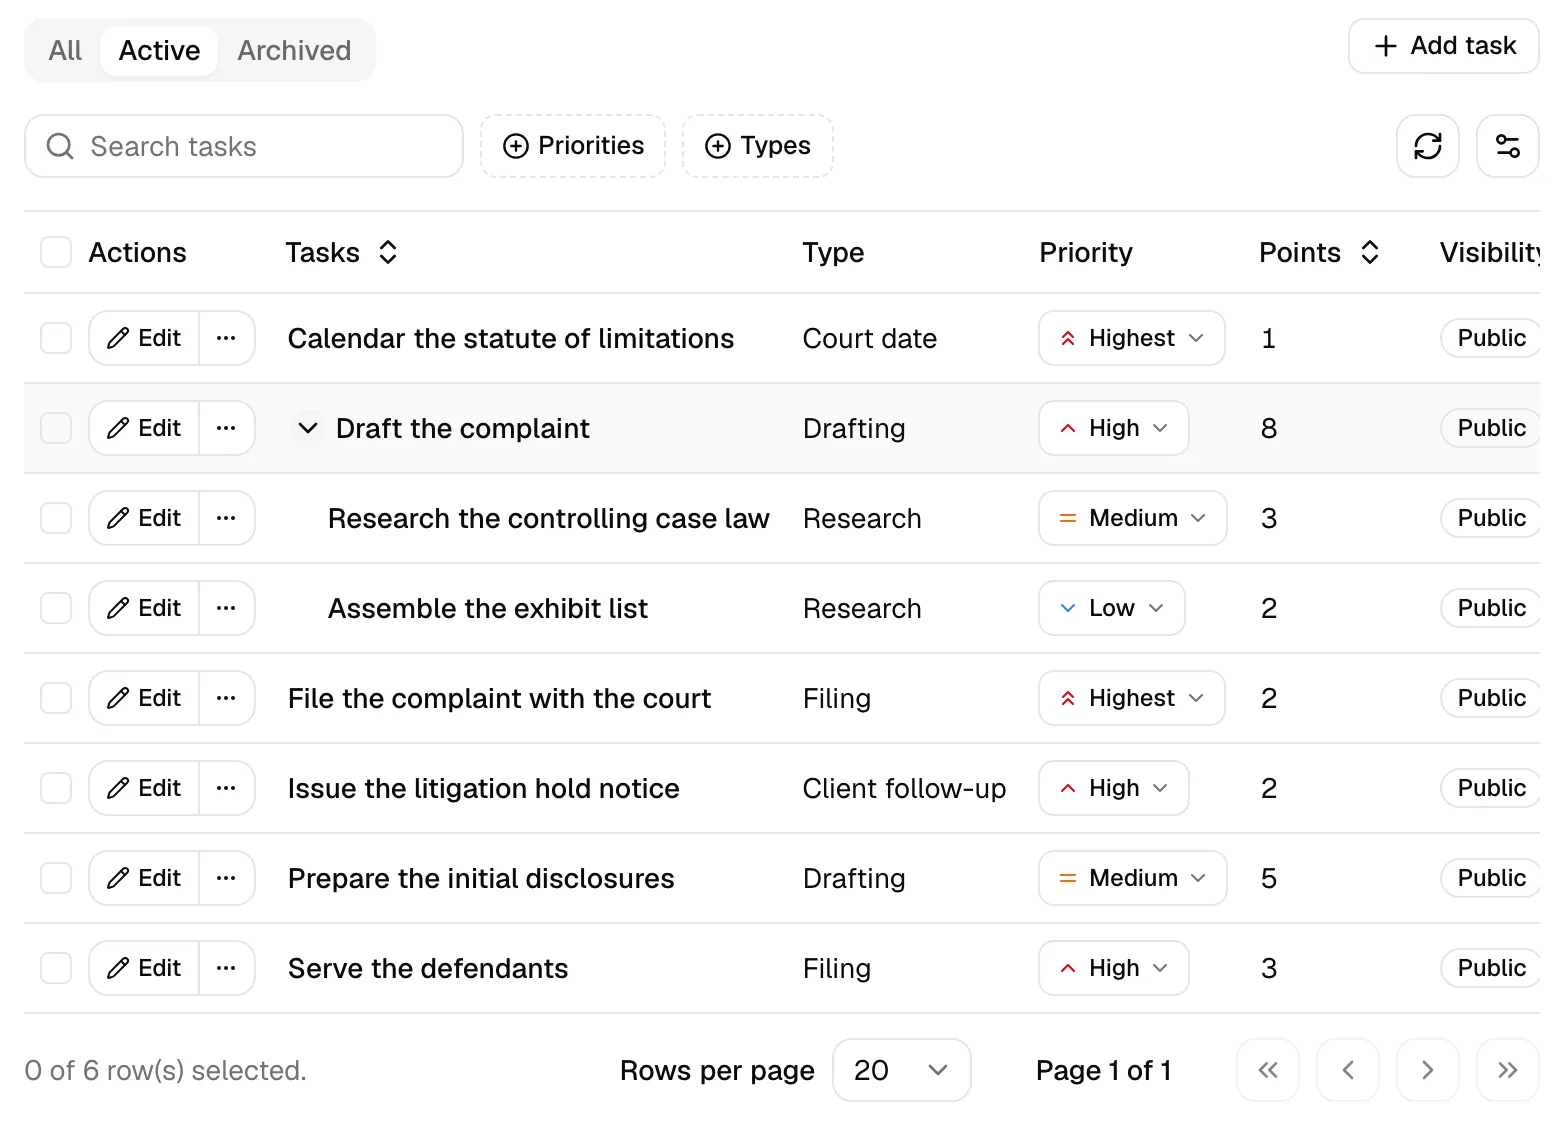
In the Tasks table, a top-level task with sub-tasks shows an expand arrow. Click it to show or hide its sub-tasks.
Working with the Tasks table
The Tasks table on a list's detail page mirrors the way you work with real tasks:
- Status tabs: All, Active, and Archived (opens on Active).
- A Search tasks box, plus Priority and Type filters.
- Columns for Tasks (the title), Type, Priority, Points, Visibility (Public or Private), Assignees, Start date, and Due date.
- The Start date and Due date columns show the rule in plain language, such as
Matter start,3d from matter start, or2w from Draft complaint. A dash (-) means the task has no scheduled date. - You can change a task's Priority straight from its cell without opening the editor: click the priority dropdown on the row and pick a new level. It saves immediately, with a Priority updated confirmation. If your role is view-only, the priority shows as a plain badge you cannot change.
Configure relative date rules on task templates
Because a template is not attached to a real matter yet, you do not type concrete dates. Instead, you describe how each date should be calculated. When the list is cloned onto a matter, Esqase resolves those rules into real dates using the matter's open date.
You set this in the task editor using two controls: Set start date and Set due date. Each one starts with a "Choose how to schedule" menu that offers these options:
- Not scheduled: the task has no date of this kind. This is the default for templates.
- When the matter starts: anchor the date to the matter's open date, plus or minus an offset.
- Relative to this task's start (due date only): anchor the due date to this same task's start date, plus an offset.
- Relative to another task: anchor the date to a different task in the same list.
Note: There is no "fixed calendar date" option on a template. A specific calendar date only makes sense on a real matter, so you can set one when you edit the live task after the matter is created.
Anchor to the matter start
Use this when a task should begin or be due a set time after the matter opens.
- In Set start date (or Set due date), open the "Choose how to schedule" menu and select When the matter starts.
- Set the Count (a number) and Unit (Days, Weeks, Months, or Years).
- Set the Direction to After or Before.
- Optionally set the Time of day (defaults to 09:00).
For example, Count 3, Unit Days, Direction After means "3 days after the matter opens." A Count of 0 means the same day the matter opens.
Anchor a due date to the task's own start
Use this so a due date always follows the task's own start date, no matter when that start lands.
- In Set due date, open the menu and select Relative to this task's start.
- Set the Count, Unit, Direction, and optional Time of day.
For example, "2 Weeks After" gives the task two weeks to complete once it begins.
Anchor to another task
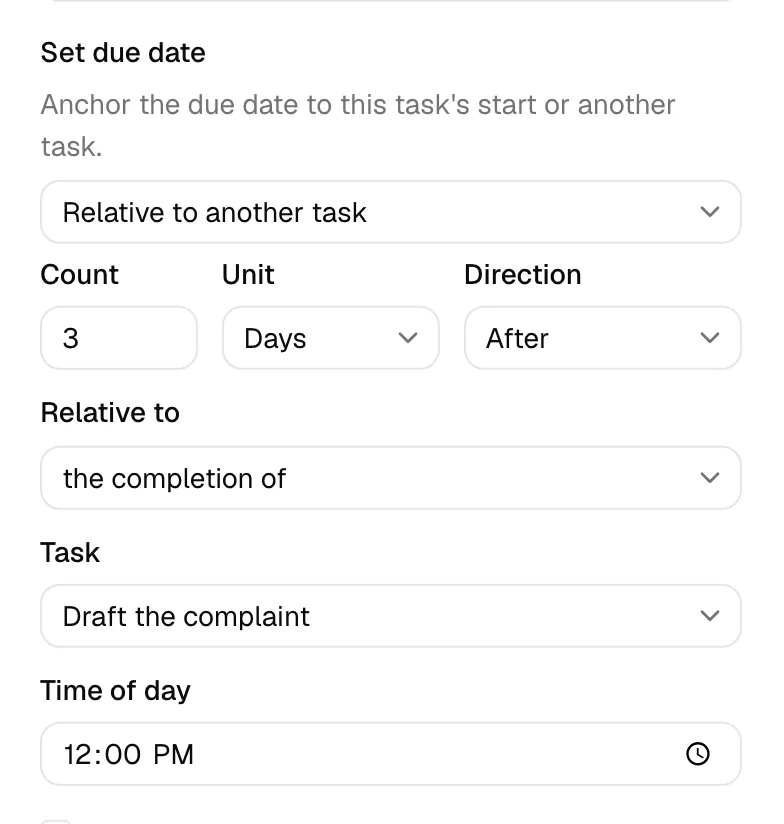
Use this to chain tasks together, so one task's date depends on another's. This is what makes a list behave like a real workflow.
- In Set start date or Set due date, open the menu and select Relative to another task.
- In the Relative to field, choose the start of or the completion of. "The completion of" uses the other task's due date.
- In the Task field, pick the task you want to anchor to (you cannot pick the task you are editing).
- Set the Count, Unit, Direction, and optional Time of day.
For example, you might set "Serve complaint" to start 5 Days After the completion of "Draft complaint." When the dates are calculated on a matter, the two tasks stay correctly spaced even if the matter's timeline shifts.
Important: Avoid creating loops, where Task A depends on Task B and Task B depends back on Task A. Esqase guards against loops by leaving a date blank rather than calculating an impossible value, but the cleaner approach is a straight chain.
How dates appear before cloning
In the Tasks table, the Start date and Due date columns translate your rules into short labels:
-means Not scheduled.Matter startmeans anchored to the matter open date with no offset.3d from matter startmeans three days after the matter opens.2w from Draft complaintmeans two weeks relative to the named task.
Assign default assignees to task templates
You can pre-assign each task so the cloned matter task arrives already routed to the right people.
- Open the task's editor.
- In the right column, find the Assignees field and click into it.
- Search and select one or more entries. Assignees can be firm members or contacts (for example, a client or co-counsel you track as a contact).
- Remove an assignee by clicking the x on its chip.
- Save the task.
When the list is cloned onto a matter, each assignee is copied to the new task, so the work is routed automatically. If an assignee can no longer be matched at clone time, the task is still created; it simply arrives without that assignee.
Tip: Assigning by role or person here means a brand-new matter's checklist is already delegated the moment it is created, with no manual hand-off.
Archive, delete, and restore a task list or its templates
Esqase uses a two-step lifecycle so you never lose work by accident: first Archive (reversible), then Delete (permanent, and only available once archived).
Archive vs. delete
- Archive moves a list or task out of your active view. It is hidden from the default Active tab but stays under Archived, and you can Restore it at any time. Archived lists are not offered when you create a matter.
- Delete permanently removes an item and cannot be undone. You can only delete something that is already archived.
Archive or delete a single task list
From the list's detail page:
- Open the list, then click Edit to confirm you are on the right one, or just use the header actions.
- To archive, open the ... (more actions) menu next to Edit and click Archive. Confirm in the dialog. The list moves to Archived.
- To restore an archived list, open it and click Restore from the ... menu, or use the row action on the Task lists page.
- To delete an archived list, open the ... menu and click Delete, then confirm. This is permanent.
Archive, restore, or delete several task lists at once
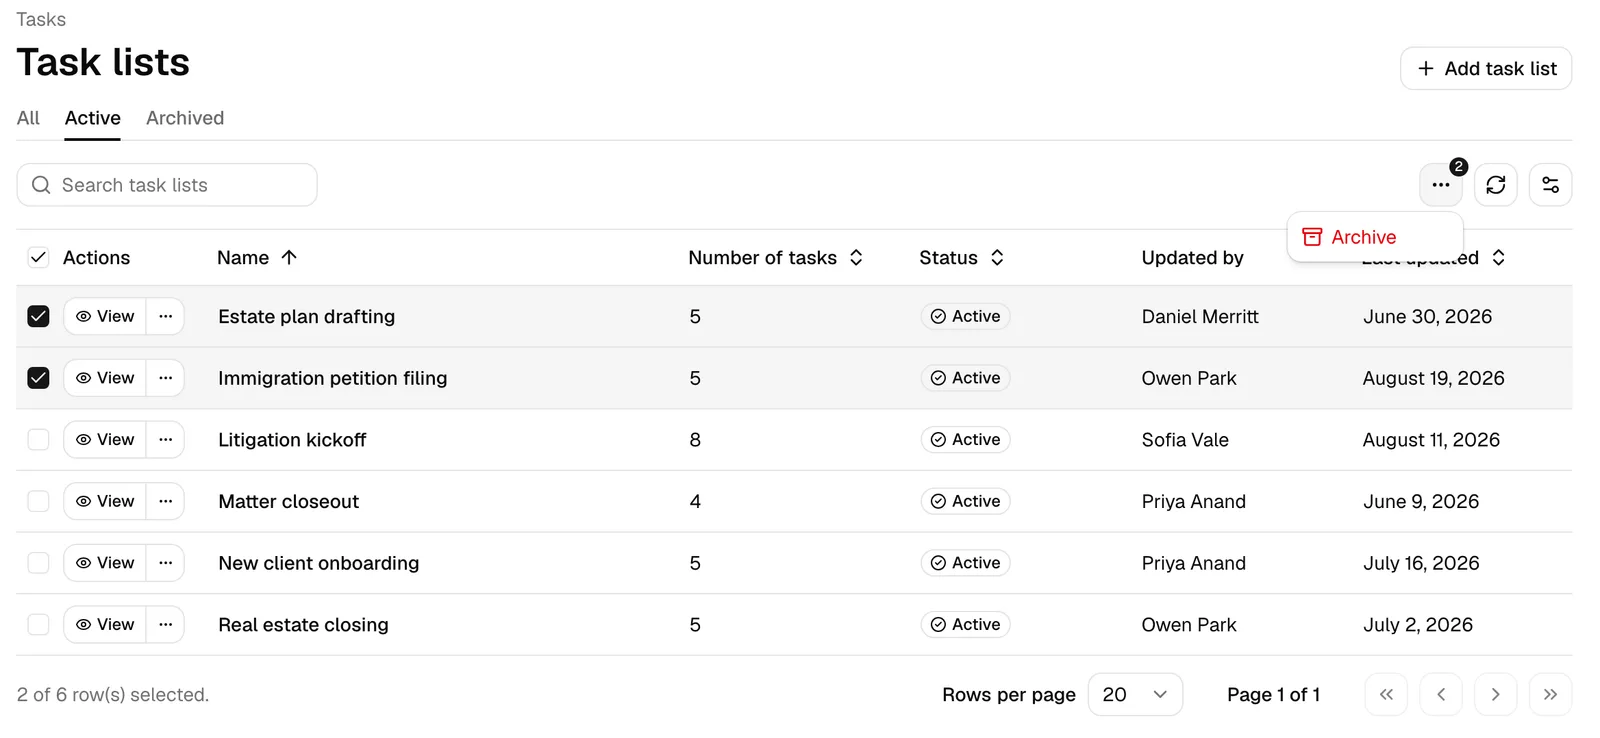
- On the Task lists page, select the checkbox on each list you want to act on.
- A batch action bar appears. Choose Archive, Restore, or Delete.
- Archive is available for Active lists.
- Restore and Delete are available for Archived lists.
- Confirm the action in the dialog. Esqase reports how many lists were affected.
Archive, restore, or delete tasks inside a list
Inside a list's Tasks table you manage the templates the same way:
- Use a task's Edit button and ... menu, or select task checkboxes and use the batch bar.
- Archive hides a task from the Active tab; archived tasks are not cloned onto new matters.
- Restore brings an archived task back.
- Delete permanently removes an archived task.
Important: Deletes are permanent and cannot be undone. When in doubt, archive instead so you can recover the item later.
How task lists clone onto a new matter
Task lists do their real work when you create a matter. The cloning happens in the matter's creation wizard, on the Tasks step.
- Start a new matter (see Creating a matter).
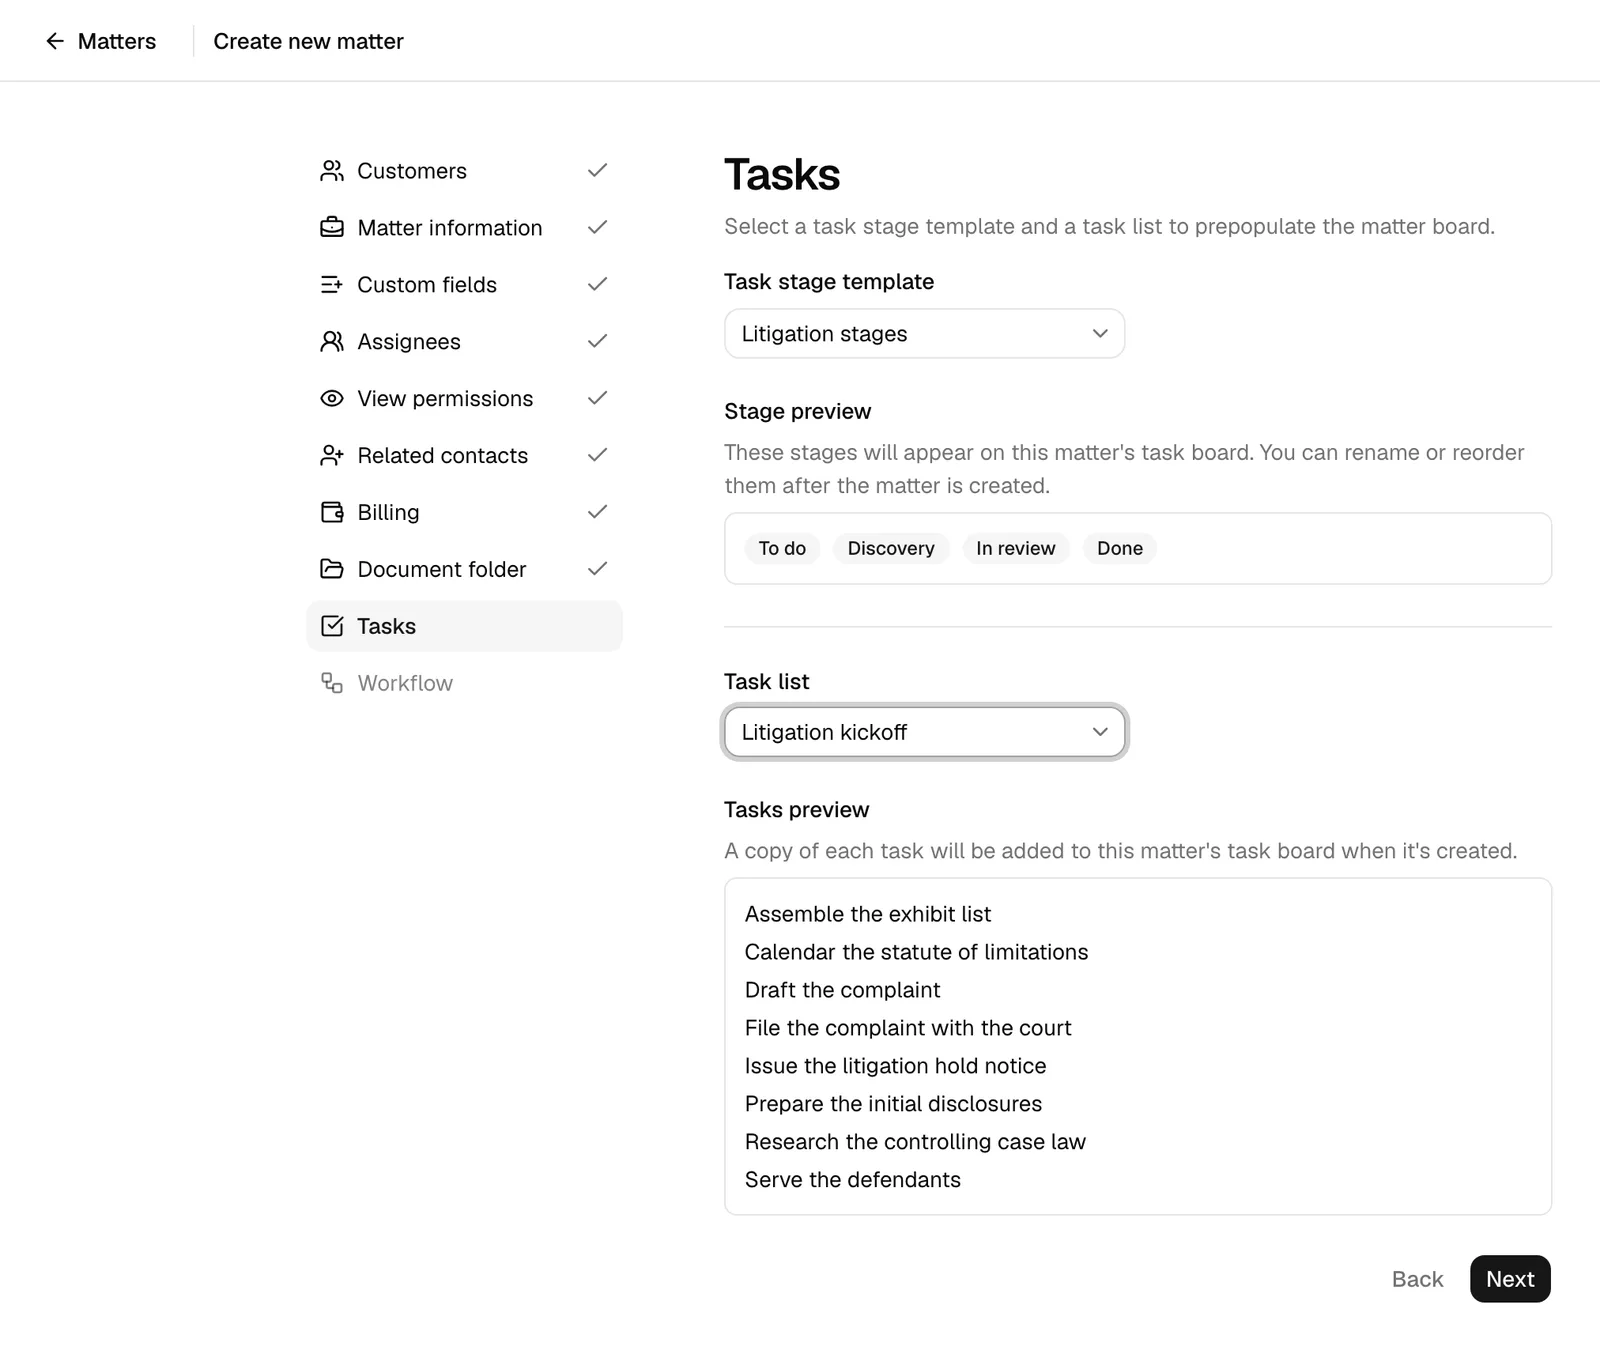
- On the Tasks step of the wizard, you will see two settings:
- Task stage template: chooses the columns (stages) for this matter's task board. Leaving it blank uses the default To do, In progress, and Done columns. A Stage preview shows the columns you will get.
- Task list: chooses which list to copy onto the matter. Leaving it blank (the placeholder reads Don't clone tasks) means no tasks are cloned. A Tasks preview lists exactly which tasks will be copied.
- Finish creating the matter.
When the matter is created, Esqase copies every active task (and its sub-tasks and assignees) from the chosen list onto the matter's task board as real, working tasks. At this point each task's relative date rule is resolved into actual start and due dates using the matter's open date. The original task list is unchanged and ready to reuse.
Note: Only Active tasks in the list are cloned. Archived tasks and archived lists are skipped.
Tip: You are not locked into the choice you make in the wizard. You can copy a list onto the matter later, and as often as you need, from the matter's Tasks tab. See Assign a task list to an existing matter.
Assign a task list to an existing matter
You do not have to decide at creation time. You can copy a task list onto a matter that already exists, straight from the matter's Tasks tab.
This is useful when a case moves into a new phase (discovery opens, a trial date is set), when the matter was created before the right list existed, or when you simply did not pick a list in the wizard.
- Open the matter, then click the Tasks tab. See The matter workspace.
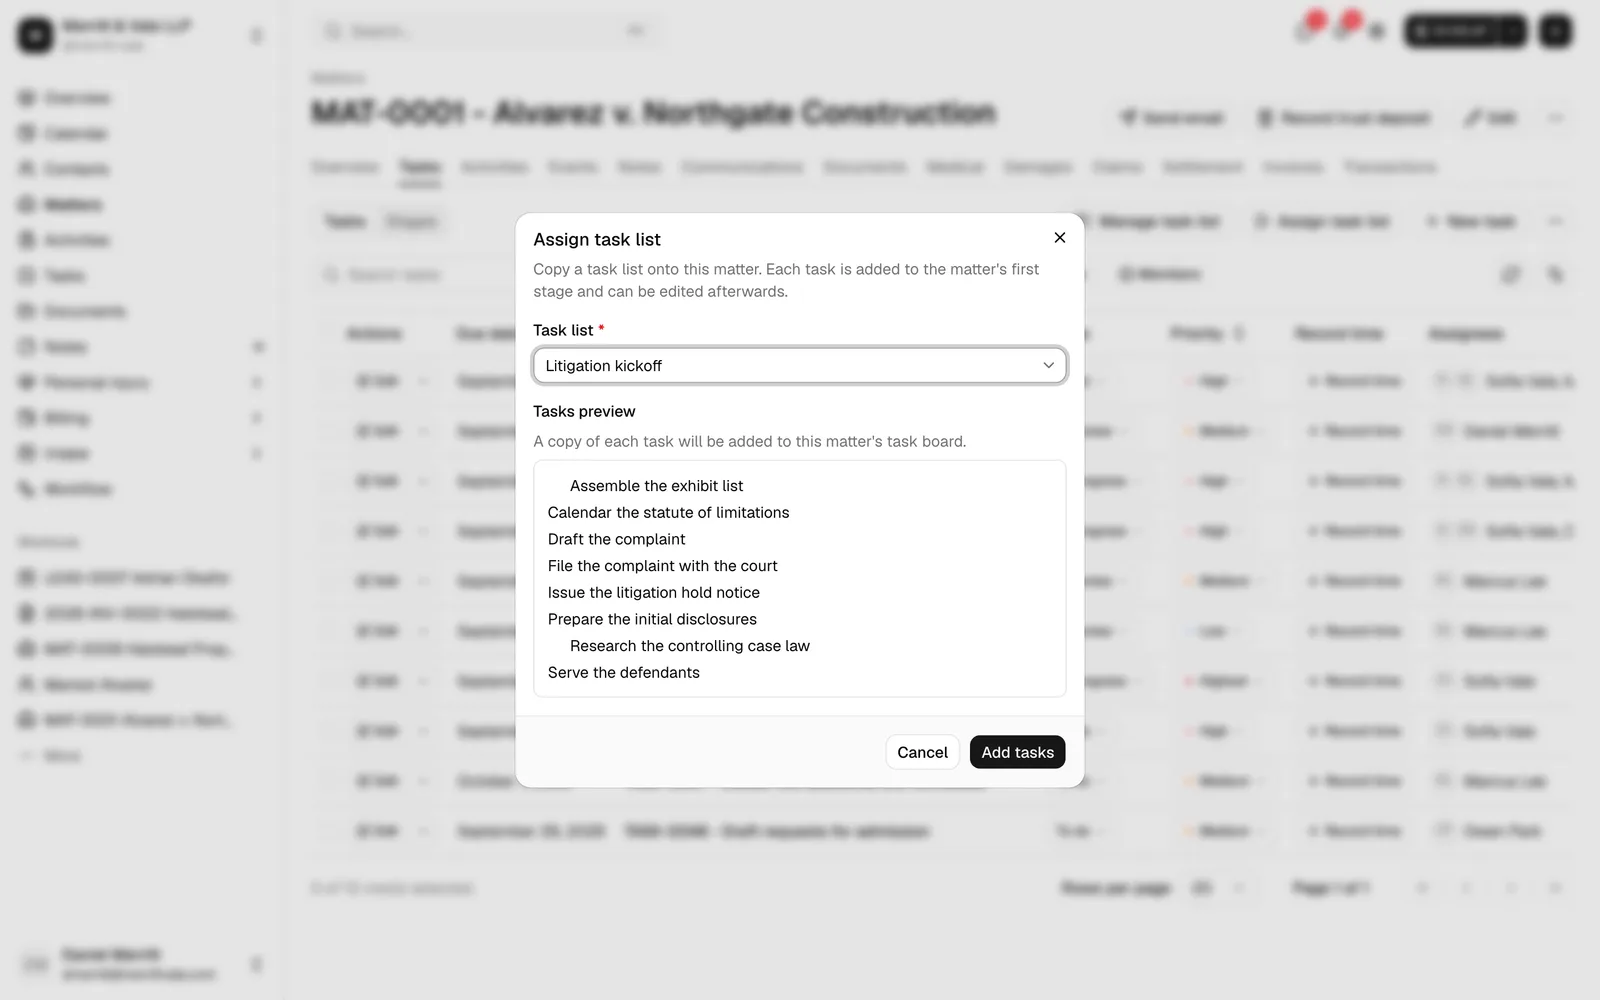
- In the top right of the tab, click Assign task list. The Assign task list dialog opens.
- In the Task list dropdown, choose the list you want to copy. Type to search by name. Only Active lists are offered.
- Read the Tasks preview panel that appears below the dropdown. It lists exactly which tasks will be created, with sub-tasks indented under their parent. Nothing has been added yet, so you can switch to a different list and compare before you commit.
- Click Add tasks, or click Cancel to close without changing anything.
Esqase confirms how many tasks were added ("1 task added" or "5 tasks added"), and the matter's task list and board refresh with the new tasks in place.
Note: The Assign task list button appears only if your role includes Create access for matter tasks, the same permission that controls New task. If you do not see the button, ask a firm owner or administrator to adjust your role. See Roles and permissions.
What gets copied
Each task is copied in full, exactly as it would be at matter creation:
- The Title, Description, Task type, Story points, Priority, and the private setting.
- The task's Assignees (members and contacts), so the work arrives already routed.
- Its sub-tasks, still nested under their parent.
- Its scheduling rules. Dates written as When the matter starts, or relative to another task, are worked out against this matter's open date, so the new tasks arrive with real start and due dates rather than blank ones.
The rules are kept, not just the dates they produced. The copied tasks join the matter's normal date cascade, so if you later move an anchor task's date, the tasks that depend on it shift with it. See How the matter-wide date cascade recomputes dates.
Every copied task lands in the first stage of the matter's task board (the left-most column, usually To do). Move a task elsewhere with the stage dropdown on its row, or by dragging its card on the Stages board. See Change a task stage.
Note: Only Active tasks in the list are copied. Archived tasks are skipped, and archived lists are not offered in the dropdown.
Important: Assigning a list adds tasks, it never removes or replaces the tasks already on the matter. Assign the same list twice and you get a second copy of every task, so check the board before you repeat it.
Troubleshooting
- The preview reads "This task list has no tasks yet." The list you picked is empty, or every task in it is archived. Add tasks stays unavailable until you choose a list with at least one active task. Open the list from the Task lists page and add tasks to it first.
- "This matter has no task stage to add the tasks to. Add a task stage first." The copied tasks need a column to land in. Open the Stages sub-tab on the matter's Tasks tab, add a column, then try again. See Task kanban, stages, and types.
- A message about task numbering. Your firm's task numbering is not set up, so Esqase cannot give the new tasks their ID numbers. A firm owner or administrator can set it under Settings. See Document and record numbering.
- A copied task arrived with no date. This works the same way as at matter creation: a relative date stays blank when its anchor has no date, or when the chain loops back on itself.
How the matter-wide date cascade recomputes dates
Once a list is cloned, the tasks on a matter still remember their date rules. That means dates can keep themselves in sync as the matter's timeline changes.
When a task on a matter is created or its dates change, Esqase automatically recomputes every other task on that matter whose date is relative (anchored to the matter start, to its own start, or to another task). Only tasks whose computed date actually changed are updated. Tasks that point to a moved anchor shift to stay correctly spaced.
In practice this means:
- If you change the matter's open date, every task scheduled When the matter starts moves with it, and any tasks chained off those tasks move too.
- If you move one task's date, downstream tasks anchored to it follow automatically.
- A task with a fixed calendar date (set directly on the live task) acts as a stable anchor and does not move on its own.
You do not trigger this manually. It runs in the background after a task save, so the rest of the board stays consistent without you re-entering dates.
Tip: The cascade respects the chain you built in the templates. If two tasks looked correctly spaced in the list, they will stay correctly spaced on the matter, even as the matter's start date or an upstream task's date moves.
Common questions
- Can I add a task list to a matter after it is already created? Yes. Open the matter's Tasks tab and click Assign task list. See Assign a task list to an existing matter.
- Do my templates change if I edit a cloned task on a matter? No. Cloned tasks are independent copies. Editing a task on a matter does not affect the original list, and editing the list does not change matters that already cloned from it.
- Why is one of my task's dates blank after cloning? A relative date resolves to blank when its anchor has no date (for example, the matter has no open date yet, or it points to an unscheduled task), or when the rule would form a loop. Give the anchor a date, or simplify the chain.
- Why don't I see Add task list or the Edit and delete options? Those actions depend on your Task list permissions. Without Create you will not see Add task list; without Update or Delete you will not see the edit, archive, or delete options. Ask a firm owner or administrator to adjust your role.