Available lang sa Ingles ang dokumentasyon ng produkto.
Requesting eSignatures
Esqase lets you collect legally binding electronic signatures on a PDF without leaving the app. You place signature fields on the document, add the people who need to sign, save, then either sign it yourself or email each signer their own secure link. This page walks through the whole flow, from opening a document to managing the request afterward.
Before you begin
- eSignatures work on PDF files only. If you want a signature on a document you wrote in the file editor, open it and click Sign in the editor header: Esqase saves a PDF copy of it (in the same folder by default, or another folder you pick) and opens that copy ready for signature setup, while the original stays editable. See Send a document for signature.
- You need a document already uploaded. To add one, open Documents in the sidebar and upload your PDF.
- Placing fields, adding signers, sending links, and signing all require Update access for documents. If your role does not include it, you will see the document but not the signing controls. Anyone with View access can open a request to review it. Creating the PDF copy from the file editor needs Create access for documents. Firm owners always have full access. See Roles and permissions.
- Approval, if your firm requires it. If your firm has document approvals turned on, a document may need internal sign-off before it can be sent for signature. You can still add signers and place fields while you wait. See Approval can hold a request back.
Note: Saving is what turns the people you added into real signers. When you click Save, Esqase creates the signature request and gives each signer their own private signing link, which starts working straight away. Emailing those links is a separate step, so you can save, check your work, and send when you are ready.
Open the document and start a signature request
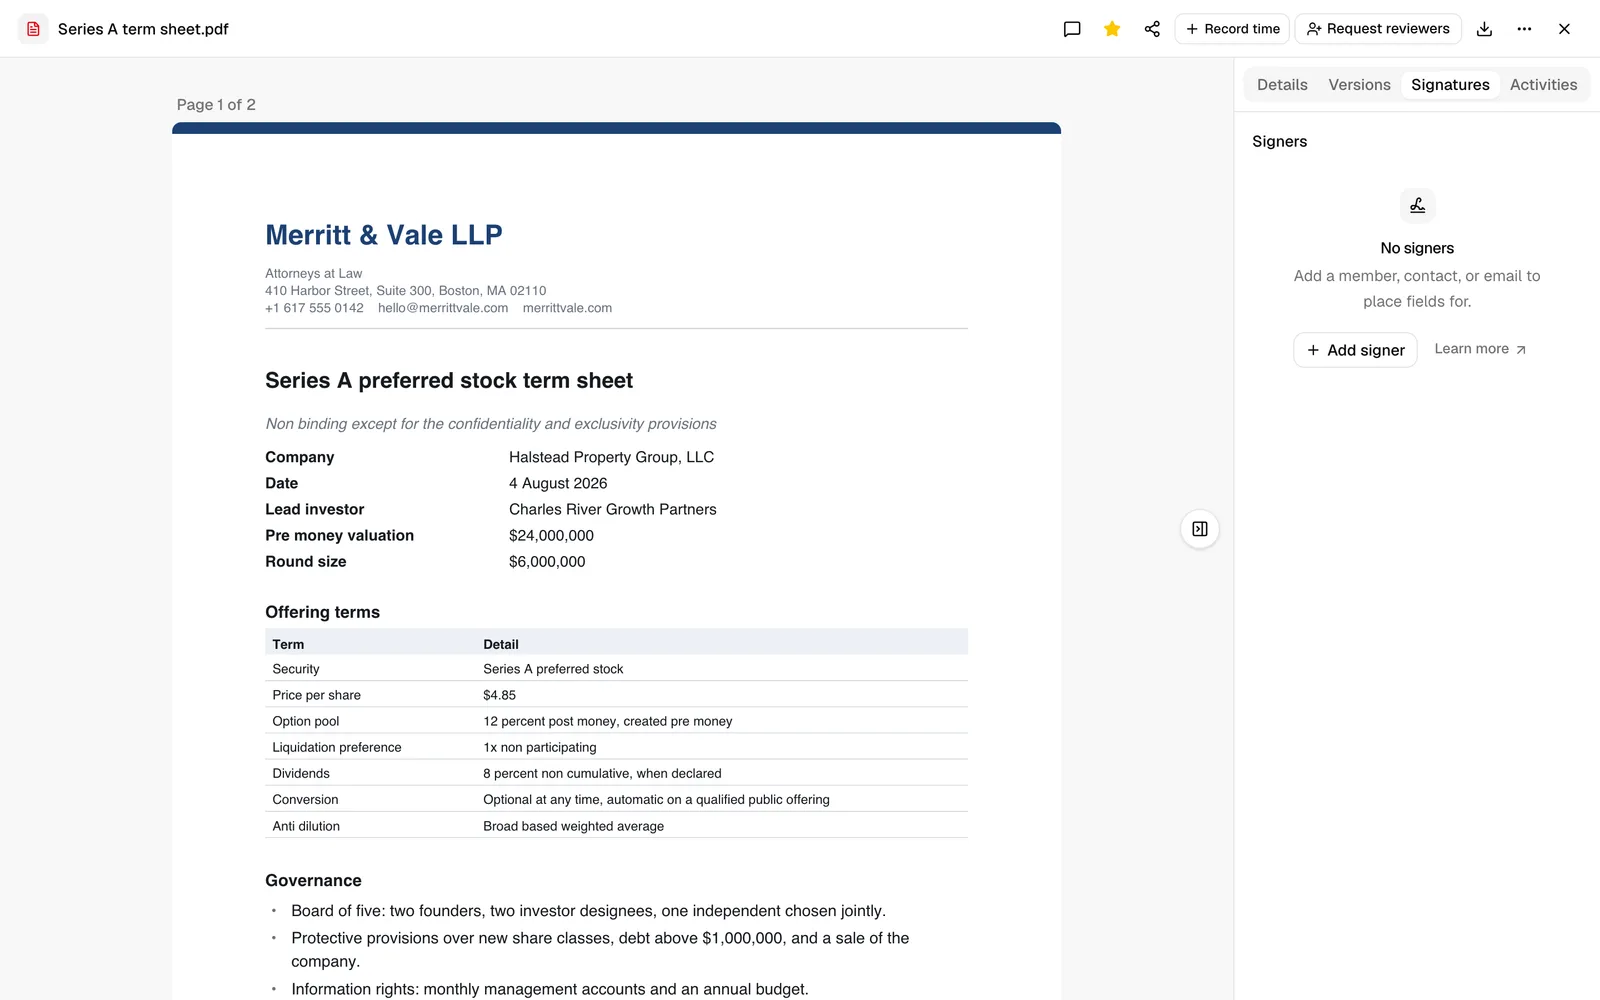
You set up a signature request on the PDF's own page, which opens full screen, using the Signatures panel on the right.
- In the sidebar, click Documents.
- Find your PDF in the file list and click it to open it.
- When the file is a PDF, the right-hand panel opens on the Signatures tab automatically. (If you are on Details, Versions, or Activities, click the Signatures tab to switch back.)
- The main area shows your PDF page by page. The Signatures panel on the right is where you add signers and choose which field to place.
Tip: You can also reach the same page from a matter. Open the matter, go to its Documents tab, and click the PDF there. A signature request on a file that lives in the matter's own documents folder stays linked to that matter, however you opened it. See The matter workspace.
Tip: If you started from a document you wrote in Esqase and clicked Sign in the editor, the PDF copy is already open on the Signatures tab, so you can skip straight to adding signers. See Send a document for signature.
Add signers (a firm member, a contact, or an external email)
A signer is anyone who needs to sign: a colleague at your firm, a client or other contact in your address book, or someone outside the firm you only have an email address for.
- In the Signatures panel, under Signers, click Add signer (or the + button if you already have signers).
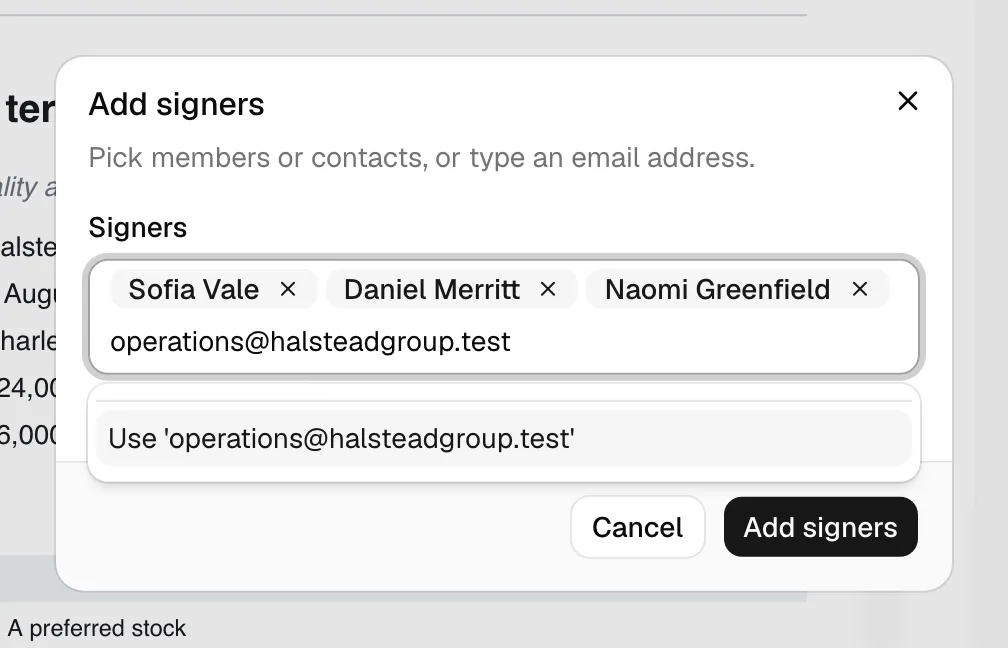
- The Add signers dialog opens. It invites you to "Pick members or contacts, or type an email address." In the Signers box, start typing.
- Members and Contacts that match appear in a dropdown, grouped under those headings. The list searches as you type and loads more people as you scroll, so you do not have to load everyone first. Click a name to add it. A member is a colleague at your firm; a contact is a person from your contacts list (for example a client).
- To add someone who is not a member or contact, type their full email address and choose Use '...' (or press Enter). This adds them as an external email signer. As the dialog notes, external email signers receive a secure link to sign.
- Each person you pick appears as a chip in the box. Remove one with the small x on its chip, or press Backspace to remove the last one.
- Click Add signer (or Add signers if you selected more than one) to add them to the request. Click Cancel to discard.
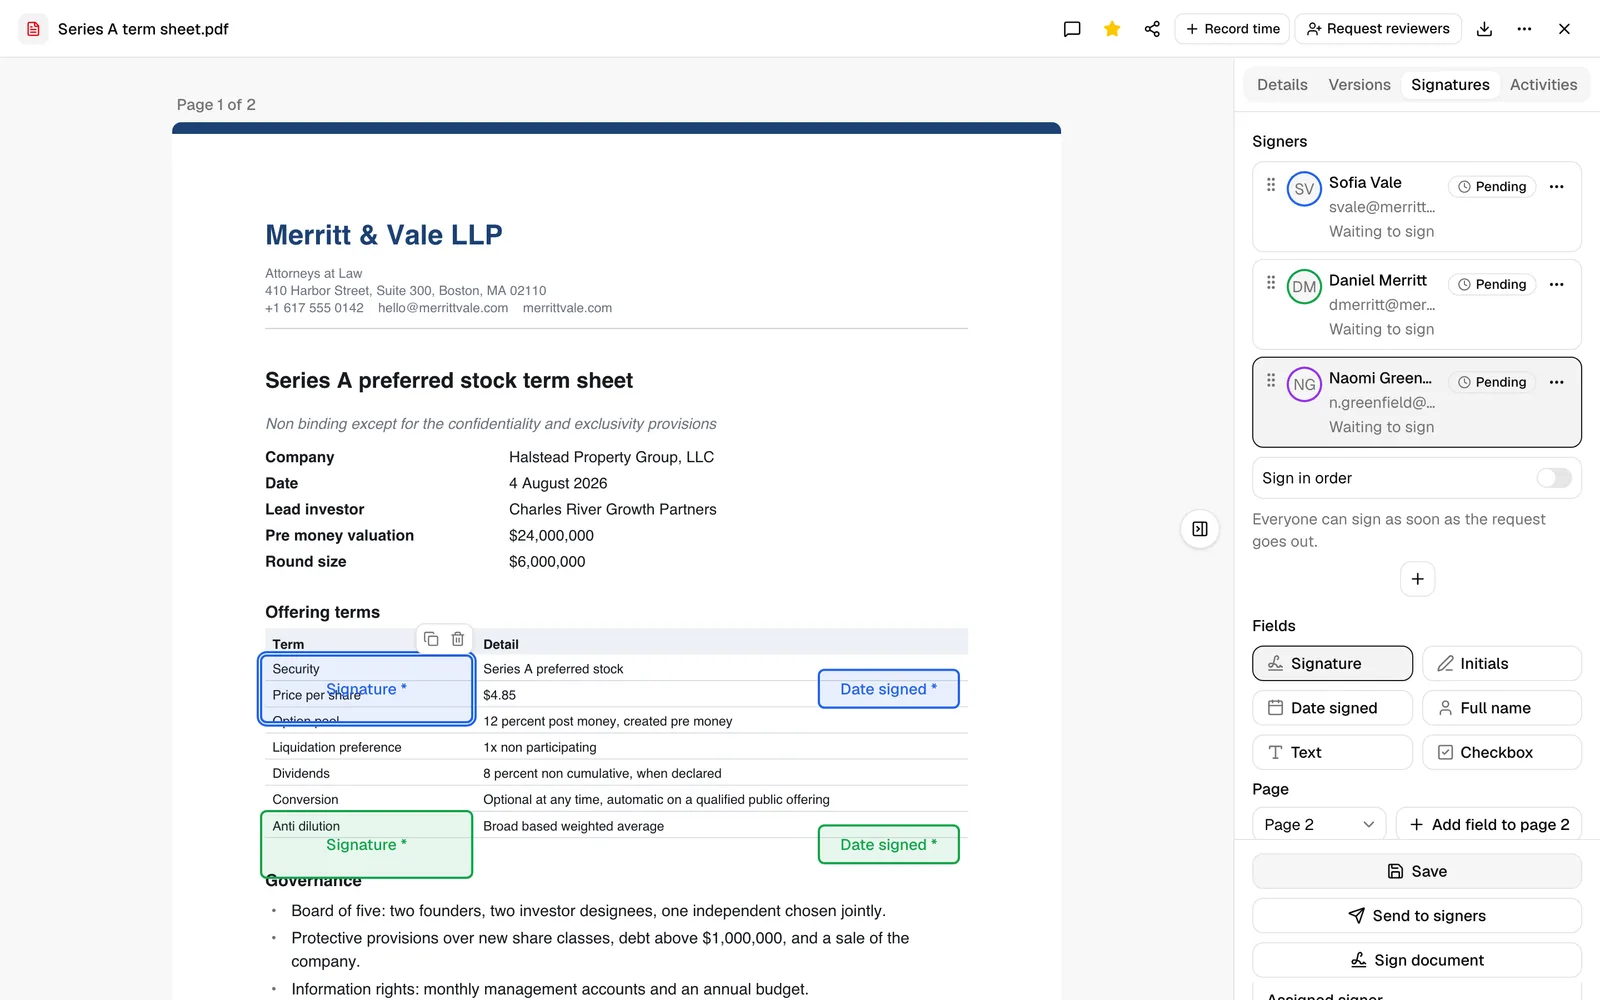
Every signer you add appears in the Signers list, each with its own color. That color is used for the fields you place for that person, so you can tell at a glance which field belongs to whom. Each row shows the signer's email address, how many fields are assigned to them, and where they have got to.
- To make a signer the one you are placing fields for, click their row in the Signers list. The selected signer is highlighted.
- To remove someone, open the actions menu on their row and choose Cancel signing. See Track and manage each signer below.
Note: Signers receive a secure link to sign, which Esqase emails when you use Send to signers. To open and sign, they confirm the email address on their link, so make sure each address is correct before you send. If a contact has no email address on file, Esqase asks for one when you send and saves it to that contact.
Set the signing order
By default, everyone you add can sign at the same time, in any order. If the document needs to go to one person before another, for example a client's signature before a partner countersigns, turn on Sign in order.
- In the Signatures panel, find the Sign in order switch above the Signers list.
- Turn it on. The helper text underneath explains what happens: each signer is invited only once the person above them has signed, and you can drag to change the order.
- With it off, the helper text instead reads that everyone can sign as soon as the request goes out.
- Drag a signer's row by its handle to move it up or down the list, or open its actions menu and choose Move up / Move down. These controls are always available, but only change anything meaningful once Sign in order is on.
Note: When Sign in order is off, the order signers appear in the list is just for your own reference and does not affect who can sign when.
Place signer fields on the document
Once you have at least one signer selected, you place the fields each signer needs to fill in. Fields are positioned directly on the PDF pages.
- In the Signers list, click the signer you are placing fields for so they are selected.
- Under Fields, choose the field type you want to drop. The available types are:
- Signature: where the signer draws, types, or uploads their signature.
- Initials: a smaller mark for initialing pages or clauses.
- Date signed: fills in automatically with the date the signer signs.
- Full name: the signer's typed name.
- Text: a free-text box the signer types into.
- Checkbox: a box the signer can check (for example, to acknowledge a clause).
- With a field type selected, click the spot on the page where you want it. A colored box appears in that signer's color, labeled with the field type.
- Repeat for every field that signer needs. Switch signers in the Signers list and place their fields the same way. Each signer's fields stay in their own color.
To adjust a field after placing it:
- Move it: drag the box to a new position on the page.
- Resize it: drag a corner or edge.
- Select it: click the box. A small toolbar appears with a copy icon (duplicate the field nearby) and a trash icon (delete it). You can also delete a selected field by pressing Delete or Backspace.
- Reassign or require it: with a field selected, the Signatures panel shows a small editor. Use Assigned signer to move the field to a different signer, and toggle the Required checkbox. Required fields must be completed before signing; a field marked required shows an asterisk on the page.
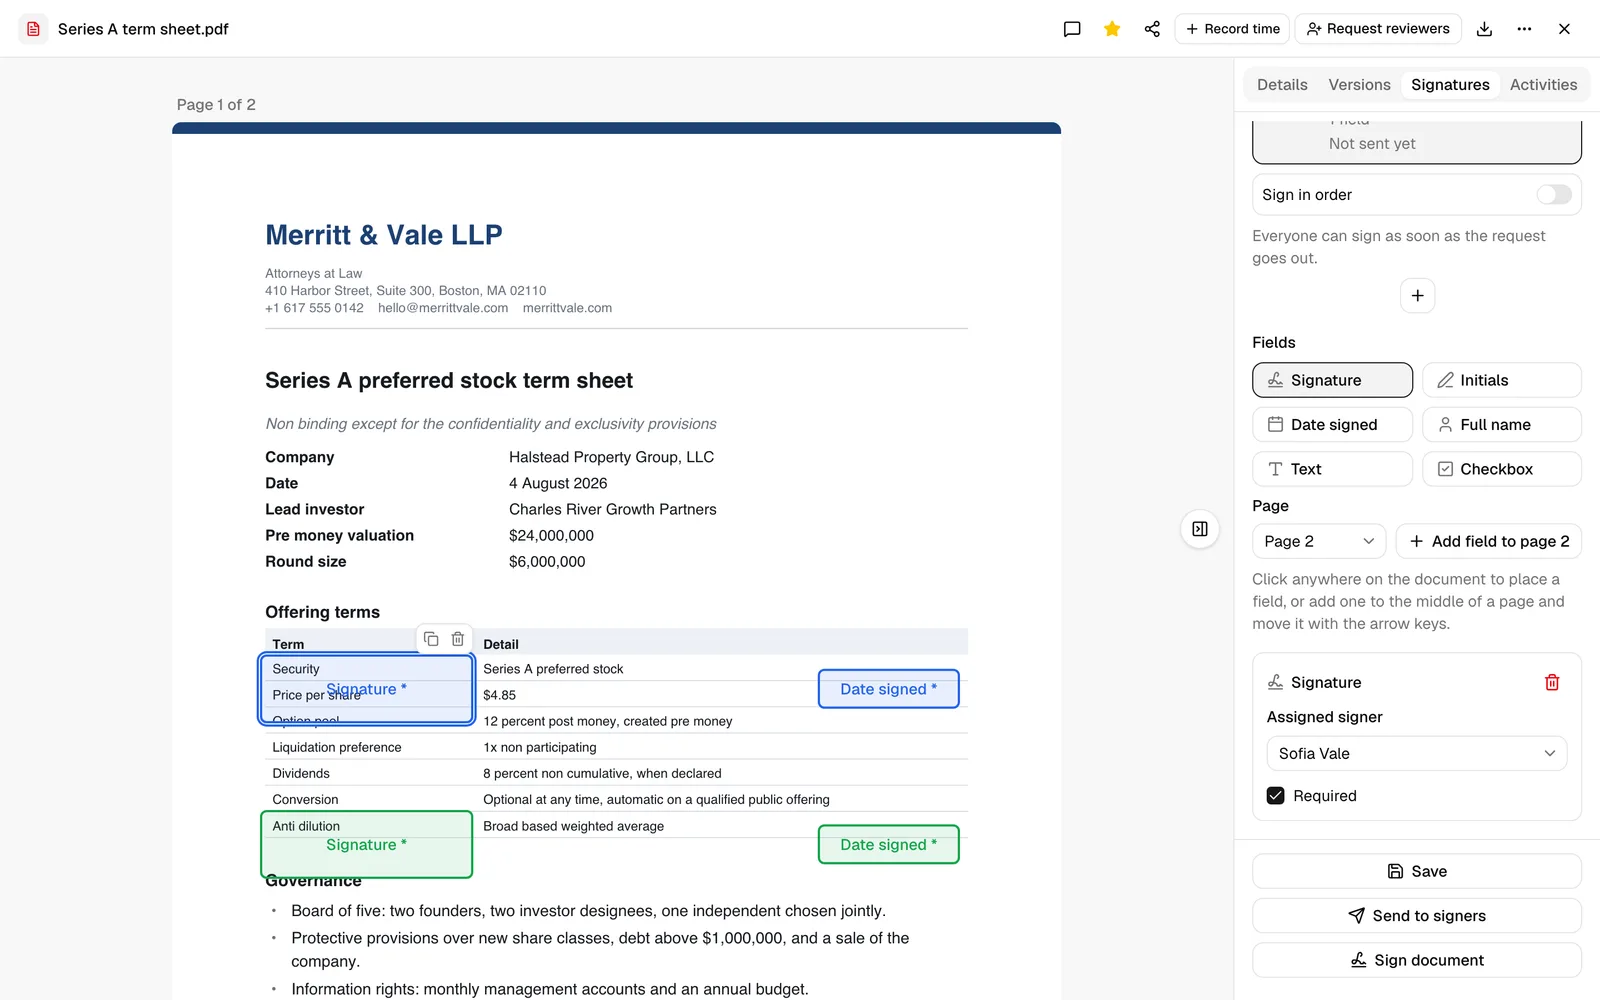
Important: Every signer needs at least one Signature field. Esqase will not let you save until they all have one, and the message names the signer who is missing it. Also check that fields you expect to be filled are marked Required, since an unrequired field can be skipped.
Save the signers
Saving is the moment your request becomes real. It records the signers and their field positions on the document, and gives every signer their own private signing link.
- After adding signers and placing their fields, click Save in the action bar at the bottom of the Signatures panel. That bar stays pinned to the bottom of the panel as you scroll, so Save, Send to signers, and Sign document are always in reach however long your signer and field lists get.
- A "Signers saved" confirmation appears, and each signer's row starts showing their progress, beginning at Pending.
What saving gives you:
- Each signer now has a working signing link. Nothing has been emailed yet: use Send to signers for that, or Copy signing link on a signer's row to share one yourself.
- The setup stays attached to this document. Close the document and reopen the same PDF later and your signers and fields are still there, along with everyone's progress.
- If you change anything afterwards (add a signer, move a field, toggle Required), click Save again so the signers see the current version. If you try to send or sign with unsaved changes, Esqase opens a Save the signers first prompt: click Save and continue and it saves, then carries on to what you were doing.
Note: All signers can act at the same time; signing does not have to happen in a fixed order. Each signer only sees and fills the fields assigned to them. Once everyone has signed, Esqase finalizes a sealed, signed PDF and a Certificate of Completion, and files the signed PDF as the newest version of the document you sent out.
Approval can hold a request back
If your firm has document approvals turned on, a document may have to be approved internally before it leaves the firm. Your firm sets those rules at Settings > Approvals. See Approvals for invoices and documents.
When a document is waiting on approval:
- Send to signers and Sign document are unavailable, and a note above the buttons, at the top of the action bar, reads This document needs approval before it can be sent for signature. Signers and fields can still be set up now.
- Save still works, so you can add signers, place their fields, and have everything ready for the moment approval lands.
- Signing links are not issued until the document is approved, so nobody outside the firm can reach it in the meantime.
To move it along, open the approval control on the document, click the + button beside the panel's heading, and click a colleague in the list to ask them to sign off. You will find the control in the file editor header for a rich-text document (the reviewer avatars, just to the right of Sign), and in the top-right row of header actions, between the record-time control and Download, on an uploaded file's page. Once the review is approved, the send and sign actions become available again.
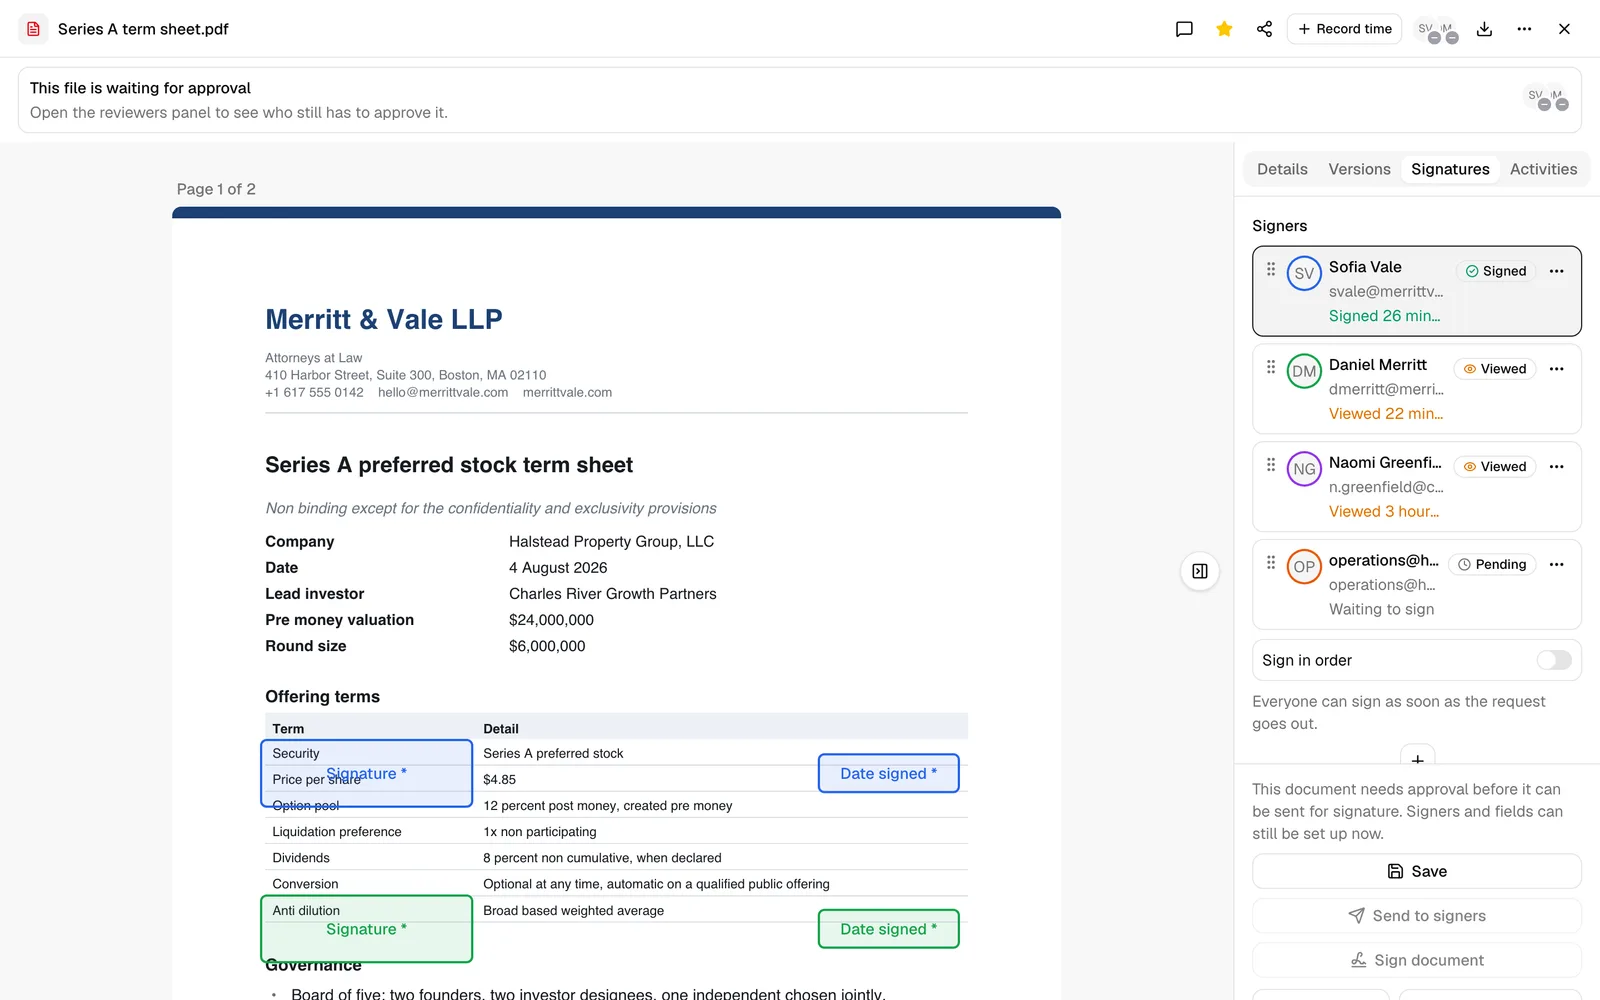
Note: An approval that is already granted is undone by a material change. If a new version of the PDF is uploaded, the approvals collected so far are cleared and a fresh review opens, so sending is blocked again until it is approved.
Send the request to your signers
Send to signers emails everyone who still has to sign. Each person gets their own message carrying their own signing link, so you can personalize the wording once and let Esqase fill in the details per person.
- Click Send to signers in the action bar at the bottom of the Signatures panel.
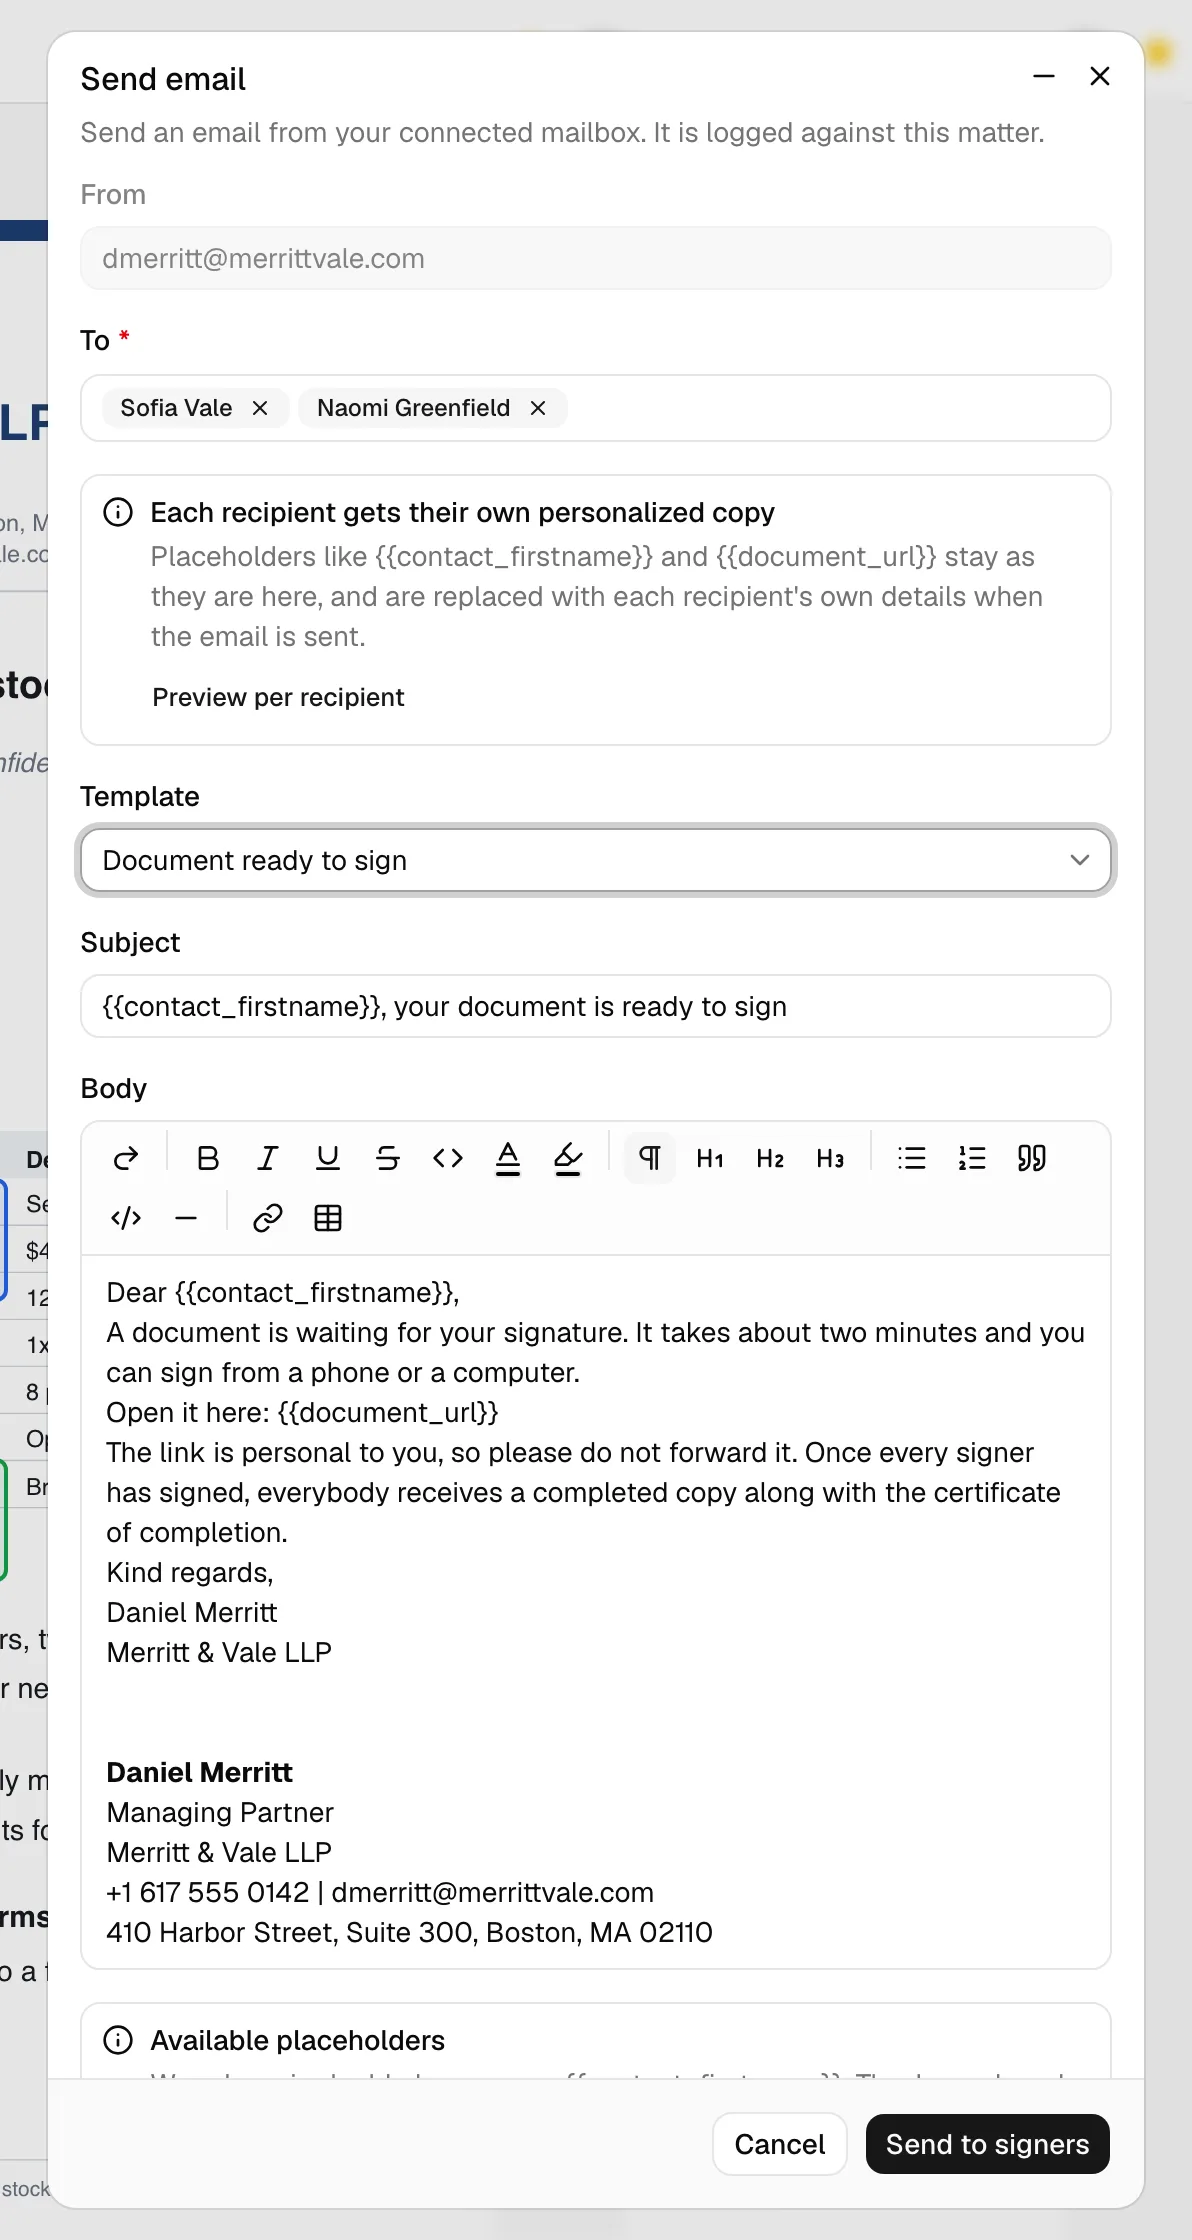
- The Send email composer opens with the To field already filled in with every signer who still has to sign. You are left out if you are one of the signers, since you can sign in the app.
- If your firm has the Document - Document Signature Request email template, it is applied for you. You can pick a different template or write your own message.
- What you see next depends on how many people are being emailed:
- One recipient: the subject and message are filled in ready to send, with their name and their signing link already in place.
- More than one: the message keeps its placeholders visible, such as
{{contact_firstname}}and{{document_url}}. A note explains that these are replaced with each person's own details when the email goes out. Click Preview per recipient to see each person's finished copy before you send.
- Click Send to signers, the composer's own send button. Esqase sends one email per signer and confirms how many went out. If any could not be sent, it names them so you can try again. (With no mailbox connected the button reads Continue instead and takes you to a per-signer hand-off list. See Send the requests from your own mail app.)
A few things worth knowing:
- A connected mailbox is optional. With Gmail or Outlook connected, Esqase sends each signer's email for you from your own address. Without one, you compose here and send the messages from your own mail app (see the next section). See Connecting Google (Gmail, Calendar, Meet) and Connecting Outlook and Zoom.
- A signer with no email address on file stops the send and asks you for one. The address you type is saved to that contact, so you only do it once.
- Each email is logged. If the document is connected to a matter, every message Esqase sends appears on that matter's Communications tab, so your team can see who was written to and when. Requests you send from your own mail app are not logged. See Logging communications.
Important: Treat signing links like passwords. Anyone who has a signer's link and can confirm that signer's email address could open the document. Send each link only to the intended person, and check each signer's email address before you send.
Send the requests from your own mail app
If nobody has connected Gmail or Outlook, Esqase cannot send the signing emails for you, but it can still prepare them. Because every signer needs their own personal signing link, this step lists each signer separately rather than showing one shared message.
- Fill in the composer as usual, then click Continue.
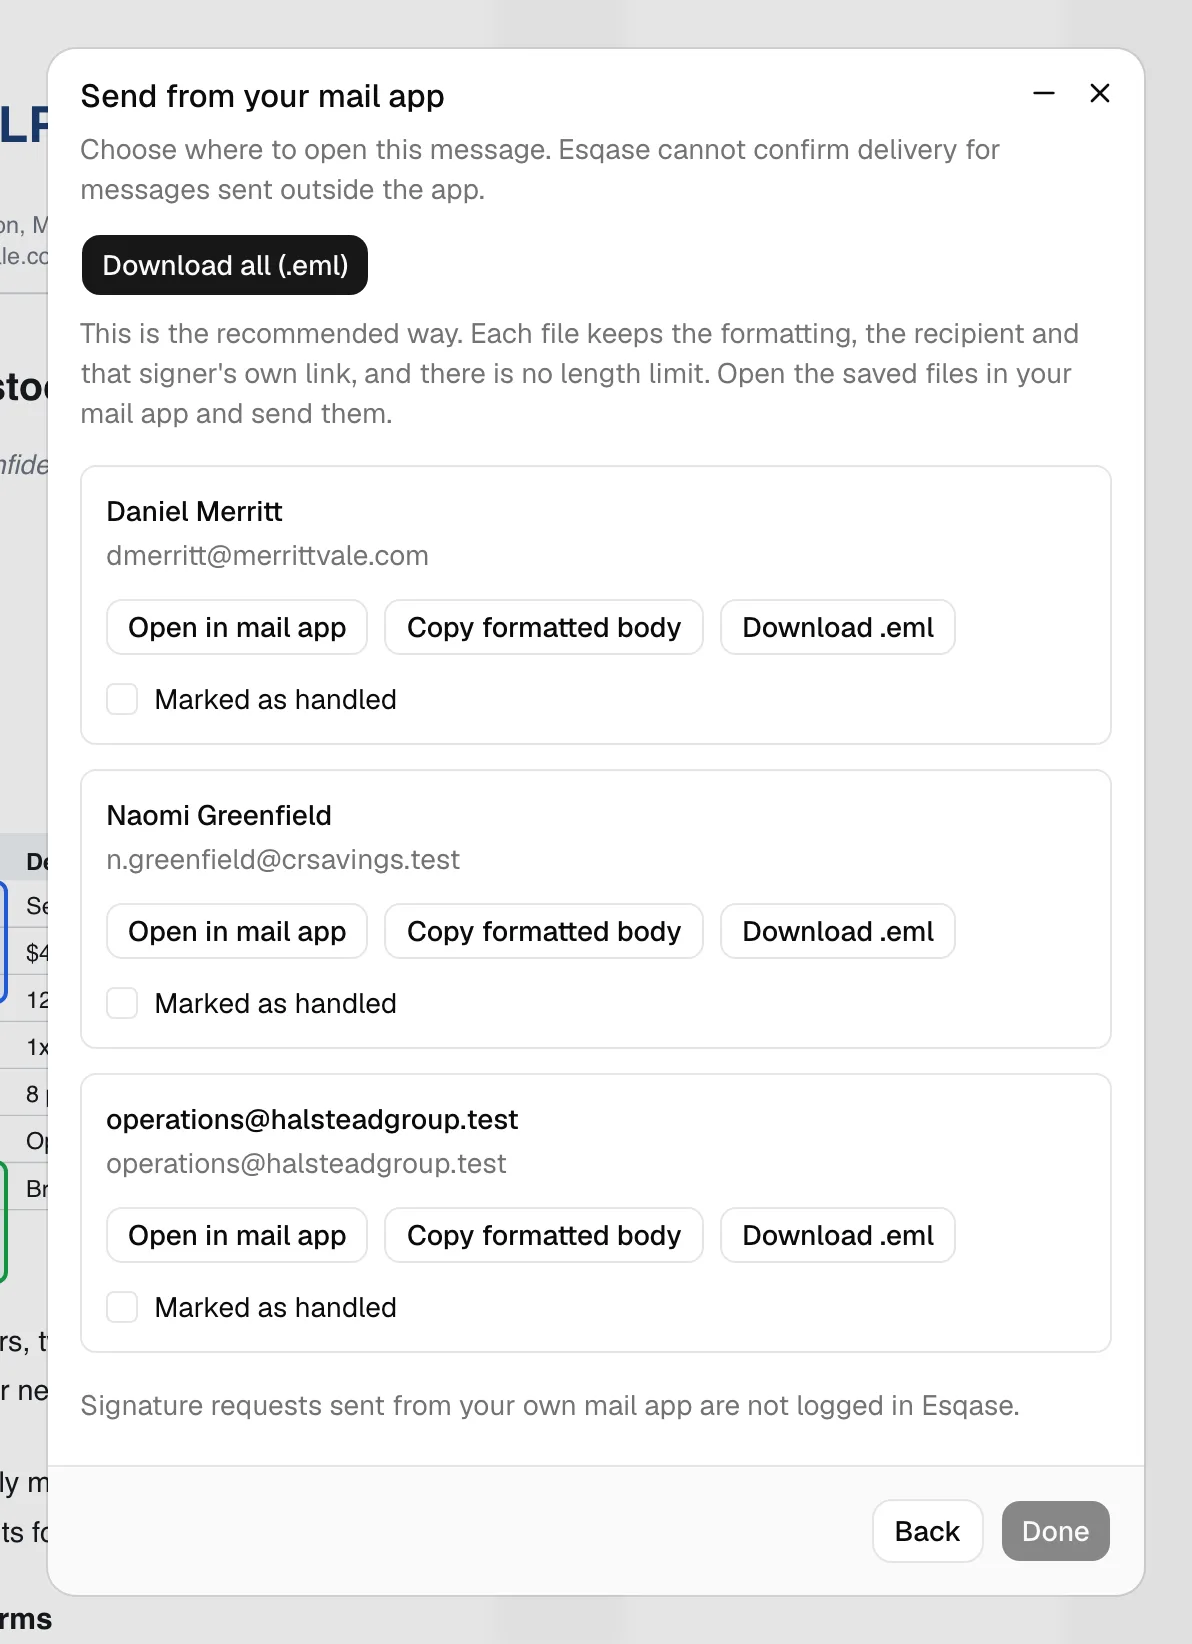
- The dialog moves to a step titled Send from your mail app, listing one block per signer with their name and email address.
- Click Download all (.eml). This is the recommended action: it saves one file per signer, each keeping the formatting, that signer's address, and that signer's own link, with no length limit. Open the saved files in your mail app and send them.
- If you would rather handle signers one at a time, each block also offers Open in mail app (opens a prefilled message for just that person), Copy formatted body, and Download .eml.
- Tick Marked as handled on each signer as you go, so you can keep your place. Done becomes available once at least one signer is marked.
- Click Done to close the dialog.
Things to know about this path:
- Nothing is logged. Signature requests sent from your own mail app do not appear on the matter's Communications tab. The step says so at the bottom of the list.
- A signer's link is never shortened. If a message is too long for a mail app link, the row tells you and points you to the download instead, so the signing link cannot be cut off.
- With more than five signers, Esqase suggests Download all (.eml) in a notice, because opening them one at a time takes a while.
- If the document still needs approval, no signing links are shown at all. You see a This document needs approval notice instead. Get the approval done, then reopen this step.
For the composer itself, see Sending email.
Track and manage each signer
Once saved, each signer's row in the Signers list shows where they have got to, so you can see the state of the whole request at a glance:
- Pending: they have not opened the document yet.
- Viewed: they have opened it but not signed.
- Signed: they have completed their fields.
- Declined: they refused to sign, which stops the request for everyone.
Alongside the status, the row shows their email address, how many fields they have, and when they last acted.
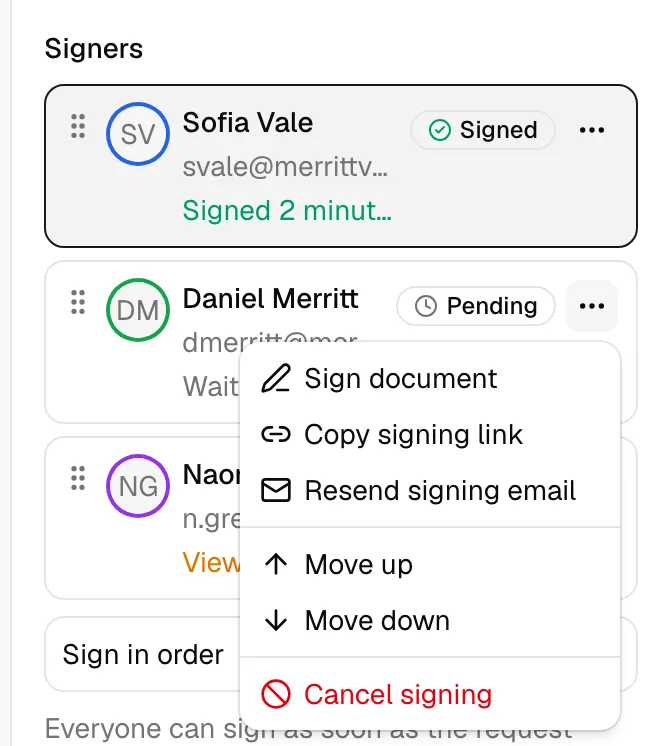
Open the actions menu on a signer's row for:
- Sign document: only on your own row, when you are a signer. Opens the document in signing mode.
- Copy signing link: copies that person's private link so you can send it another way. If your browser blocks the copy, Esqase shows the link so you can select it by hand.
- Resend signing email: sends that one signer their existing link by email again, without touching anyone else's request. It only appears while their link is live and they have not signed yet, and needs an email address on file for them. Use it when a first email was missed or buried, rather than resending to everyone.
- Move up / Move down: reorders that signer in the list. See Set the signing order.
- Cancel signing: removes that person from the request. Their signing link stops working immediately and their fields come off the document. Someone who has already signed cannot be cancelled, because their signature is part of the finished document.
Note: Esqase notifies your firm as the request progresses. You get a notification when someone signs, when someone declines, and when a document becomes fully signed. Choose which of these reach you in your notification preferences. See Notifications.
Sign a document internally as a member
When you are one of the signers and you placed fields for yourself, you can sign in the app right away without sending yourself a link.
- Click Sign document in the action bar at the bottom of the Signatures panel, below Send to signers. The same action is on your own row in the Signers list. (It appears as soon as you are a signer with at least one field of your own and you have not signed or declined yet, so you do not have to save first to see it.) If you have unsaved changes, Esqase opens the Save the signers first prompt: click Save and continue and it saves, then opens the signing view.
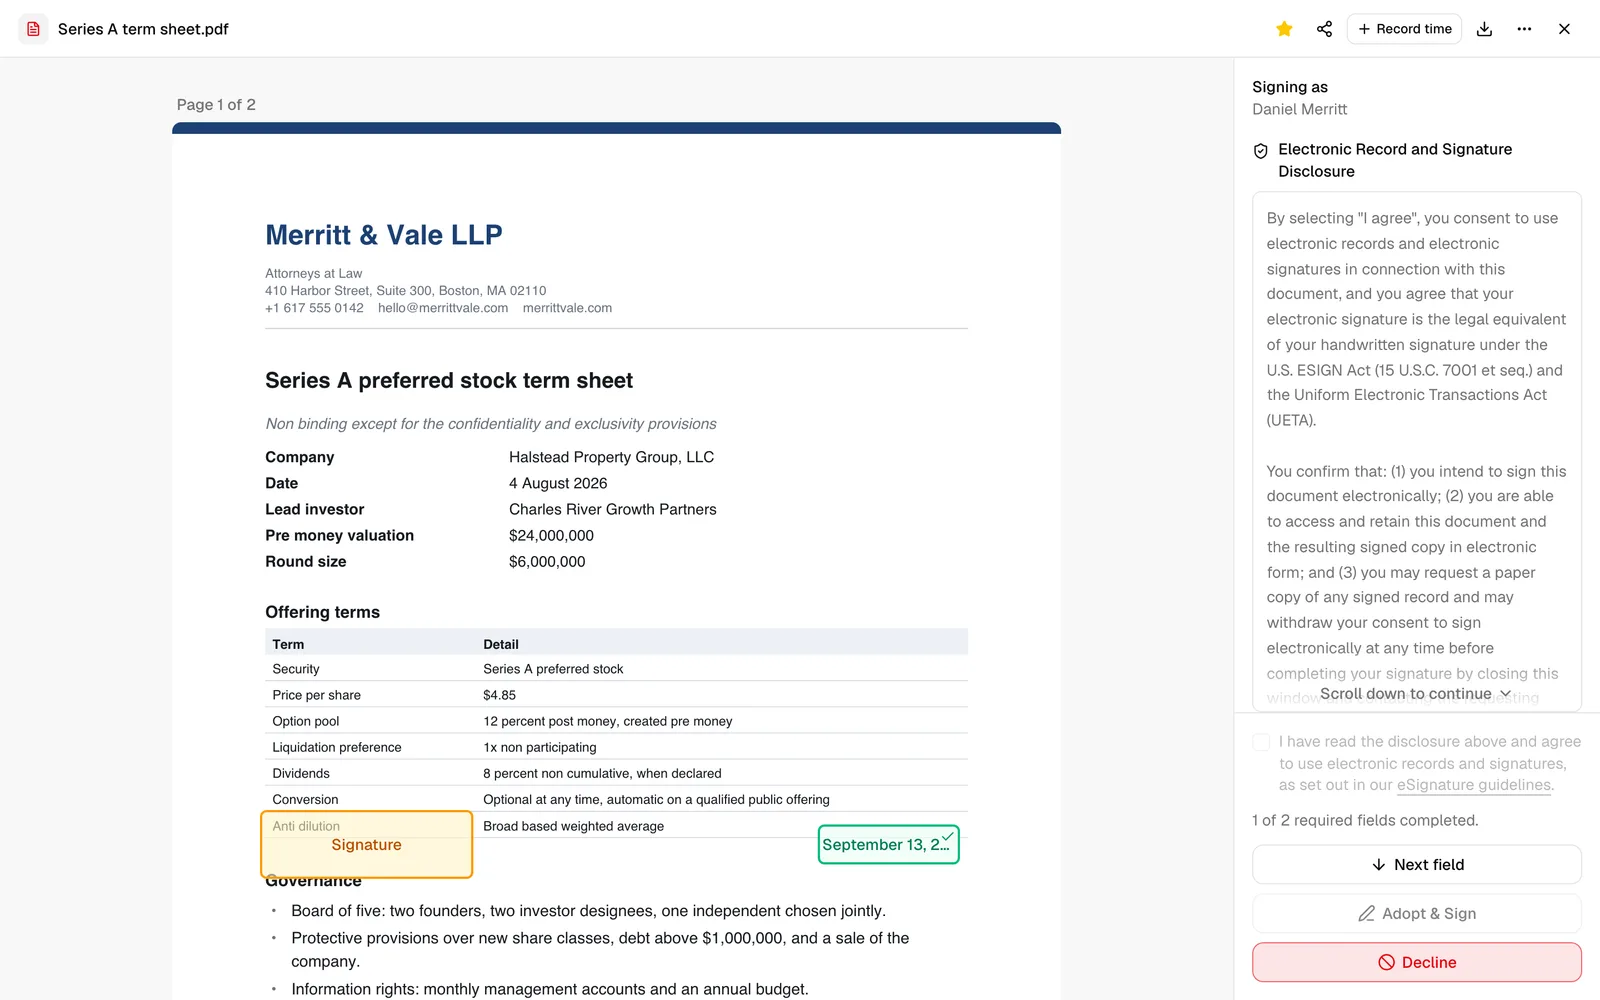
- The document opens in signing mode. The side panel shows Signing as with your name and the consent disclosure, with the consent checkbox and the Adopt & Sign and Decline buttons pinned to the bottom of the panel. Each field assigned to you is highlighted on the page; required fields that still need attention pulse so they are easy to find.
- Click a field to fill it (you can leave the signature field alone and let Adopt & Sign collect it in step 5):
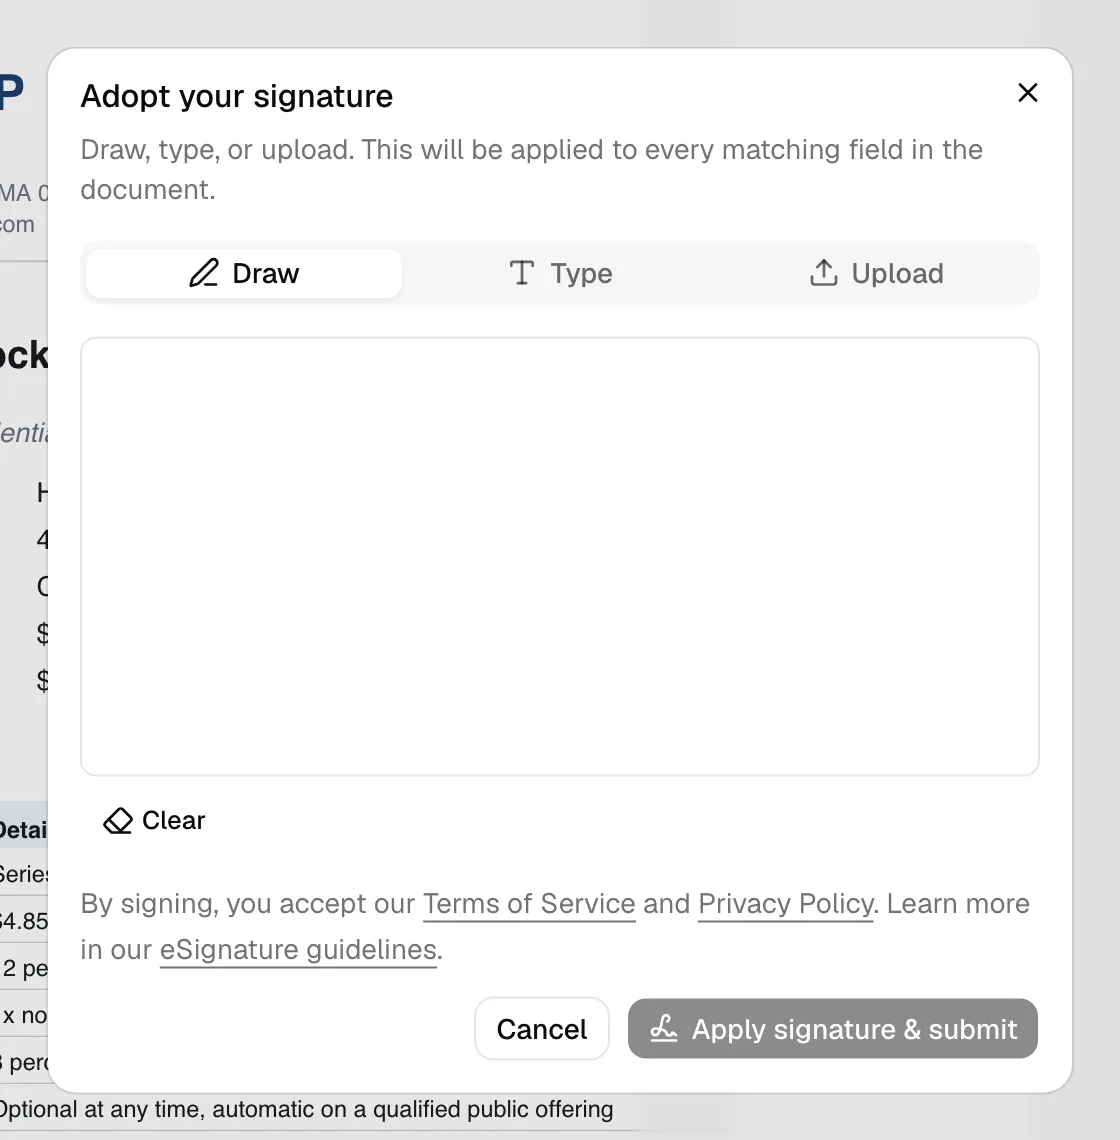
- Signature or Initials: a dialog opens to adopt your mark. Use the Draw, Type, or Upload tab, then apply it. Your adopted mark is applied to every matching field of that type for you.
- Date signed: pick a date (it defaults to today).
- Full name: prefilled with your name; you can edit it.
- Text: type your entry.
- Checkbox: click to check or uncheck.
- Review the eSignature consent disclosure in the side panel and accept it. You must scroll the disclosure all the way to the bottom before the consent checkbox can be ticked: until then it is greyed out and a "Scroll down to continue" hint shows at the foot of the box. The wording of this disclosure reflects your firm's country (see the note below), and the exact text you agree to is recorded with your signature.
- Click Adopt & Sign. This opens the "Adopt your signature" dialog rather than signing straight away. Draw, type, or upload your signature and click Apply signature & submit, which applies it to every matching field and records your signature in one step. If you were the last signer, the document is completed; otherwise the remaining signers can still sign.
If you do not want to sign, click Decline, the red outlined button directly below Adopt & Sign. You can add an optional reason. Declining stops the signing request for everyone.
Note: Adopt & Sign stays disabled until you have scrolled the disclosure to the bottom and ticked the consent box. If it is still inactive after that, a field on the document is unfilled, and the line "Complete the highlighted fields in the document to continue" appears above the button.
Note: The legal language in the consent disclosure (shown to you when you sign in the app, and to every signer who signs by link) is chosen from your firm's country, which is set in your firm details. Firms in the Philippines and the United States see a statement written for that country's law; firms in any other country, or a firm with no country set, see a neutral statement that the electronic signature is legally binding and is the legal equivalent of a handwritten signature to the fullest extent permitted by applicable law. The exact text each person agreed to is preserved with their signature and reproduced on the Certificate of Completion. Your firm's country is set when the firm is created and recorded in your firm details. See Your firm profile and details.
Manage the request afterward
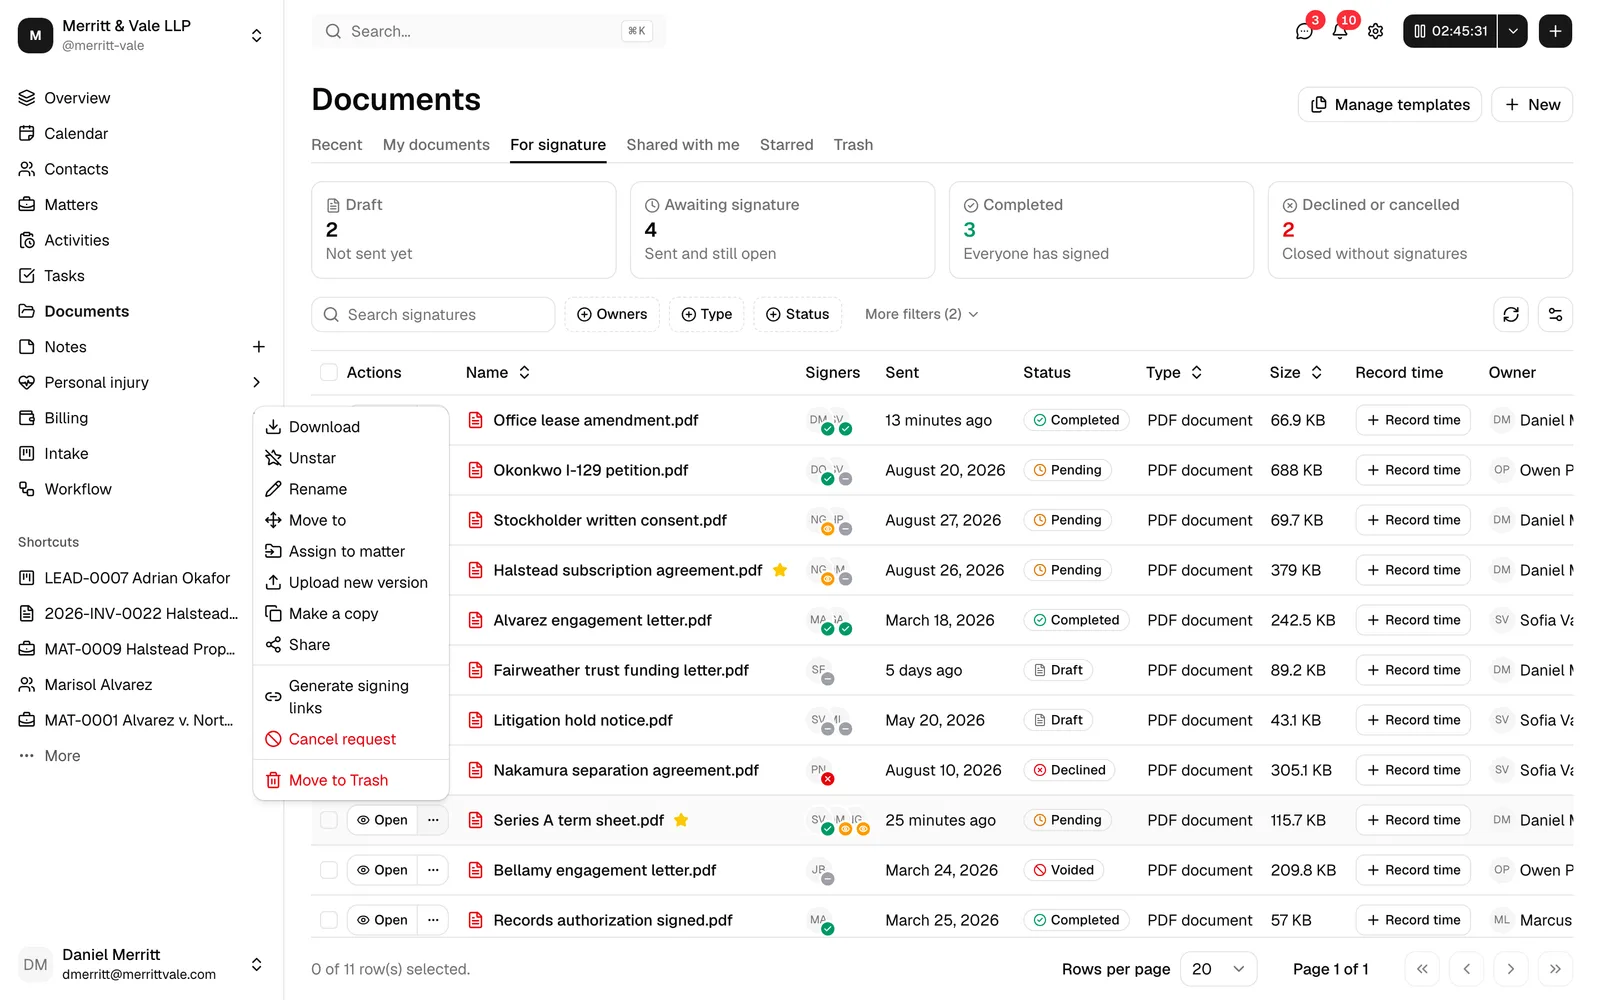
Every document you send for signature is listed on the For signature tab of your Documents page, where you can track progress and take action. It is your documents table, narrowed to the files that are in signing.
- In the sidebar, click Documents, then click the For signature tab, immediately to the right of My documents.
- Directly below the tab strip, stat cards summarize your firm's signing activity at a glance: Draft, Awaiting signature, Completed, and Declined or cancelled.
- Use the Status filter in the table toolbar to narrow the list to a specific status, including Voided and Archived requests. Leave it clear to see every status at once.
- Each row shows the document name with its signing badge (for example Signed 1 of 3), plus dedicated Signers, Sent, and Status columns, the record-time control, the owner, who last updated it, and when. Use the search box to find a document by name.
Per-row actions:
- Open: opens the document on its own page so you can review the request, its fields, and each signer's status. Closing it brings you back to the For signature tab.
- More actions (the ... menu next to Open) carries the usual document actions (download, star, rename, move, share, and so on), plus the request actions:
- Generate signing links, on a Draft row: activates the request right from the list, without opening the document. See Generate signing links for a draft.
- Copy signing links, while the request is still open: copy the existing links for the outside signers. This does not issue new links or resend anything, so links you have already emailed keep working.
- Cancel request, while the request is still open: cancel a request that has not been completed. Once cancelled it can no longer be signed, and this cannot be undone.
- Archive request, once the request is finished, declined, or cancelled: marks it Archived. The document stays listed on For signature; filter by Status to isolate archived requests.
Signing the document yourself, and the completed files (the clean copy, the Certificate of Completion, and the integrity check), live on the document's Signatures tab. Click Open to get there.
For more on viewing a request's full history, status changes, and signer events, see Managing signature requests.
Common questions
- Can I get a signature on a Word or rich-text document? Not directly. Signatures are placed on PDFs. For a document you wrote in Esqase, open it in the editor and click Sign: Esqase saves a PDF copy next to the original and opens it here, ready for signers. For a Word file, save it as a PDF and upload that, then start the request on the PDF.
- Does the PDF copy replace my original document? No. The copy is a separate file, saved in the same folder unless you choose another one in the dialog. Your original keeps its own text, versions, and comments, and you can carry on editing it. Each click of Sign makes another copy, so create one copy per round of signing.
- A signer says their link does not open. What should I check? Confirm you sent them the correct, complete link, and that they are confirming the same email address the link was issued for. A link stops working if the request was cancelled, if that signer was cancelled, or if the document has since been archived, moved to trash, or deleted.
- Can I change fields after sending? Yes. Adjust the fields and click Save again so signers see the current version. Anyone who has already signed keeps their signature and is left as they are. If signing is underway and you need different terms altogether, cancel the request and start a new one. Note that uploading a whole new version of the PDF is different from adjusting fields: it automatically cancels the open request, so start a fresh one on the new version. See Upload a new version of a file.
- I removed a signer by mistake. Can I undo it? No. Cancelling a signer takes effect immediately and their old link cannot be revived. Add them again and save, and they get a fresh link you can send.
- What happens to signing links if I move the document to Trash, archive it, or delete it? Moving a document to Trash immediately cancels (voids) any signature request still in progress on it and revokes its share links, so a signer's link stops working right away. Permanently deleting a document does the same. Anyone who already signed can still reach their confirmation page. Archiving a request, which you can only do once it is finished, declined, or already cancelled, does not touch any links, since there is nothing left in progress to affect.
- Where do clients actually sign? Clients open their secure link and sign on a guided page outside the firm dashboard. See How clients sign documents.
- What does the client see? A walkthrough of the client signing experience is covered in How clients sign documents.
- Send to signers is greyed out. Why? Either you have not saved your signers yet, or your firm requires this document to be approved first. See Approval can hold a request back.