Creating and sending invoices
Invoices are how your firm bills clients for the time and expenses recorded against a matter. Esqase turns billable activities into invoice line items, walks each invoice through a draft, review, and approval lifecycle, then lets you send it to the client by email with a built-in payment link. This page covers the whole flow, from finding an existing invoice to discussing it with your team and collecting the payment.
Before you begin
- Access. Invoices follow your role's permissions for the Invoices area. If your role includes View access, you can open the Invoices page and read invoices. Create access lets you make new invoices, Update access lets you edit, submit, approve, decline, record payments, archive, cancel, and restore, and Delete access lets you permanently delete archived invoices. Firm owners have full access. If a button described here is missing, your role most likely does not include the matching permission.
- A matter with billable activities. An invoice is always tied to one client and one matter, and its line items come from that matter's billable, un-invoiced time entries and expenses. To learn how those are recorded, see Time and expense tracking.
- Payment setup (for sending a payment link). To generate a payment link or email a client a way to pay, your firm needs at least one payment method enabled and a default deposit account set. See Payment settings.
Note: What "submitting" an invoice does depends on your firm's approval rules. If your role is set to require approval for invoices, a submitted invoice goes to In review and waits for its reviewers. If it is not, the invoice goes straight to Pending. Your firm sets those rules at Settings > Approvals. See Approvals for invoices and documents.
View and filter the invoice list
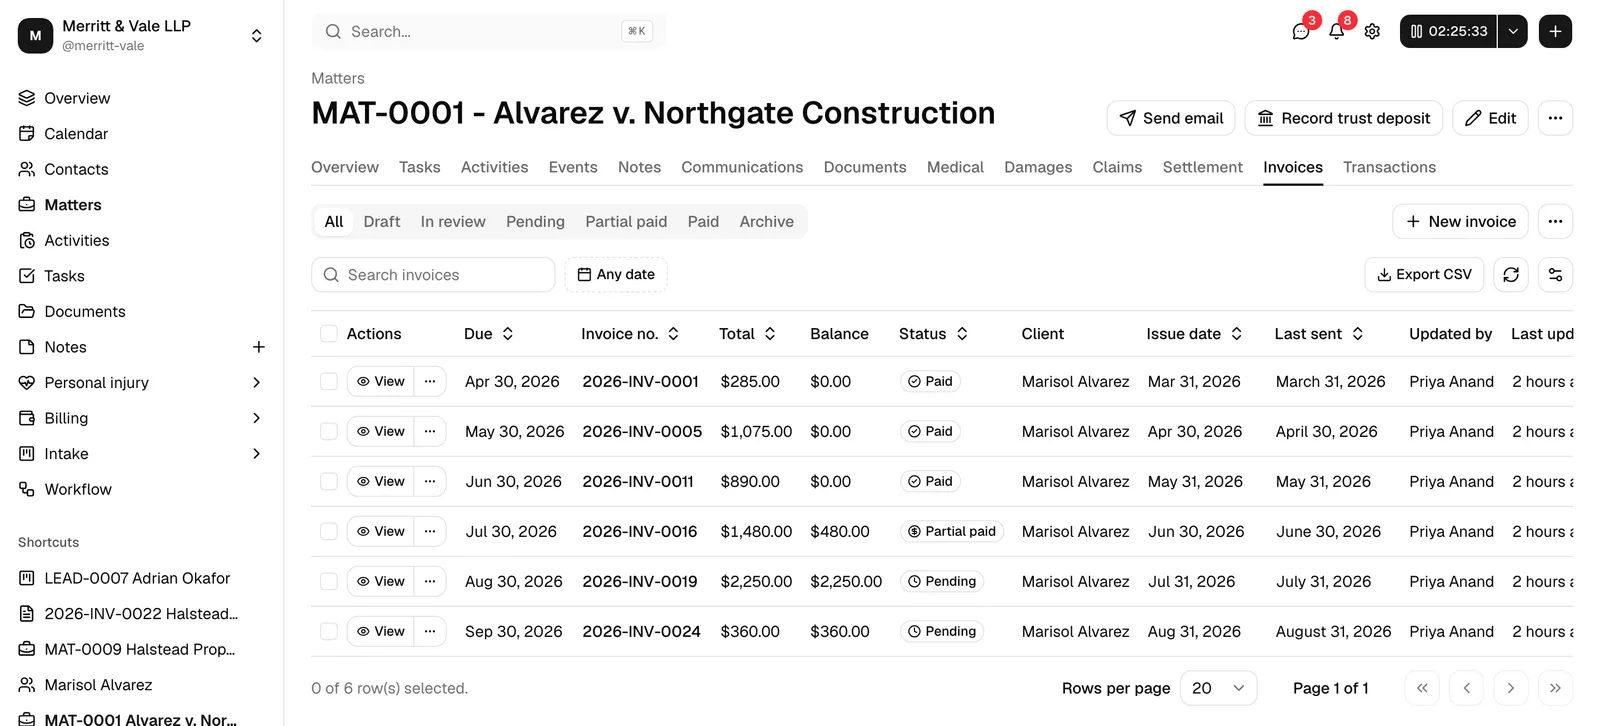
The Invoices page lists every invoice across your firm, with totals, balances, statuses, and quick actions.
- In the sidebar, open Invoices.
- Use the status tabs across the top to narrow the list: All, Draft, In review, Pending, Partial paid, Paid, and Archive. The Archive tab gathers archived, canceled, and declined invoices together.
- Type in the Search invoices box to find an invoice by number, client, or matter.
- Click the date range control to limit the list to invoices within a span of dates.
- To clear everything at once, click Clear filters.
The table shows, for each invoice, its Due date, Invoice no., Total, Balance (total minus what has been paid), Status, Client, Matter, Issue date, Last sent, Updated by, and Last updated. Click any column header to sort, and use the view options control on the right to show or hide columns or refresh the list.
Four of those columns are links, so you can go straight where you need to: Invoice no. opens the invoice, Client opens the contact, Matter opens the matter (shown as its number and title, for example MAT-0042 - Smith v. Acme Corp), and the name in Updated by opens that member's page.
Note: If an invoice belongs to a matter you do not have access to, the Matter column reads Restricted matter and is not a link. You still see the invoice and its amount, because billing is your job; you just do not learn which matter it is for. See Roles and permissions.
A totals summary above the table rolls up the invoices currently in view.
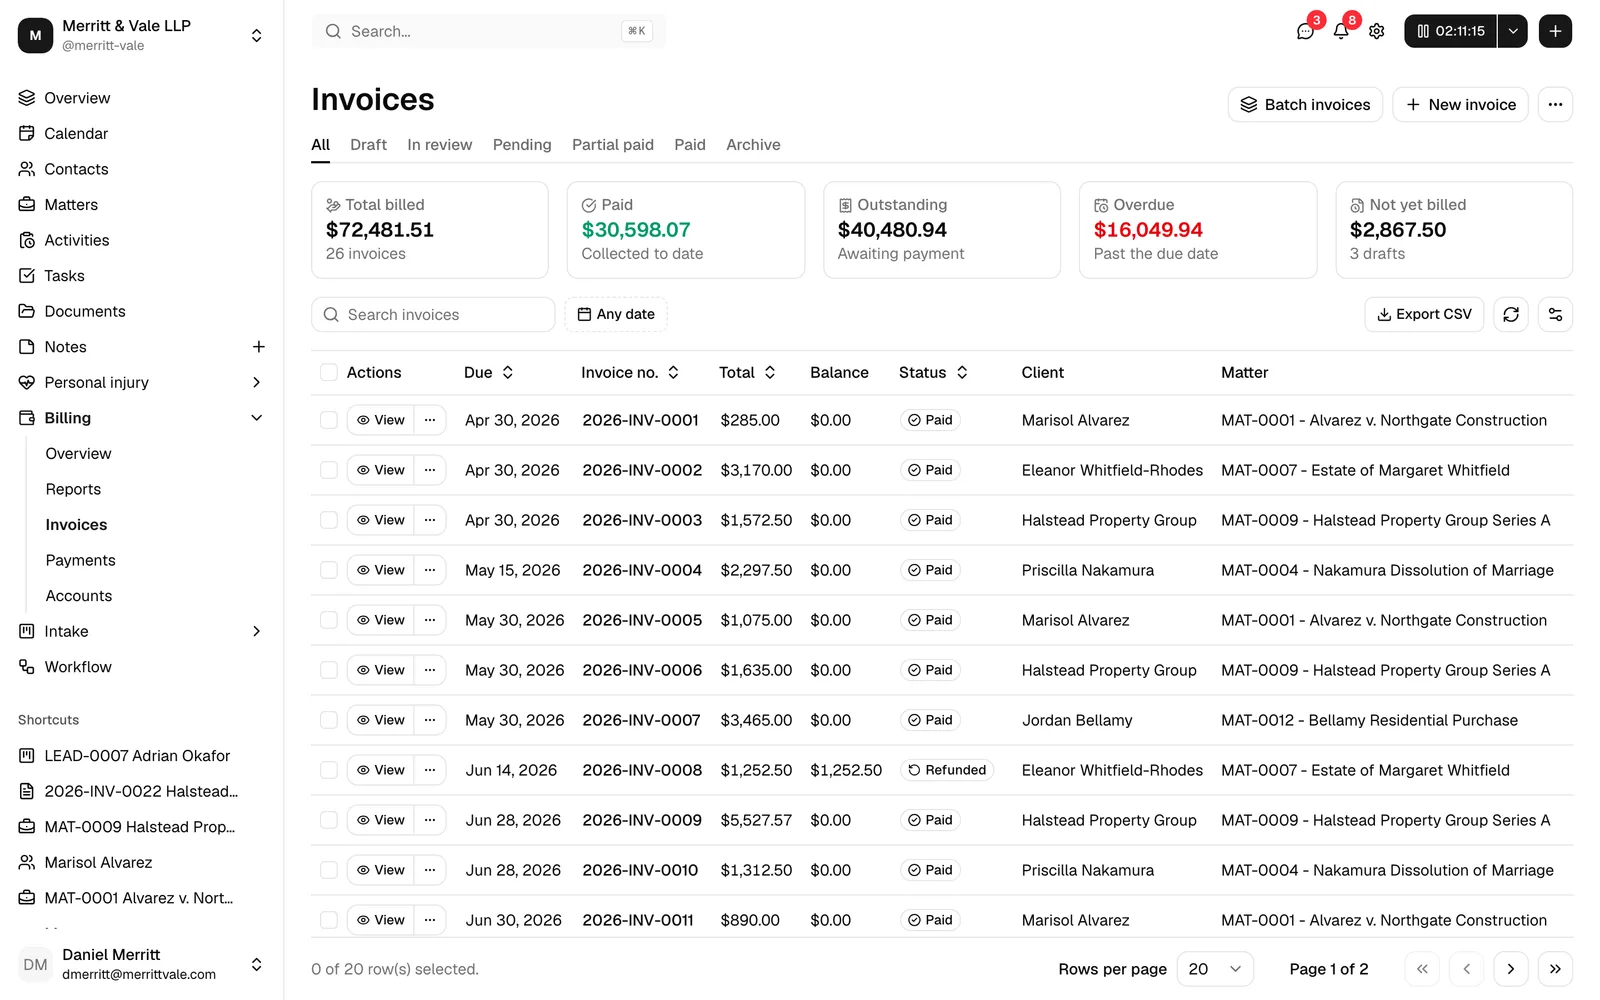
Each row has a View button (opening the invoice) and a More actions menu. The actions you see in that menu depend on the invoice's status and your permissions; they mirror the actions on the invoice's own page, described later on this page.
Acting on several invoices at once
Tick the checkbox at the start of one or more rows to select them, then use the batch actions control to Archive, Restore, Cancel, or Delete the selected invoices together. Each batch action only applies to invoices it is valid for (for example, Delete only affects archived invoices), and destructive actions ask you to confirm first.
Bill several matters at once
If unbilled work is spread across many matters, you do not have to invoice them one by one. Click Batch invoices at the top of the Invoices page to open a screen that gathers every matter with unbilled billable work, so you can review it all and generate the invoices together. See Batch invoicing.
Create an invoice from a matter's billable activities
You create an invoice by picking a client and one of their matters, then choosing which of that matter's billable, un-invoiced activities go on it as line items.
- On the Invoices page, click New invoice. (You can also start from a matter; see The matter Invoices tab below, which pre-selects the matter for you. To start from the entries you want to bill, see Create an invoice from selected activities.)
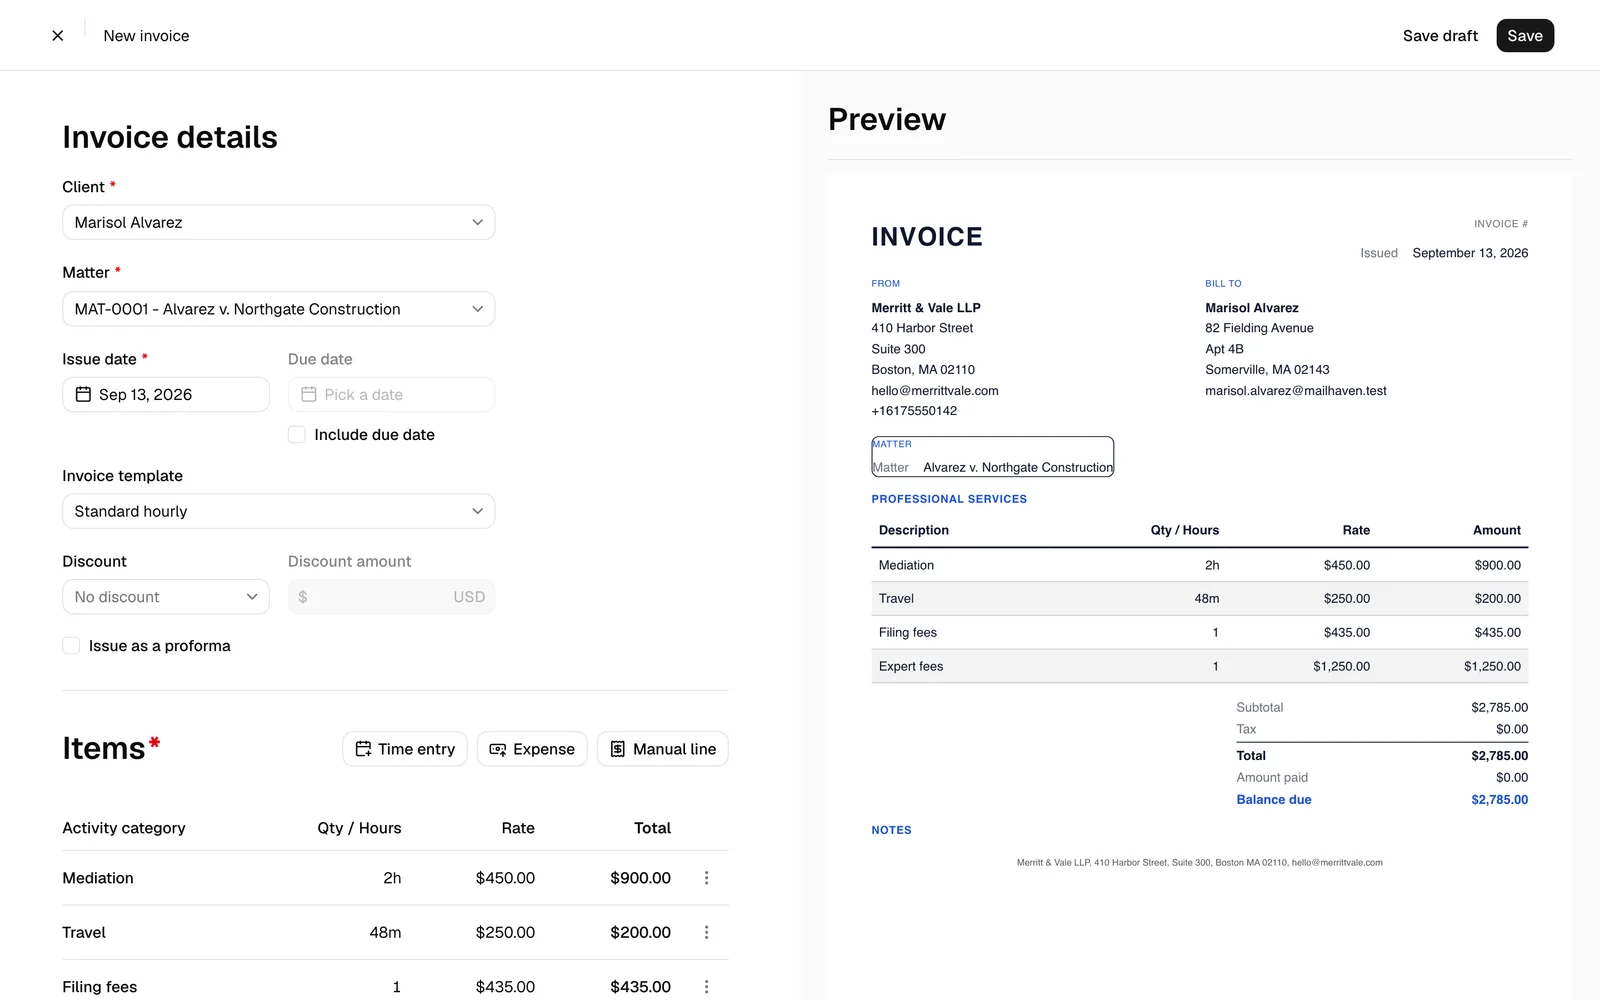
- The invoice editor opens with an Invoice details form on the left and a live Preview on the right.
- In Client, search for and select the client you are billing. This is required.
- In Matter, choose one of that client's matters. This field stays disabled until you pick a client, and it only lists matters that client is a customer on. This is required.
- Add the matter's billable time entries and expenses with the Time entry and Expense buttons above the Items table. Nothing is added until you pick it; see Add existing activities.
- Set the Issue date (defaults to today). This is required.
- To put a payment deadline on the invoice, tick Include due date and pick a Due date. If you leave Include due date unticked, the invoice shows no due date.
- In Invoice template, choose the layout used to render the invoice (for example in the preview and on the PDF, including the PDF your client downloads from the payment page). Your firm's default template is selected for you if one is set. Templates are managed separately; see Invoice templates and the builder.
- Tick Issue as a proforma if this is a request for funds rather than a tax invoice. See Recurring invoices and pre-bills.
- To reduce the whole invoice, tick Apply a discount. Two fields appear: set Discount type to Percentage or Fixed amount (it starts on Percentage), and enter the value in Discount percent or Discount amount beside it. Leave the box unticked if there is no discount. See Credit notes, write-offs, and discounts.
Tip: The Preview panel on the right updates as you change the client, matter, dates, template, and line items, so you can see exactly how the finished invoice will look before you save it.
Important: You choose which activities go on the invoice; Esqase calculates all the money. Quantities, rates, line totals, tax, and the invoice subtotal and total are recalculated from the underlying activities when you save, so the amounts on the finished invoice always match the recorded work.
Create an invoice from selected activities
When you already know which time entries and expenses you want to bill, start the invoice from the entries themselves. The new invoice opens with only those entries as line items, with their matter and the matter's client already filled in. No other entries from the matter are added.
- Open the Activities page, or the Activities tab of a matter.
- For one entry, open the More menu (three dots) in its Actions column and click Create invoice. For several entries, select their checkboxes, open the actions menu above the table, and click Create invoice.
- The invoice editor opens with the entries in the Items table. Check the details, add or remove items as usual, and save the invoice as a draft or submit it.
📷 Screenshot: The new-invoice editor opened from selected activities, with Client and Matter already filled in and only the selected entries in the Items table.
Create invoice is only offered for entries that can go on an invoice, and the entries you select together must belong to one matter and use one currency. For the full list of rules, see Start an invoice from the Activities page.
Note: An entry can stop being available between choosing it and the invoice opening, for example when a colleague puts it on another invoice first. The editor then shows a notice above the Items table, such as 1 of 3 selected activities could not be added, or None of the selected activities could be added when none are left. Activities that are already on another invoice, or that can no longer be billed, are left out.
Note: If the entries could not be added at all, the editor shows We couldn't add the selected activities with the reason. One reason is an archived matter: This matter is archived. Restore it before adding new records to it. Restore the matter first, then start the invoice again.
Tip: On an invoice that opened with selected entries, changing Client to another client of the same matter keeps the matter and the items. Choosing a client who is not on that matter clears both.
Add and remove line items
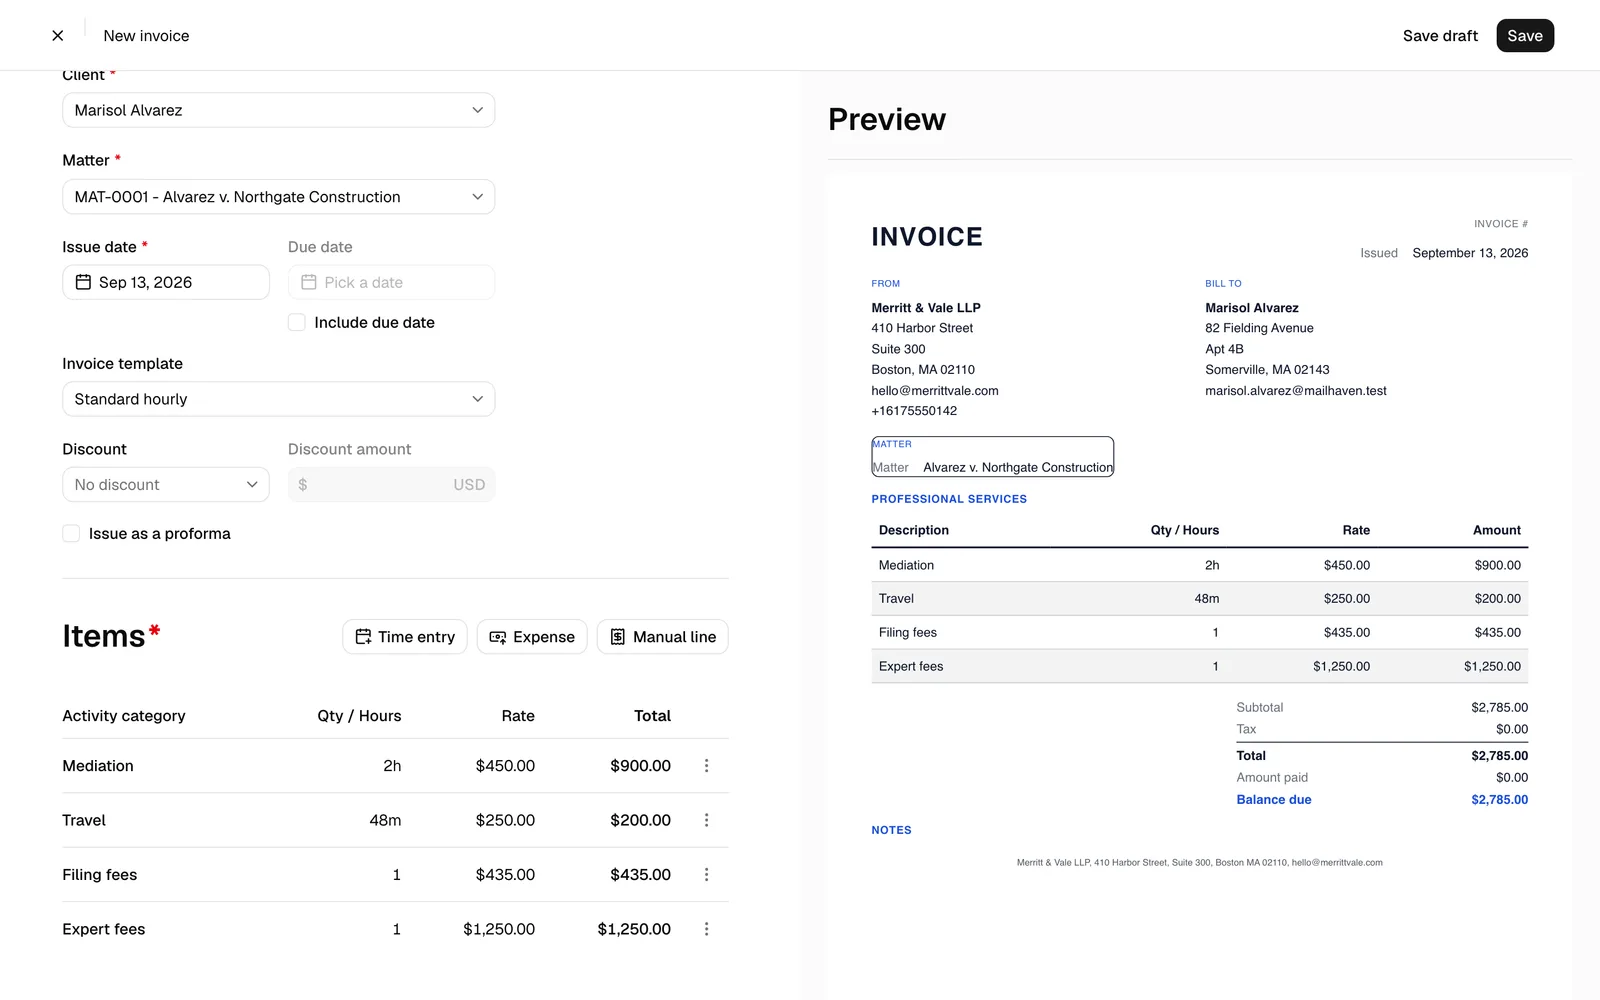
The Items table lists the billable activities that will appear on the invoice. You can add more or remove ones you do not want to bill yet. At least one line item is required before you can submit an invoice (a draft may have none).
Each item shows its Activity category, Qty / Hours, Rate, and Total.
Add existing activities
- Above the Items table, click Time entry to add billable time, or Expense to add a billable expense. (Both buttons stay disabled until you have selected a matter.) A third button, Manual line, adds a charge that has no time or expense entry behind it; it is covered below.
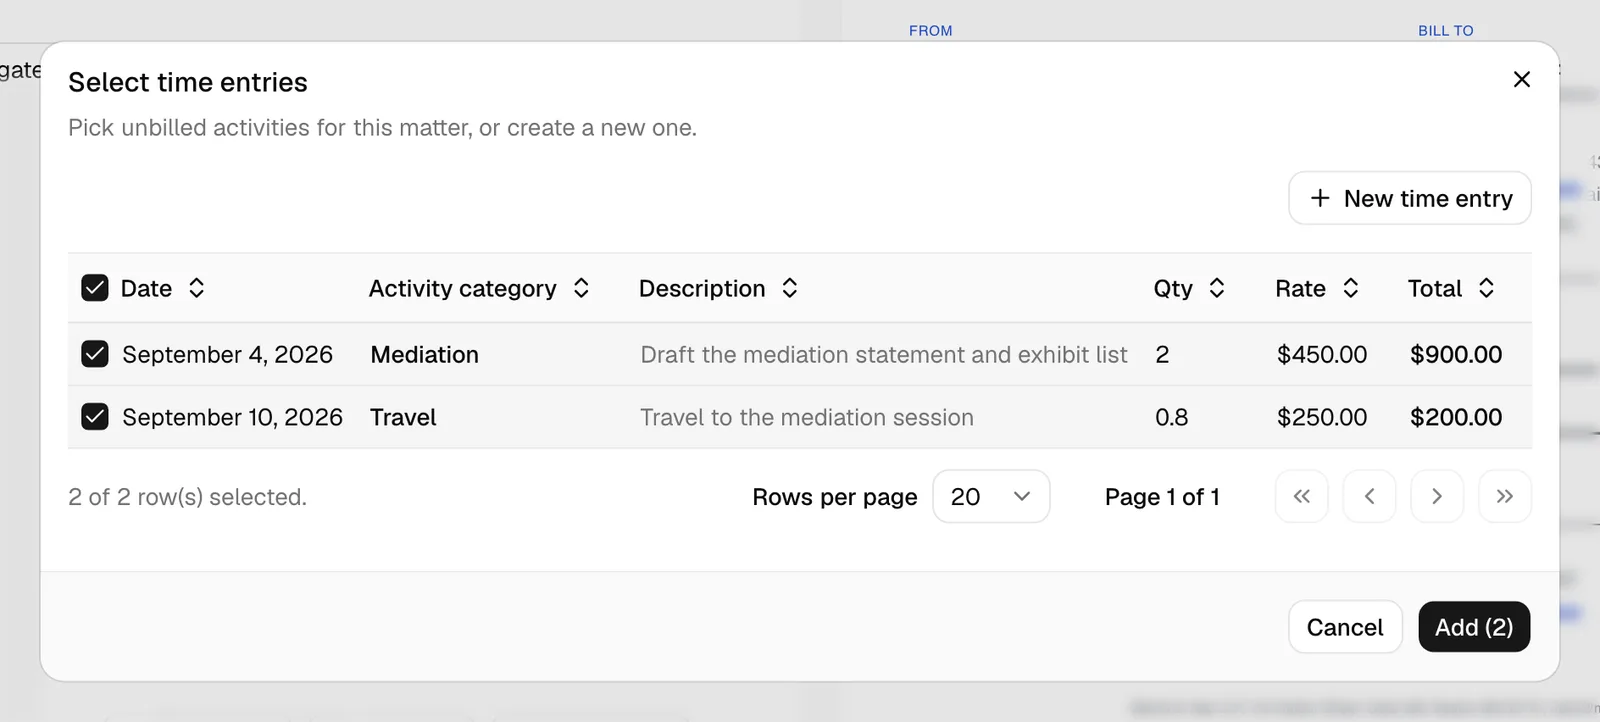
- A dialog opens listing the matter's unbilled activities of that type that are not already on the invoice. Use the checkboxes to pick the ones you want.
- Click Add to put the selected activities on the invoice. The button shows how many you have selected.
Create a new activity while building the invoice
If the work you want to bill has not been recorded yet, you do not have to leave the invoice.
- In the add-items dialog, click New time entry or New expense.
- Fill in and save the activity. It appears in the list already ticked, alongside anything you had ticked before.
- Click Add to put the selected activities on the invoice.
Add a manual line
A manual line is a charge with no time entry or expense behind it: a fixed fee, an agreed lump sum, or an adjustment.
- Above the Items table, click Manual line. Unlike the other two buttons, this one works with or without a matter selected.
- Fill in the dialog:
- Description. What the charge is for, for example "Fixed fee for document review".
- Quantity and Rate. The line total is quantity times rate.
- Date. The date the charge belongs to.
- Tax. One of your firm's tax rates, or none. See Tax rates.
- Save. The line joins the Items table like any other.
Note: Esqase prices a manual line from the tax rate you pick, using the percentage on your firm's own tax record rather than anything typed into the form. That is what keeps the tax on the finished invoice defensible.
Edit or remove a line item
- In the Items table, click the menu at the end of a row.
- Choose Edit to open and update the underlying activity (the line item refreshes after you save), or Remove to take the item off this invoice.
Note: Removing a line item only takes the activity off this invoice. The activity itself stays in the matter and remains available to bill on a future invoice.
Edit a draft or in-review invoice
You can keep editing an invoice while it is a Draft or In review. Once it has been approved (or otherwise finalized), it can no longer be edited.
- Open the invoice from the Invoices list (or its row's More actions menu) and click Edit, or use Edit in the More actions menu.
- The same editor opens. Change the client, matter, dates, template, or line items as needed.
- Save your changes (see below).
Note: The Edit button only appears for invoices in Draft or In review status, and only if your role includes Update access for invoices.
Save as a draft
A draft lets you set an invoice aside and come back to it. Drafts can have zero line items and are never sent to anyone.
- In the invoice editor, click Save draft in the top bar.
- The invoice is saved with Draft status and you stay in the editor so you can keep working.
Note: Save draft is available while you are creating a new invoice or editing one that is still a Draft. Once an invoice has been finalized, it cannot be pulled back to draft from the editor.
Important: A draft does not take an invoice number. It reads as Pre-bill in the list and on its own page until you finalize it, and a draft you abandon leaves no gap in your client-visible sequence. Your firm can turn this off, so that every invoice takes a number the moment it is created; see Invoice and billing settings.
Draft invoices a workflow creates
A workflow can bill for you. An Invoice step creates a draft invoice on the matter it is attached to, with one line for each activity category the step was given, priced from your firm's rates. The draft itself is never sent: you check, edit, and finalize it like any other. What happens once it is approved depends on the step, which can create a payment link, email the invoice to the client, and send payment reminders until it is paid (see After a workflow invoice is approved).
A member sees it before it goes anywhere, out of the box. Invoice steps wait for approval even when they are set to run automatically, because Invoice is on the list of steps that need approval under Settings > Firm > Automation. If an owner or administrator takes Invoice off that list, a step with Auto approve the invoice turned on approves its own draft when the member the workflow runs as could approve it, and otherwise waits for a member as before. See When Esqase approves the invoice. Esqase writes the draft, then holds the workflow and tells the firm the step needs approval. On the lead or matter, the step offers Review, which names the draft invoice, gives you a Review draft invoice link that opens it in a new tab, and carries a checkbox reading Also approve this invoice, ticked for you. Click Approve and continue and the step and the invoice are both approved in one go. Clear the checkbox first if you want the invoice left as a draft. Choose Skip this step and the workflow moves on without it. See Automation settings.
What approving from the step does to the invoice. With Also approve this invoice ticked, the invoice leaves Draft at the same moment the step is approved and is credited to you: it takes its number from your firm's sequence (if your firm assigns numbers on finalizing), the activities behind its lines are marked billed, and it becomes Pending, ready to send. If your role requires approval for invoices, the checkbox reads Also send this invoice for review instead, and the invoice becomes In review with your firm's reviewers on it. If your role does not include Update access for invoices the checkbox is greyed out and reads Your role cannot approve invoices, so this one stays a draft for someone who can, so approving the step leaves the draft where it is. If the invoice is no longer a draft, the dialog says so in a plain line instead of offering the checkbox.
📷 Screenshot: The step review dialog for an Invoice step, showing the draft invoice number, the Review draft invoice link, the ticked Also approve this invoice checkbox, and the Approve and continue button.
A step can also wait for the money. An invoice step can be set to count as done when the invoice is approved, or when it is paid, rather than as soon as the draft exists. Until then the step shows as waiting on the lead or matter and the steps below it hold. Approving the invoice is what releases a step that waits on approval, whether you tick Also approve this invoice in the review or finalize the draft yourself in the invoice editor. Either way the step finishes on its next pass and the workflow carries on.
Billing a lead uses a small invoicing matter. Invoices belong to a matter, so a step on a lead that has not been converted yet puts the draft on a matter created for that purpose, named after the contact, for example "Jane Dela Cruz - Pre-engagement (lead LEAD-0117)". It sits in a Pre-engagement practice area with Open, Invoiced, and Closed stages, which Esqase creates the first time it is needed. The next invoice for that lead reuses the same matter. The lead itself is not marked hired, converted, or done, so you can bill a consultation without deciding whether to take the case. If the lead is converted later, the work carries on in the real matter. See Managing leads and Converting leads to matters.
Note: A draft an automation creates is recorded as created by the member the workflow is running for, so the invoice's history names a person. Everything after the draft, finalizing, review, sending, and collecting, works exactly as it does for an invoice you build by hand.
After a workflow invoice is approved
However the invoice is approved (by the step, in the step's review, in the invoice editor, or by your firm's reviewers), the step can then send it for you:
- Payment link. Esqase uses a payment link the invoice already has, or creates one offering every payment method your firm has set up, on your firm's default partial-payment policy (never installments) and with no expiry. With no payment method set up there is no link, no email, and no reminders.
- Invoice email. It goes to the invoice's client at the same address the payment notice uses (Billing, then Primary, then Work), with the payment link in it, and updates Last sent. An invoice that was already sent is not emailed again.
- Payment reminders. They go out on the step's schedule until the invoice is paid, nothing is left to pay, or the step's total or your firm's limits are reached. Each one updates Last sent.
This happens only while Esqase is running the workflow on that lead or matter. If the workflow is paused, its automation has not been started, or your firm has paused automation, the link and email wait and go out when it resumes. The step's row on the lead or matter says what went out, for example Payment link created. Invoice emailed October 4, 2026. Reminder 1 of 3 sent. See Invoice step.
Important: One reminder schedule at a time. While a workflow's payment reminders are running for an invoice, your firm's due-date reminders skip that invoice, and they pick it up again when the workflow's reminders pause or finish. See Invoice and billing settings.
Submit an invoice for approval, then approve or request changes
When the invoice is ready, you finalize it. What happens next depends on your firm's approval rules.
- In the invoice editor, click Save in the top bar. (At least one line item is required.)
- Esqase finalizes the invoice and opens its read-only page:
- If your role requires approval for invoices, the invoice becomes In review and a review opens on it automatically. Your firm's default reviewers are added and notified.
- If your role does not require approval, the invoice becomes Pending (ready to send and collect).
- At this point the invoice takes its number from your firm's sequence, and keeps it. The year in the number comes from the invoice's issue date, so back-dating an invoice numbers it in that year.
Your firm decides which roles require approval, which roles can approve, and how many approvals an invoice needs, at Settings > Approvals. See Approvals for invoices and documents.
Review an invoice that is in review
An invoice waiting on approval shows its review at the top right of its page. If nobody has been asked yet, it is a Request reviewers button. Once someone is reviewing, it is a row of reviewer avatars, each carrying a small badge with that person's decision: a green check for Approved, a red x for Requested changes, an amber dash for changes that have all been marked done and are waiting on a second look, and grey dots for Awaiting review. Hover one to see the person's name, their role, and their decision.
- Open the In review invoice, or find it in the In review tab on the Invoices list.
- Click Request reviewers, or the avatars, to open the review panel. Its heading reads Request a review, with the review's status beside it (for example, Awaiting approval), and beneath it a count such as 1 of 2 approvals.
- To bring a colleague in, type in the Search team members box and click their name. A check mark marks everyone already reviewing; clicking a name that already has one takes that request back.
- If your role can approve invoices, click Approve. When the number of approvals reaches what your firm requires, the review is complete and the invoice moves to Pending, ready to send and be paid.
- To send it back instead, click Request changes, write what should change (use @ to mention a colleague), and click Send review. Your note is posted into the invoice's Comments section with a Review chip on it, and the invoice stays blocked until that reviewer approves it later. Requesting changes is reversible: it does not decline the invoice.
- To read what a reviewer asked for, find them in the same member list: a reviewer who requested changes shows a View feedback button where their check mark would be. Click it and the panel closes and the page scrolls to their comment in Comments, highlighting it for a moment. Clicking their name instead still takes their review request back, as it does for any reviewer.
- As you work through what a reviewer asked for, click Mark as done underneath their review comment in Comments. When all of their points are done, their badge turns amber and they are told the invoice is ready for another look.
Note: If you take the last reviewer off an invoice your firm does not require a review for, the review is cancelled and the invoice stops waiting for approval, so the Approve and Decline actions below become available again. If your firm does require the review, the last reviewer cannot be removed. See Approvals for invoices and documents.
Important: An invoice with an open review cannot have a payment link generated or a payment recorded against it until the review is approved. If you try, Esqase tells you the invoice needs approval first.
Note: Approving an invoice marks its attached activities as billed, so they are no longer offered as available items on other invoices.
Approve or decline (invoices without a review)
Some invoices carry no review: your firm may have invoice approvals switched off, or the invoice may have been submitted before your firm started using approvals. For those, In review still offers the older pair of actions to anyone with Update access for invoices, including the person who submitted it.
- Open the In review invoice, or find it in the In review tab.
- Click Approve to approve it. The invoice moves to Pending and can now be sent and paid.
- Click Decline to reject it. The invoice moves to Declined. A declined invoice can be restored later if you change your mind.
These actions are available from the invoice's page, from the More actions menu, and from the invoice's row in the list. When an invoice does have a review, the review replaces them and approving happens on the invoice's page, where the reviewer avatars and the request-changes note live.
Editing an approved invoice restarts its review
A review applies to the version of the invoice that was reviewed. If you change the invoice materially (the client, matter, currency, line items, quantities, rates, taxes, or totals), the approvals collected so far are cleared and a fresh review opens with the same reviewers, so they can look at the new figures. Editing other details does not disturb the review.
Understand invoice statuses and the lifecycle
Every invoice carries a status that tells you where it is in its life. You can see it on the invoice's page (in the sidebar) and as a badge in the Invoices list.
- Draft. A work-in-progress that has not been finalized. Editable; not sent or billed.
- In review. Submitted by someone whose role requires approval, and waiting for its reviewers. Editable until approved.
- Declined. An in-review invoice that was rejected. Can be restored. Only the older approve/decline actions produce this status; asking a reviewer for changes does not decline an invoice.
- Pending. Approved and ready to send and collect payment on. Nothing has been paid yet.
- Partial paid. Some, but not all, of the balance has been paid.
- Paid. The full balance has been paid.
- Refunded. A refund has been issued against the invoice.
- Written off. The whole remaining balance was written off as uncollectible. See Credit notes, write-offs, and discounts.
- Canceled. The invoice was canceled. Can be restored.
- Archived. The invoice was archived (hidden from the active list). Can be restored, or permanently deleted.
A typical path is Draft to In review (or straight to Pending when your role does not need approval) to Pending, then Partial paid and Paid as money comes in.
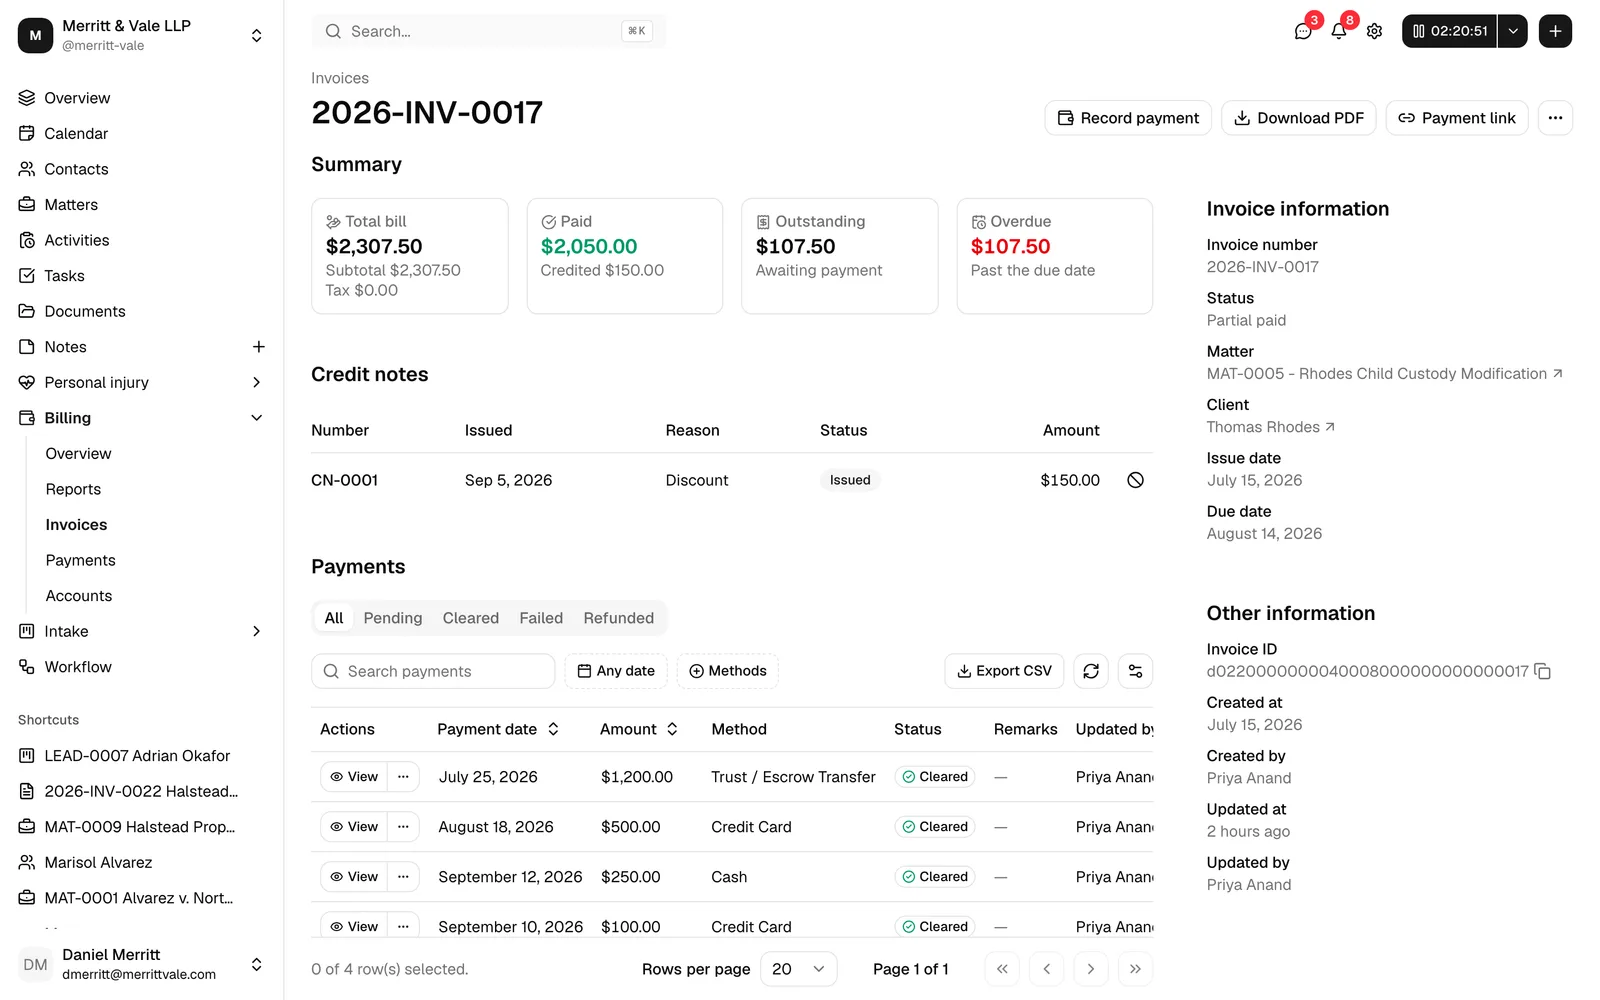
The invoice page header shows the invoice number, and the Summary section shows four figures:
- Total bill (with the breakdown beneath it in this order: Subtotal, Discount as a negative amount when one applies, Tax, and Withholding when it applies),
- Paid so far (with Credited and Written off beneath it when either applies),
- Outstanding (what is still owed, after payments, credit notes, and write-offs),
- Overdue (the outstanding amount if the due date has passed, shown in red).
Record a manual payment against an invoice
When a client pays you outside of Esqase (for example by check or a bank transfer you reconcile yourself), record that payment so the invoice reflects it. This is available while an invoice is Pending or Partial paid.
- Open the invoice (or use the More actions menu on its row in the list).
- Click Record payment.
- The Record payment dialog opens, showing the invoice number, the client, and the Outstanding balance.
- Enter the payment details (such as the amount and the account it goes into) and save with Record payment.
The invoice's Paid and Outstanding figures update, and its status moves to Partial paid or Paid depending on how much was paid. Recorded payments appear in the Payments section on the invoice's page.
For the full payment form and the account/trust rules, see Recording and managing payments and Accounts, trust, and transactions.
Note: When a client reports a bank transfer or QR payment on a payment link, Esqase creates the payment for you as Pending, so you do not need to key it in by hand. You still have to review it and mark it cleared before the invoice balance moves. A card or bank account payment through LawPay or Confido Legal is recorded and cleared for you. See Recording and managing payments.
Generate a payment link
A payment link is a secure web page where your client can view the invoice and pay it: by card or from their bank account when your firm has connected LawPay or Confido Legal, or through their own bank or payment app, telling you they have paid. It is available once the invoice is Pending, Partial paid, or Paid. Refunded invoices cannot take a new payment, so no link is offered for them. If the invoice needs approval, the link becomes available once the review is approved. See Approvals for invoices and documents.
- Open the invoice and click Payment link.
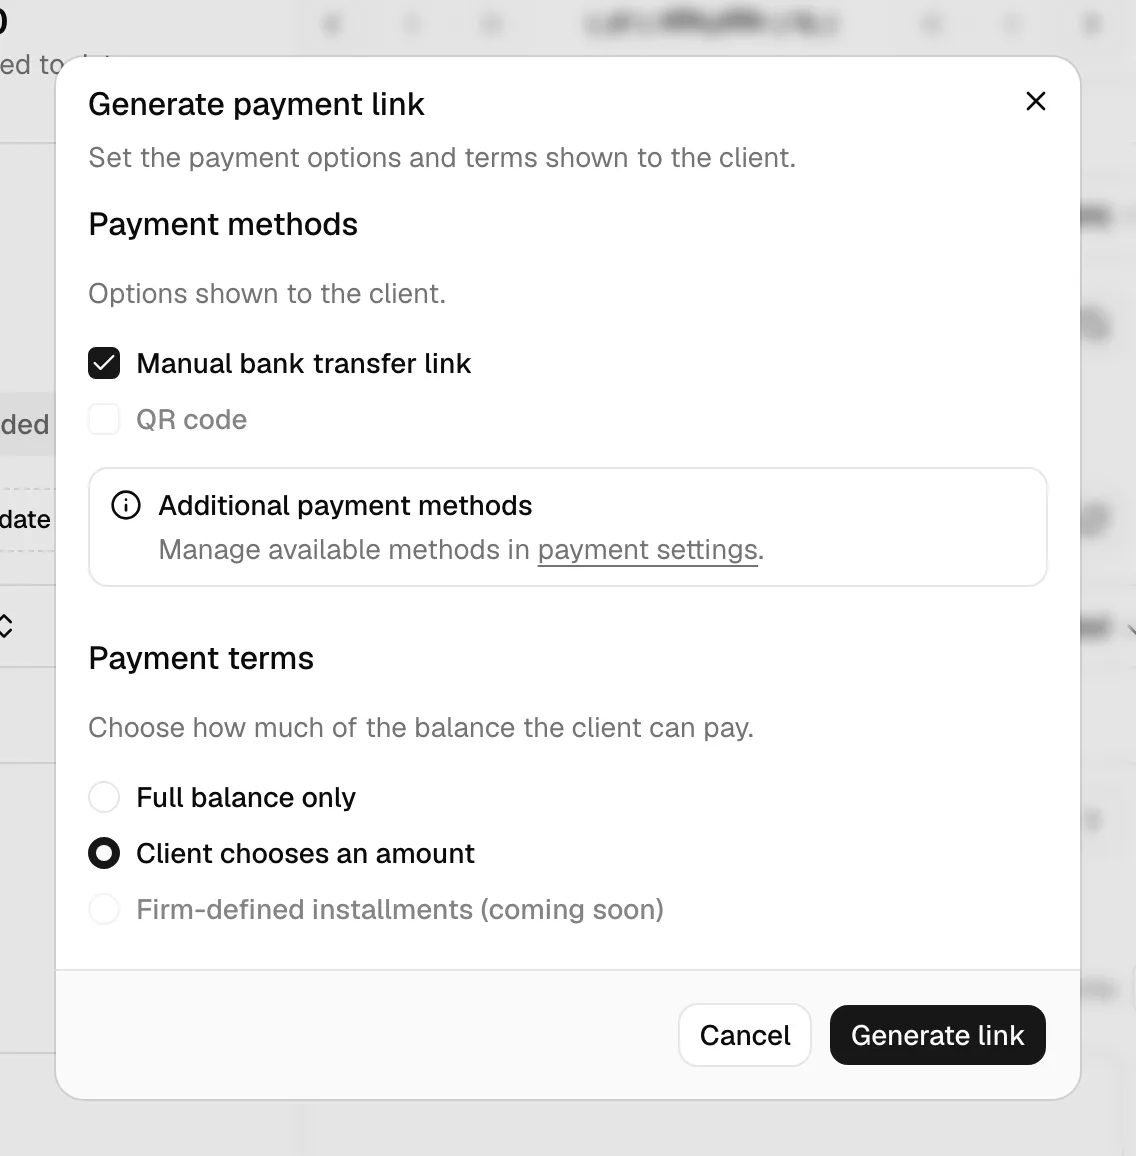
- The Generate payment link dialog opens. Under Payment methods, tick the options to offer the client: Card, Bank payment (eCheck) or Bank payment (ACH) (the name depends on your processor), Manual bank transfer link, and QR code. Only the methods your firm has set up can be turned on here; the dialog tells you where to set up the others (payment settings, or Integrations for a card processor).
- Under Payment terms, choose how much the client may pay:
- Full balance only requires paying the whole outstanding balance.
- Client chooses an amount lets the client pay a partial amount.
- Firm-defined installments splits the balance into a schedule of installments that you set up in the dialog, and lets the client turn on autopay. See Payment plans and autopay.
- Click Generate link.
- On the Payment link ready screen, use the copy button next to the Link field to copy the URL, then share it however you like. The client verifies their identity by email when they open the link.
- To email the link straight away, click Send email to client (see the next section), or click Done to finish.
Important: A payment link can only be generated once your firm has a payment method ready: a connected LawPay or Confido Legal account with its accounts mapped, or a bank transfer link or QR code together with a default deposit account. If none is ready, the dialog shows a "Finish payment setup first" notice with links to payment settings and Integrations. See Payment settings and Taking card and bank payments with LawPay or Confido Legal.
Once a link with installments exists, the invoice's page shows a Payment plan section below its payments, where you edit the schedule, pause or cancel autopay, and charge an installment. See Manage the plan on the invoice.
To learn what your client sees and how they pay, see How clients pay invoices.
Send an invoice to a client by email
You can email the client a payment link and notice directly from the invoice. With Gmail or Outlook connected, Esqase sends it for you; with no mailbox connected, the composer hands the finished message to your own mail app. See Sending email and Integrations overview.
- Open the invoice and click Payment link.
- Generate the link as described above, then on the Payment link ready screen click Send email to client.
- The email composer opens, pre-filled with your firm's invoice payment notice template and addressed to the invoice's client. Esqase uses the client's Billing email address when they have one, otherwise their Primary or Work address. The generated payment link is woven into the message so the client can click through and pay.
- Review and edit the subject and message, then send.
Only the invoice's client is added to To, because the payment link opens only for that client's email addresses. If the client has no email address on file, To starts empty and a note under it says so.
The invoice records the moment it was last sent, which appears in the Last sent column on the Invoices list. The email is also logged as a read-only Email row, so your team can see that the payment notice went out and when. It is logged on the Communications tab of the invoice's matter when you can open that matter and it is not archived; otherwise it is logged in Esqase without a matter. If you sent it from your own mail app instead, the row is only created if you asked for one on the hand-off step, and it is marked Unverified because Esqase cannot confirm delivery. See Logging communications.
Tip: The email message comes from a reusable template you can customize. See Email templates and Email signatures.
Email a client about an invoice
To write to the client about an invoice without sending a payment link, use Send email at the top of the invoice's page.
- Open the invoice and click Send email. On a narrow screen, it is in the More actions menu instead.
- The email composer opens, addressed to the invoice's client at the same email address the payment notice uses. No template is filled in for you.
- Write your message, or pick a template, and send.
📷 Screenshot: An invoice detail header showing the Send email button alongside the other header actions.
Send email is available at any status except Archived, as long as your role includes Create access for Communications. Choosing Send email from the header + menu while the invoice is open addresses the email the same way.
This email does not create a payment link and does not change Last sent. It is logged the same way as the payment notice: on the Communications tab of the invoice's matter when you can open that matter and it is not archived, and otherwise in Esqase without a matter.
Tip: The invoice payment notice template expects a payment link, which this email does not have. If you pick that template here, Esqase asks you to confirm before sending with the link missing. To give the client a way to pay, use Payment link and then Send email to client instead. See Confirm unfinished placeholders before sending.
Download or render the invoice PDF
You can download a PDF of the invoice once it is Pending, Partial paid, Paid, or Refunded.
- Open the invoice (or use the More actions menu on its row in the list).
- Click Download PDF.
- Esqase generates the PDF using the invoice's template and downloads it to your device.
Note: The PDF uses the invoice template selected on the invoice. To change how it looks, pick a different template while editing, or adjust the template itself. See Invoice templates and the builder.
The PDF totals block reads down in this order: Subtotal, Discount if there is one, then one Tax line per tax rate used on the invoice (labelled with the rate, and marked (included) when your firm prices tax-inclusive), then Withholding tax if it applies, then Total, Amount paid, Credited and Written off where they apply, and finally Balance due. The discount and withholding show as negative amounts. Anyone checking the arithmetic on this PDF can see how the tax total was reached, not just its sum. See Tax rates.
Note: The PDF your client downloads from their payment link lists the same rows in the same order, but shows tax as a single Tax line, with no line per rate and no (included) mark. See How clients pay invoices.
Reduce a balance after the invoice has gone out
Once an invoice has been issued, its figures are fixed: you do not go back and edit them. Two actions in the More actions menu change what is owed without rewriting what the client received.
- Issue credit note. Reduces the balance and records a separate, numbered credit document. Offered while an invoice is Pending, Partially paid, or Paid and still has an outstanding balance.
- Write off. Closes the remaining balance as uncollectible. Offered while an invoice is Pending or Partially paid and still has an outstanding balance.
Both are covered in full on Credit notes, write-offs, and discounts.
Important: Once any money has been recorded against an invoice, whether paid, credited, or written off, that invoice can no longer be archived or deleted. The record stays.
Cancel an invoice
Canceling marks an invoice as no longer payable while keeping it on record. It is available for any invoice that is not already canceled or archived.
- Open the invoice list, select the invoice (or invoices), and choose Cancel from the batch actions, confirming when prompted. You can also cancel a single invoice from its More actions menu where offered.
- The invoice moves to Canceled. You can Restore it later if needed.
Note: Canceling is reversible. To remove an invoice from your active workspace without canceling it, archive it instead.
Archive, restore, and delete
These actions help you clean up and, when necessary, permanently remove invoices.
Archive
Archiving moves an invoice out of your active list without losing it. It is available from the More actions menu on the invoice page or its row, and as a batch action.
- Choose Archive and confirm.
- The invoice moves to Archived and appears under the Archive tab.
Restore
Restoring brings a canceled, archived, or declined invoice back.
- Find the invoice (usually under the Archive tab) and choose Restore from its More actions menu, or select it and use the Restore batch action.
- The invoice returns to an active status.
Delete
Deleting permanently removes an invoice and cannot be undone. To protect your records, you can only delete an invoice that is Archived, and only if your role includes Delete access for invoices.
- Archive the invoice first if it is not already archived.
- From the archived invoice's More actions menu choose Delete, or select it and use the Delete batch action.
- Confirm in the Delete invoice? dialog. The invoice is permanently removed.
Important: Deleting is permanent. If there is any chance you will need the invoice again, archive it instead of deleting it.
Comment on an invoice
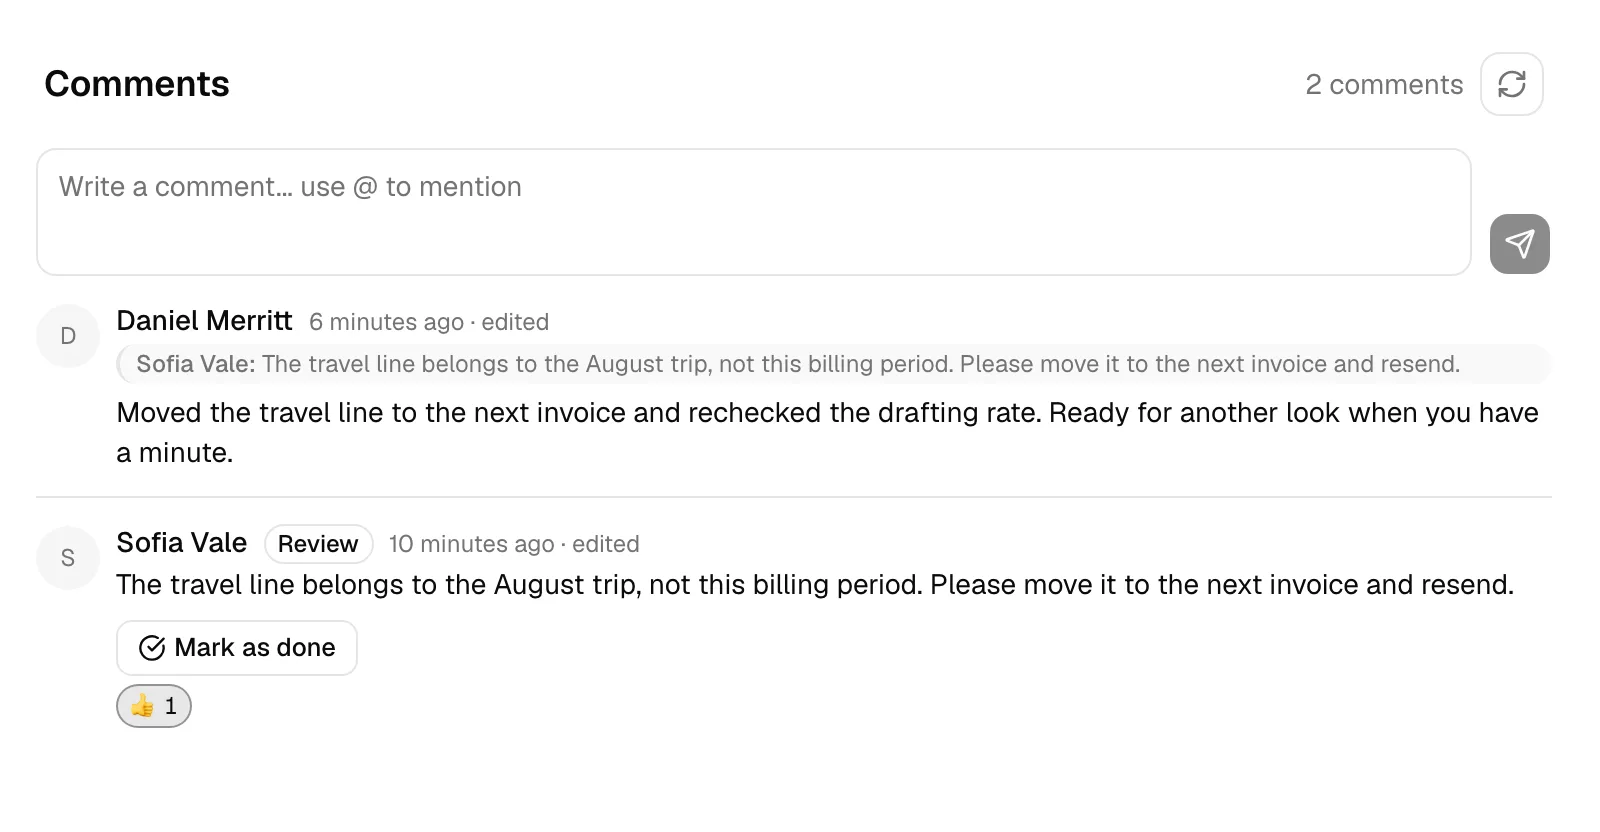
Every invoice has its own discussion thread, the same chat-style feed used on tasks and documents. Use it to query a line item, agree a write-off, or work through what a reviewer asked for.
- Open the invoice and scroll to the Comments section, which sits between the Payments section and Recent activities. A count at the top of the feed shows how many comments the invoice has.
- Type your note in the Write a comment... use @ to mention box.
- Click the send button (or press Enter) to post. A Comment posted confirmation appears, and your comment shows in the list with your name and how long ago you posted it.
If there are no comments yet, the feed reads No comments yet. Start the discussion.
What you can do with a comment:
- Mention a colleague: type @ to bring up your firm's members, each with their profile photo (or initials), keep typing to search, and click the person you want. Their name is highlighted in the posted comment and they are notified.
- React: hover a comment, click the add reaction (smiley) button, and pick one of 👍, ❤️, 😂, 😮, 😢, or 🙏. Reactions gather into counters beneath the comment; click a counter to add or remove your own.
- Reply: hover a comment and click the reply button. A Replying to banner naming the author appears above the box, and the posted reply carries a short quote of the comment you answered.
- Edit or delete your own: hover a comment you wrote and use the edit (pencil) or delete (trash) button. An edited comment shows an edited marker next to its time; deleting asks you to confirm and removes it for everyone.
- Read older comments: the feed shows the 20 newest comments first, with Page 1 of N and back/next buttons beneath it. Use those to walk back through a long discussion. The refresh control on the Comments heading pulls the conversation by hand at any time.
The feed updates on its own while you have the invoice open, so a colleague's comment, edit, deletion, or reaction appears without a refresh.
Comments carrying a Review chip were written by a reviewer asking for changes. The fastest way to reach one is View feedback on that reviewer's row in the review panel, which scrolls the page to their comment and highlights it briefly. If you are on the invoice editor rather than the invoice's page when you click it, Esqase takes you to the invoice's page first, because the editor has no comments on it. See Work through the changes a reviewer asked for.
Note: You need Update access for invoices to post, reply, react, edit, or mark a review done. With View access only, you can read the conversation but the comment box and those actions are hidden.
Note: Commenting notifies the person who created the invoice and everyone who has already commented on it, and anyone you @mention is notified instead of a duplicate. You are never notified about your own comment. Choose your channels under Settings > Notifications (the Comment on my invoice and Mentioned in an invoice comment events). See Notifications.
Important: Invoice comments are internal to your firm. They are never shown to a client on a payment link or on the invoice PDF.
View an invoice's activity timeline
Each invoice keeps a running history of what happened to it, so you can see who did what and when.
- Open the invoice.
- Scroll to the Recent activities section, at the bottom of the page beneath Comments.
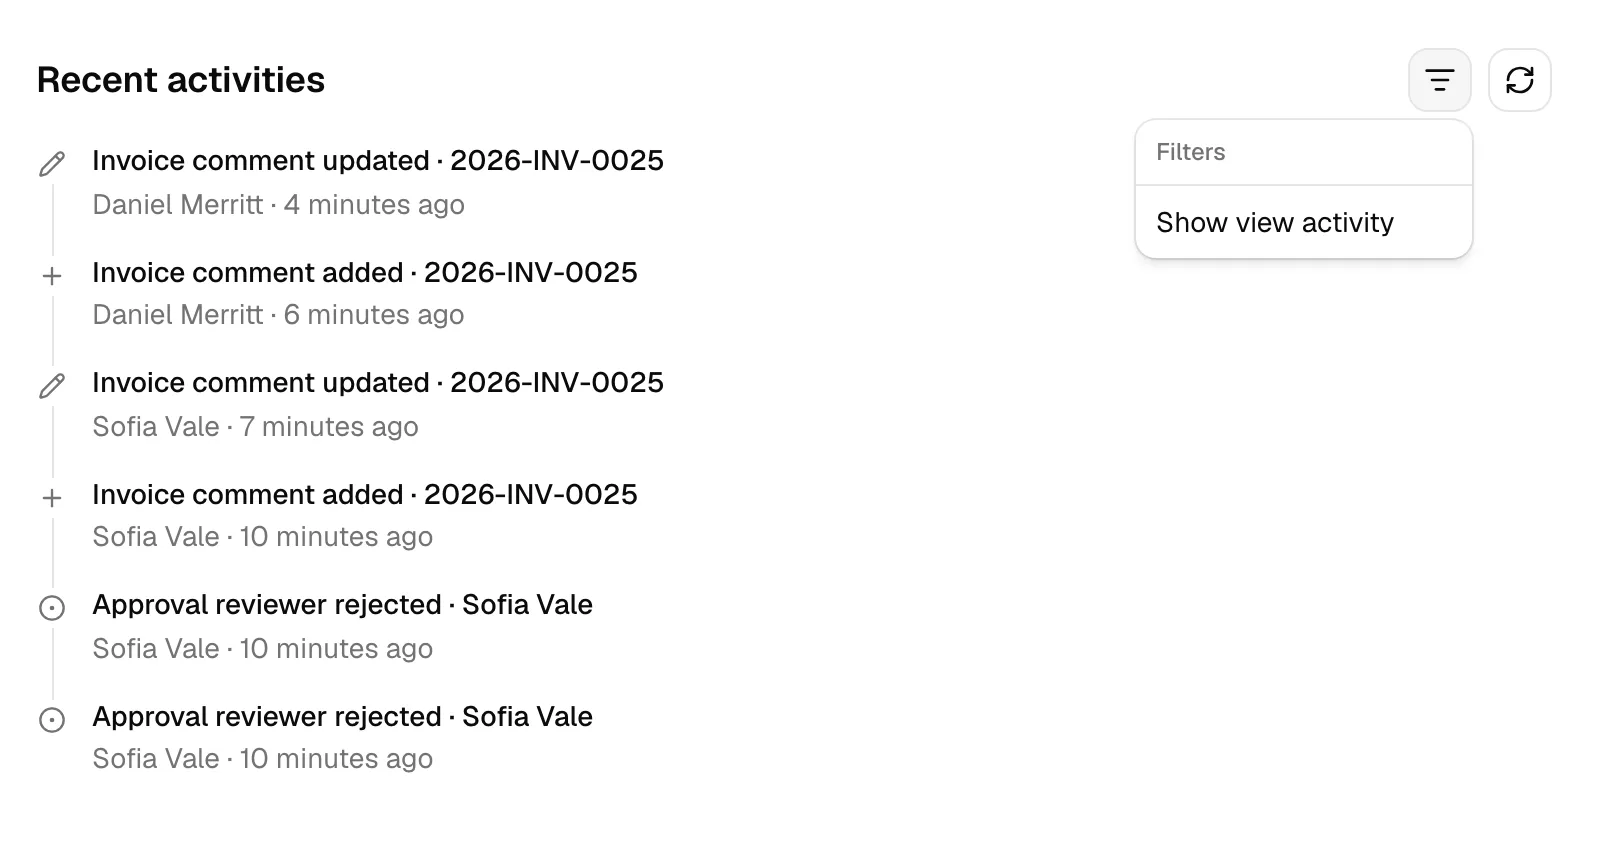
- The timeline lists events such as the invoice being created, updated, submitted, approved or declined, sent, a payment recorded, and the invoice archived, restored, canceled, or deleted. Review activity appears here too: the review being opened, reviewers being added or removed, each reviewer approving or asking for changes, and review comments being marked done or reopened.
To reduce noise, simple "viewed" events are hidden by default. Click the filter control next to Recent activities and turn on Show view activity to include them. Use the refresh control to reload the timeline, and the page controls to move through older events.
For more on history across the app, see Activity timelines and audit logs.
The matter Invoices tab
You can work with a matter's invoices without leaving the matter.
- Open a matter and select the Invoices tab.
- You see the same invoice table, filtered to that matter (the Matter column is hidden since they are all the same matter).
- Click New invoice here to start an invoice with this matter, and its client, already filled in for you.
All the same actions (view, edit, record payment, payment link, download, approve, decline, archive, restore, cancel, delete) work from this tab, subject to your permissions. To learn more about the matter workspace, see The matter workspace.
Common questions
Why can't I edit this invoice? Only Draft and In review invoices can be edited. Once an invoice has been approved (or is otherwise past review), it is locked. You will still see actions like Record payment, Payment link, and Download PDF where they apply.
Why is the Payment link button asking me to finish setup? A payment link needs at least one enabled payment method and a default deposit account. Visit Payment settings to complete both.
I submitted an invoice but it didn't ask anyone to approve it. Why? Your role is not set to require approval for invoices, so your invoices go straight to Pending. Firm owners can change which roles need approval at Settings > Approvals. See Approvals for invoices and documents.
Why can't I record a payment or generate a payment link on this invoice? The invoice has an open review that has not been approved yet. Open the invoice and check the review panel at the top right to see who still has to decide. This can also happen after you edit an already-approved invoice, because a material change restarts its review.
Can my client see the comments on an invoice? No. Invoice comments stay inside your firm. They are not on the invoice PDF and not on the payment link the client opens.
Can I bill the same activity twice? No. Once an invoice that includes an activity is finalized, that activity is marked as billed and is no longer offered when you add line items to another invoice.
Related
- Time and expense tracking
- Batch invoicing
- Invoice templates and the builder
- Recording and managing payments
- Payment settings
- Payment plans and autopay
- Recurring invoices and pre-bills
- Credit notes, write-offs, and discounts
- Invoice and billing settings
- Financial reports and exports
- The billing overview dashboard
- Approvals for invoices and documents
- Notifications
- How clients pay invoices