Payment settings
Payment settings control how your firm collects money on the invoices you send. From one place you set the account that collected payments land in, decide whether clients can pay part of a balance or in installments, manage your LawPay or Confido Legal connection for card and bank payments, choose how autopay works, and turn on the two self-reported ways to pay: a manual bank-transfer link and a scannable QR code. These settings shape exactly what your client sees on the payment page when you send them an invoice link.
Before you begin
- Payment settings live under Settings > Payments. To open them, you need view access to your firm's payment settings, and to change anything you need update access. Firm owners and administrators always have full access. By default, attorneys and staff do not see this settings area at all, so if the menu item is missing, ask an owner or administrator.
- To choose a default deposit account, your firm needs at least one operating or savings account. If you have none yet, you can create one right from the settings page (see below). Trust accounts can never be used as the deposit account for invoice-link payments.
- There are two kinds of client payment method. Card and Bank account payments run through your firm's own LawPay or Confido Legal account and are recorded by Esqase automatically. Bank transfer and QR code payments are self-reported: the client sends the money through their own bank or payment app, tells you they have paid, and you confirm it in Esqase. Esqase never holds your clients' money either way.
Note: A "deposit account" is the operating or savings account where collected money is recorded. A "trust account" (also called an IOLTA account) holds client funds you have not yet earned, which is why it can never be the deposit target for an invoice payment.
Opening payment settings
The payment settings are split into five tabs so each option has its own screen.
-
In the sidebar, open Settings.
-
Under the firm settings, click Payments.
-
You will land on the Defaults tab. The other four sit just beneath it in this order:
- Defaults: the default deposit account and the default payment terms.
- Processor: your LawPay or Confido Legal connection, its account mappings, and its recent activity.
- Autopay: the card, bank, autopay, and payment plan email switches.
- Manual link: the bank transfer or wire option.
- QR code: the QR code option.
Click any of them to switch screens. Each tab saves on its own with its own Save changes button.
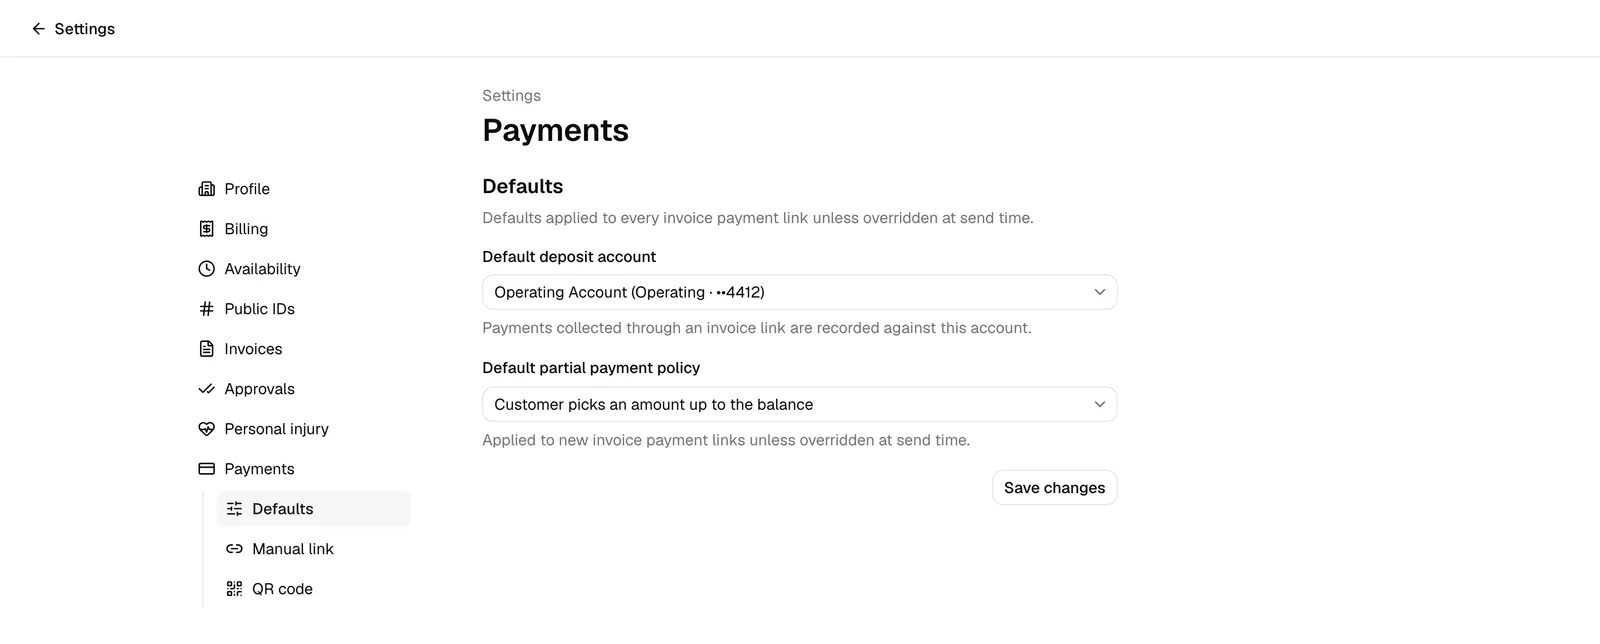
📷 Screenshot: The Payments settings sub-navigation showing all five tabs: Defaults, Processor, Autopay, Manual link, and QR code.
Tip: Each tab is saved independently. If you change something on Manual link and then jump to QR code without clicking Save changes, your manual-link edits are not kept.
Set the firm default deposit account
The default deposit account is the operating or savings account that invoice payments are recorded against. When a client pays by bank transfer or QR code through an invoice link and you confirm the payment, the money lands here. Card and bank account payments through LawPay or Confido Legal are recorded on the account you map on the Processor tab instead (see The Processor tab).
- Open the Defaults tab.
- Click the Default deposit account field. It is a searchable dropdown, so you can type to filter.
- Pick the account you want collected payments recorded to.
- Each option shows the account name and, where available, the account type and the last four digits of the account number, for example Operating Account (Operating · ••1234).
- Only active operating and savings accounts appear in the list. Trust accounts are never offered here.
- Click Save changes. A Defaults saved confirmation appears.
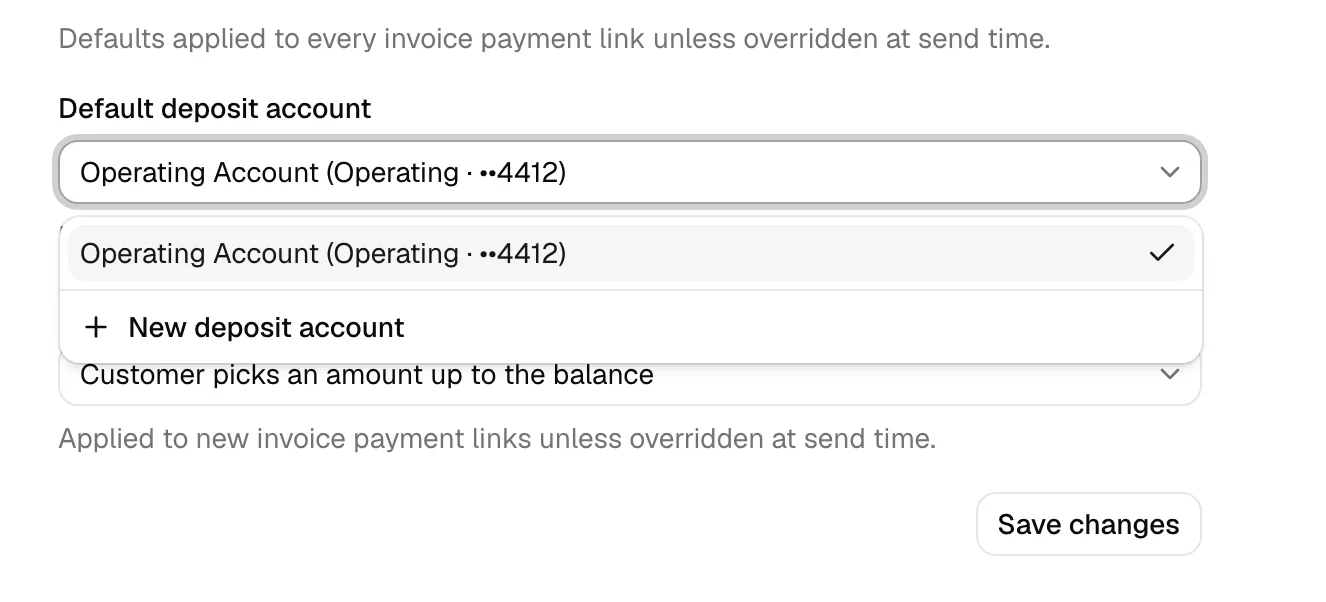
Creating an account on the spot
If you have no accounts yet, or you need a new one, you do not have to leave the page.
- In the Default deposit account dropdown, click New deposit account at the bottom of the list.
- Fill in the account details in the dialog that opens, then save it. The new account is created as an operating account and is selected automatically.
- Click Save changes to keep it as your default.
Important: If an account that was previously set as your default is later archived or changed to a type that cannot accept deposits, it still appears in the dropdown marked inactive so you can see what is in effect and switch away from it. Leaving an inactive account as your default can block invoice-link payments, so choose an active operating or savings account.
Common questions
- What if I leave the deposit account blank? New invoice payment links will not have a place to record collected money. Set a default so links work without extra setup each time.
- Can I use a trust account as the default? No. Trust accounts are deliberately excluded. Funds collected on an invoice are earned revenue and belong in an operating or savings account.
Set the default partial-payment policy
The partial-payment policy decides how much of an invoice a client is allowed to pay when they open the payment link. This is a firm-wide default that is applied to every new invoice payment link, and you can still override it for an individual invoice when you generate that link.
- Open the Defaults tab.
- Click the Default partial payment policy dropdown.
- Choose one of the three options:
- Full balance only: the client must pay the entire outstanding balance in one go. Use this when you do not want partial payments.
- Customer picks an amount up to the balance: the client can enter any amount they like, from a small partial payment up to the full balance. Good for clients who want to pay in stages on their own schedule.
- Firm-defined installments: the client pays according to an installment plan, one scheduled amount at a time. You build the schedule when you generate the link. See Payment plans and autopay.
- Click Save changes. A Defaults saved confirmation appears.
Note: This policy is the default for new payment links only. Changing it does not alter the policy on links you have already sent, and you can pick a different policy at send time when you generate a link for a specific invoice.
Tip: With Firm-defined installments as the default, the Generate payment link dialog opens with installments already chosen and the plan editor ready. On an invoice that already has an active plan, or has nothing left to pay, the dialog falls back to Full balance only.
The Processor tab
The Processor tab is where your firm's LawPay or Confido Legal connection lives. It has three sections.
- Open the Processor tab.
- Payment processor shows the connection: the provider, whether it is Live or Test, its status (Application in progress, Map accounts, Connected, or Needs reconnecting), the processor account and login, how and by whom it was connected, and when Esqase last checked it. The buttons on the right are Refresh accounts (reload the processor's bank accounts), Reconnect (when the connection needs it), and Disconnect. With no processor connected, the section offers Go to Integrations, Sign up with LawPay, Apply with Confido Legal, and Add Confido API token instead.
- Account mappings lists the processor's Operating accounts and Trust accounts. Choose the Esqase account that records each one's payments, pick a Default in each group, and click Save changes. Card and bank payments are offered only once a default operating account is mapped.
- Recent activity lists the payment updates the processor sent, newest first, with their status. Esqase also checks the processor every 15 minutes for anything missed.
For the full walkthrough of connecting, mapping, test and live connections, and troubleshooting, see Taking card and bank payments with LawPay or Confido Legal.
📷 Screenshot: The Processor tab for a connected processor, showing the Payment processor details, the Account mappings section with Operating and Trust groups, and the Recent activity table.
The Autopay tab
The Autopay tab holds the switches for online payments, in one section titled Online payments and autopay. It appears once a processor is connected; until then it reads No payment processor connected with a Go to Processor button.
- Open the Autopay tab.
- Under How clients can pay, turn Card payments and Bank payments (eCheck) (LawPay) or Bank payments (ACH) (Confido Legal) on or off. Bank payments usually take 3 to 5 business days to clear, and show as pending until then.
- Under Payment plans, turn Autopay for payment plans on to let clients save a card or bank account for their remaining installments, and Send payment plan emails on to email a client a link to pay by hand when an automatic charge fails. Retry schedule shows when a failed card charge is tried again: Failed card charges are retried on days 3, 5 and 7.
- Click Save changes. A Payment settings saved confirmation appears.
All four switches start on. See Payment plans and autopay for how automatic charges, retries, and the emails work.
📷 Screenshot: The Autopay tab with the Card payments, Bank payments, Autopay for payment plans, and Send payment plan emails switches, the Retry schedule line, and the Save changes button.
Configure a manual payment link
A manual payment link sends clients to an out-of-band payment method, such as your bank's payment page, an online wire-instructions page, or any URL you choose. It is the right option when you collect money through your bank but still want clients to see clear "pay us this way" guidance on the invoice page.
How it works for the client: they open the link or follow your instructions, send the money themselves, and then mark the payment as sent on the invoice page. Esqase records that as a pending payment, and you confirm it later once the funds arrive. See Recording and managing payments for how to confirm a pending payment.
- Open the Manual link tab.
- Turn on Show a manual payment link to customers. This switch controls whether the option appears on the client payment page at all.
- In Payment link or wire instructions URL, paste the web address you want clients sent to. It must be a valid URL beginning with
https://(orhttp://). You can leave this blank if your instructions alone are enough. - In the Instructions field, write what the client should do. This is a rich-text editor, so you can add formatting and line breaks. Spell out account numbers, references to include, and anything else they need. These instructions are shown right beside the link on the client payment page.
- Click Save changes. A Manual link settings saved confirmation appears.
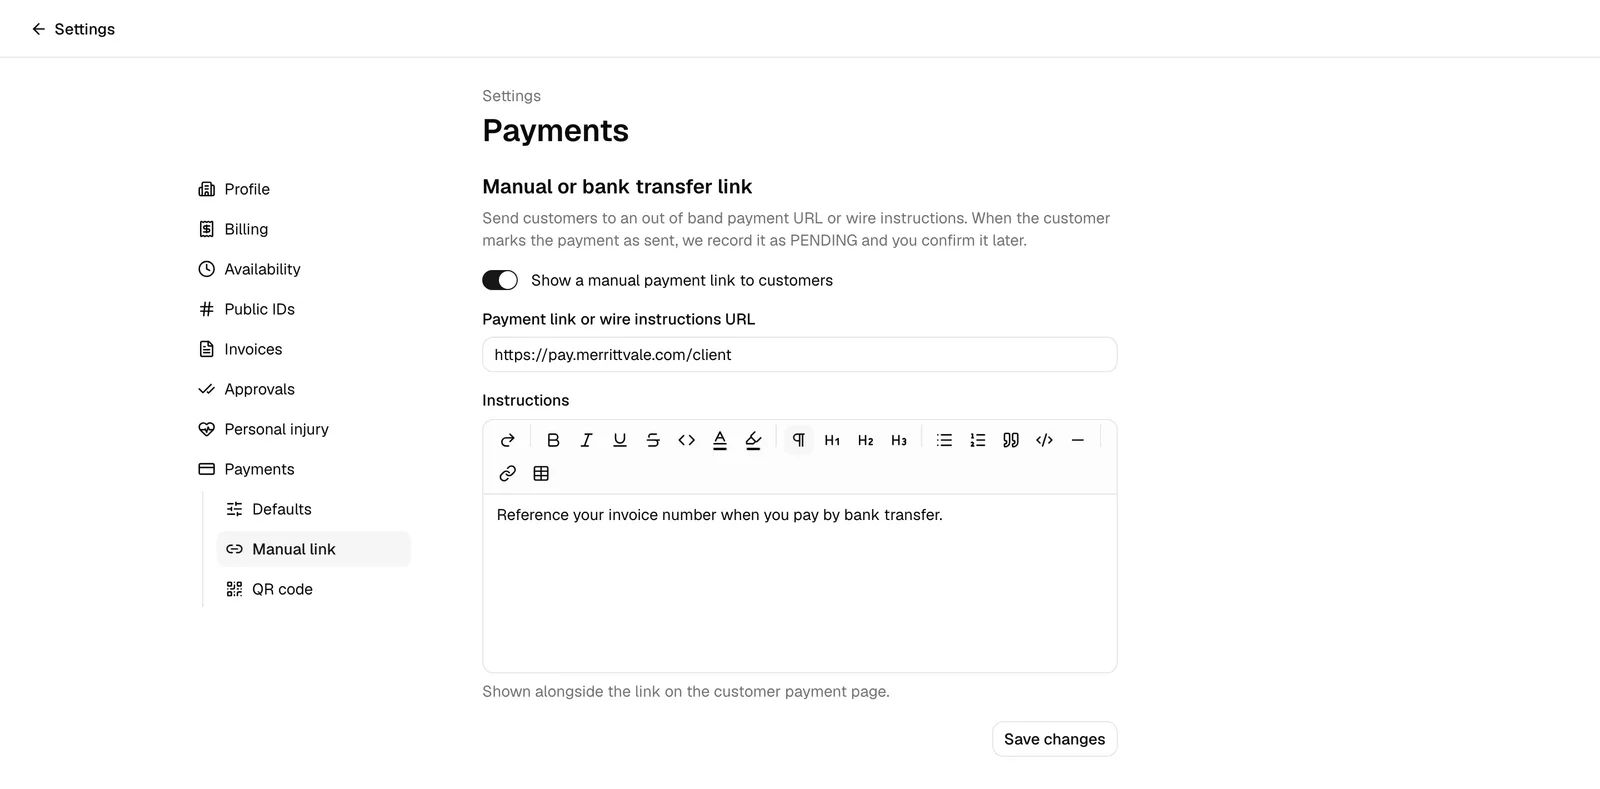
Tip: Even with the switch on, the manual option only appears on a client's invoice page if you generate a payment link for that invoice. The setting decides whether the option is available, not whether every invoice automatically uses it.
Configure a QR-code payment image and instructions
A QR code lets clients pay by scanning a static image with their banking or wallet app (for example PIX, UPI, or Venmo). Like the manual link, the client scans, pays on their own, and marks the payment as sent, which Esqase records as pending until you confirm it.
- Open the QR code tab.
- Turn on Show a QR code option to customers. This switch controls whether the QR option appears on the client payment page.
- Under QR image, click Upload image and choose your QR file. Accepted formats are JPEG, PNG, WebP, GIF, and SVG, up to 25 MB. A preview appears once the upload finishes.
- To swap the image later, click Replace image and pick a new file.
- After a successful upload you will see a reminder that the image is not saved yet. You must still click Save changes to keep it.
- In the Instructions field, tell clients how to pay with the code. This is a rich-text editor. A helpful example is "Scan the QR with your banking app, then click 'I have paid'." These instructions show alongside the QR on the client payment page.
- Click Save changes. A QR code settings saved confirmation appears.
Important: Uploading an image and saving the page are two separate steps. If you upload a QR image and navigate away without clicking Save changes, the new image is not kept.
How these settings affect the client payment experience
When you send a client a payment link for an invoice, these settings decide what they can see and do on the payment page.
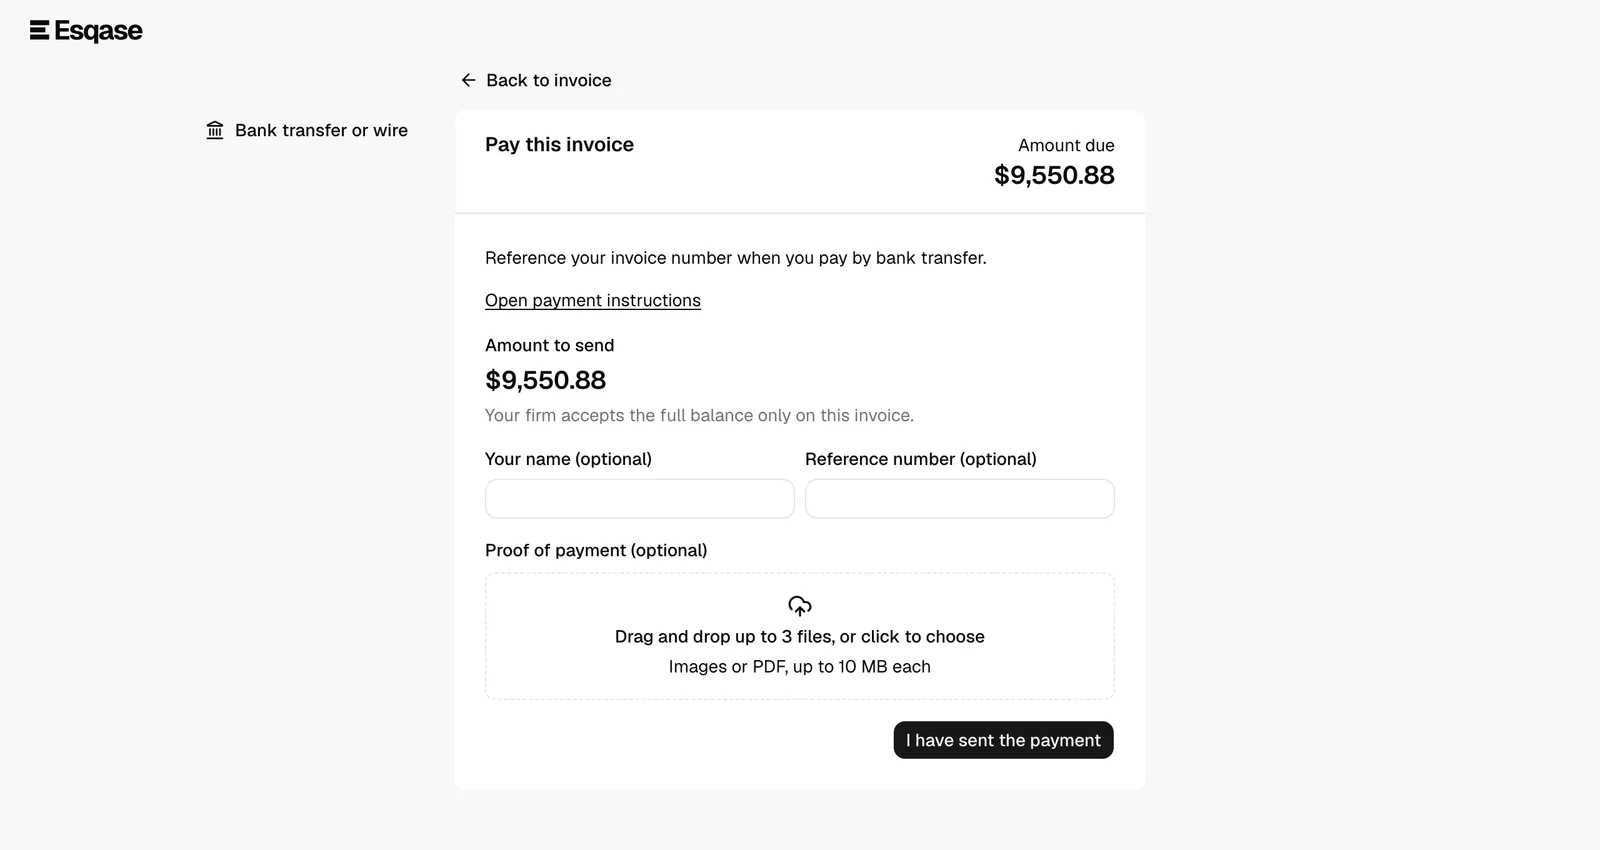
- The page shows the invoice and an Amount due, with a heading of Pay this invoice.
- A short list of available payment methods appears down the side. The list only includes the options you have turned on:
- If your firm has a processor connected with Card payments on, the client sees a Card option.
- If your firm has a processor connected with Bank payments on, the client sees a Bank account option.
- If you turned on the manual link, the client sees a Bank transfer or wire option that opens your link and instructions.
- If you turned on the QR code, the client sees a QR code option that displays your image and instructions.
- The partial-payment policy controls the amount the client may pay. With Full balance only the amount is locked to the balance and the page explains that your firm accepts the full balance only. With Customer picks an amount the client gets an Amount sent field capped at what is still collectible.
- The manual link and the QR code are self-reported. After paying, the client confirms with I have sent the payment and can attach proof of payment. Esqase logs this as a pending payment, and the money is recorded against your default deposit account once a firm member reviews it and marks it cleared.
- Card and bank account payments are recorded by Esqase on their own: a card payment clears straight away, and a bank payment clears when the processor reports it, usually 3 to 5 business days later. See How clients pay invoices.
Note: If you have not turned on either payment method, the client sees a message that your firm has not finished setting up payments for the invoice and is asked to contact you directly. Turn on at least one method here so clients always have a way to pay.
Important: A method only counts as turned on when it is complete. The manual link needs the switch on and a URL saved, and the QR code needs the switch on and an image uploaded. A switch on its own does not put the method on the client's payment page.
Troubleshooting
- I do not see the Payments item under Settings. Your role may not include access to firm payment settings. By default only owners and administrators can open this area. Ask an owner or administrator for access.
- Everything is read-only and Save changes is greyed out. You have view access but not update access. An owner or administrator can grant you update access to payment settings.
- The deposit account dropdown is empty. Your firm has no active operating or savings accounts. Use New deposit account in the dropdown to create one, or set one up in Accounts, trust, and transactions.
- My QR image disappeared after I refreshed. You likely uploaded the image but did not click Save changes. Re-upload and save.
- The client says they can't pay. Confirm at least one method is turned on and complete here (a saved manual-link URL, or an uploaded QR image), and that you generated a payment link for that specific invoice. See Creating and sending invoices.
- The client says the page reads "Payment reported". They have already told you they sent money and it is waiting for someone at your firm to confirm it. That amount is held against the balance so they cannot report it twice. Clear it from the Payments list; see Recording and managing payments.
- Generating a link says the installments must add up to the balance due. With Firm-defined installments, adjust the rows in the plan editor until Remaining reads zero. See Payment plans and autopay.
- The Autopay tab says no payment processor is connected. Connect LawPay or Confido Legal on the Integrations page, or finish setting it up on the Processor tab. See Taking card and bank payments with LawPay or Confido Legal.
- The client does not see Card or Bank account. Check the Processor tab (the status must be Connected, with a default operating account mapped) and the Autopay tab (the matching switch must be on).