Managing leads
A lead is a prospective client your firm is still deciding whether to take on. The Leads area is where you track every inquiry from first contact through to a signed engagement, using a visual pipeline, outcome tables, and a per-lead checklist of follow-up steps. When a lead becomes a client, you convert it into a matter in one click.
This page covers everything you can do on the Leads page and on an individual lead's profile. Sources and the convert-to-matter flow have their own pages: see Lead sources and Converting a lead to a matter.
Before you begin
- To open the Leads page at all, your role needs View access for leads. If you do not have it, the page shows a "no access" message instead.
- Creating leads, editing them, moving them between stages, and managing the pipeline columns are each gated separately. Where a button is missing, your role most likely does not include that level of access. Firm owners can do everything.
- Some leads can be marked private. A private lead is visible only to its assignees and to firm owners, so you may not see every lead another member created.
View the leads pipeline
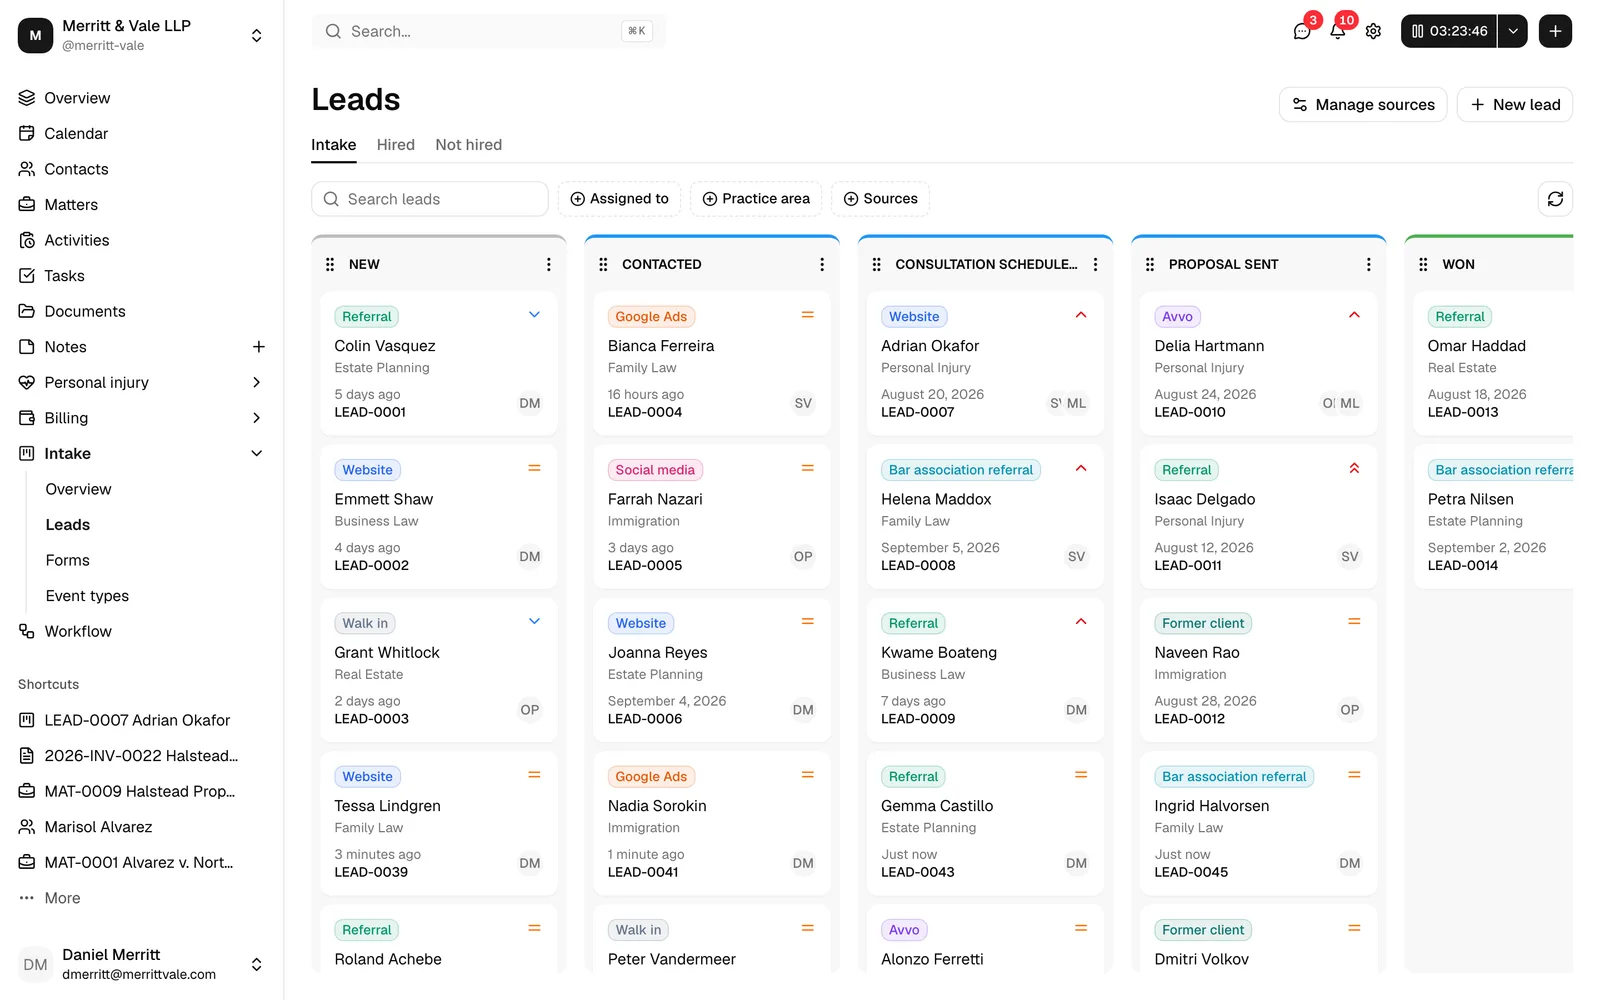
The Intake tab is your live pipeline. Each column is a stage (for example, "New inquiry" or "In consultation"), and each card is a lead. The card shows the prospect's name, the practice area, when the lead was added, any source tags, a value indicator, and the avatars of the members it is assigned to.
- In the sidebar, click Leads.
- Make sure the Intake tab is selected. This is the default.
- Use the tools above the board to narrow what you see:
- Search leads filters cards by contact name, company, practice area, or form name as you type.
- Assigned to shows only leads assigned to the members you pick.
- Practice area filters by the lead's practice area.
- Sources filters by where the lead came from.
- When any filter is active, a Clear filters button appears. Click it to reset.
- Click the refresh button (the circular arrows on the right) to reload the board if a teammate has made changes.
- Click any card to open that lead's full profile.
Stage columns are color-coded by their type: gray for To do, blue for In progress, and green for Done. This gives you an at-a-glance sense of where each lead sits in the process.
Tip: The pipeline only shows leads that are still in intake. Once a lead is marked hired, not hired, or archived, it moves off the board and into the matching outcome tab.
Manage lead stage columns
Stage columns define the steps in your intake pipeline. You can add, rename, reorder, and remove them to match how your firm works.
Add a column
- On the Intake tab, click the add-column control at the end of the board (the + at the right edge of the columns).
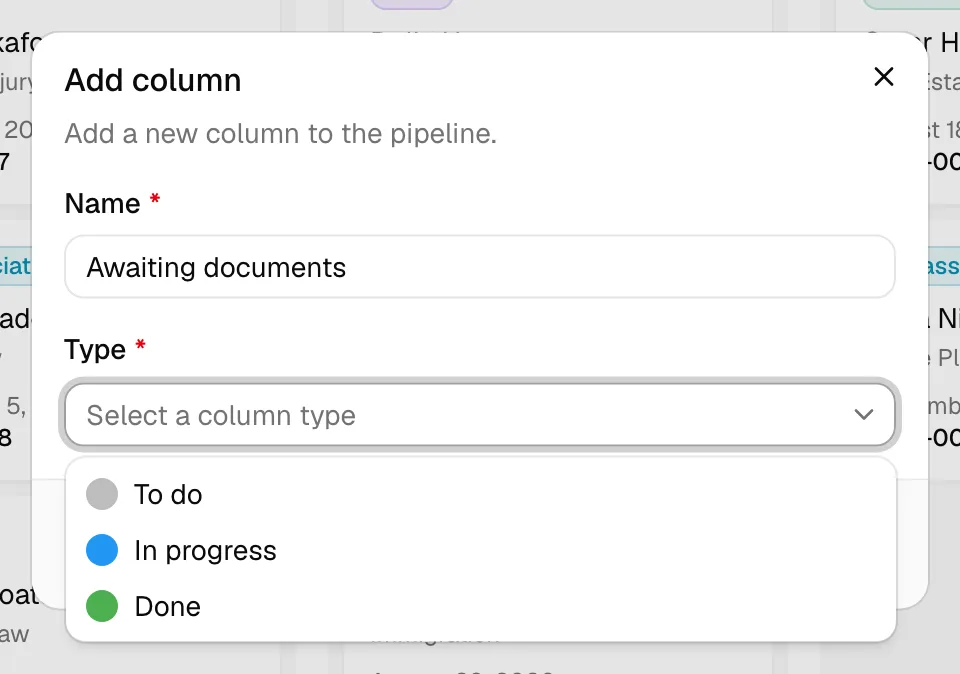
- In the Add column dialog, fill in:
- Name (required, up to 64 characters), for example "New inquiry". This is what shows at the top of the column.
- Type (required). Pick To do, In progress, or Done. The type only sets the column's color accent; it does not move leads automatically.
- Click Add column. The new column appears at the end of the board.
Rename or change a column's type
- Hover over the column header and open its menu, then choose the edit option.
- In the Edit column dialog, change the Name or Type.
- Click Save changes.
Reorder columns
Drag a column by its header and drop it where you want it. Esqase saves the new order automatically and shows a brief "Columns reordered" confirmation. If the save fails, the board snaps back to the previous order.
Delete a column
- Open the column's menu and choose the delete option.
- In the Delete column? dialog, confirm by clicking Delete column.
Important: Deleting a column permanently removes it from the pipeline and cannot be undone. Move any leads out of the column first so they are not left without a stage.
Move a lead between stages
You can advance a lead through the pipeline by dragging its card.
- On the Intake tab, click and hold a lead card.
- Drag it to another column, or to a new position within the same column to reorder it.
- Release. Esqase saves the move and briefly shows "Lead moved". If the save fails, the card returns to where it started.
You can also change a lead's stage from its profile without dragging:
- Open the lead.
- In the sidebar under Lead information, click the Stage badge.
- Pick the new stage from the menu. The change saves immediately.
Note: The Stage badge and stage dragging are only available while the lead is still in intake. A hired or not-hired lead no longer has an editable stage.
Create a new lead
Creating a lead also creates a brand-new contact record for the prospect in one step. You do not pick an existing contact; you type the person's or company's details directly into the form.
- On the Leads page, click New lead. (If you do not see this button, your role does not include Create access for leads.)
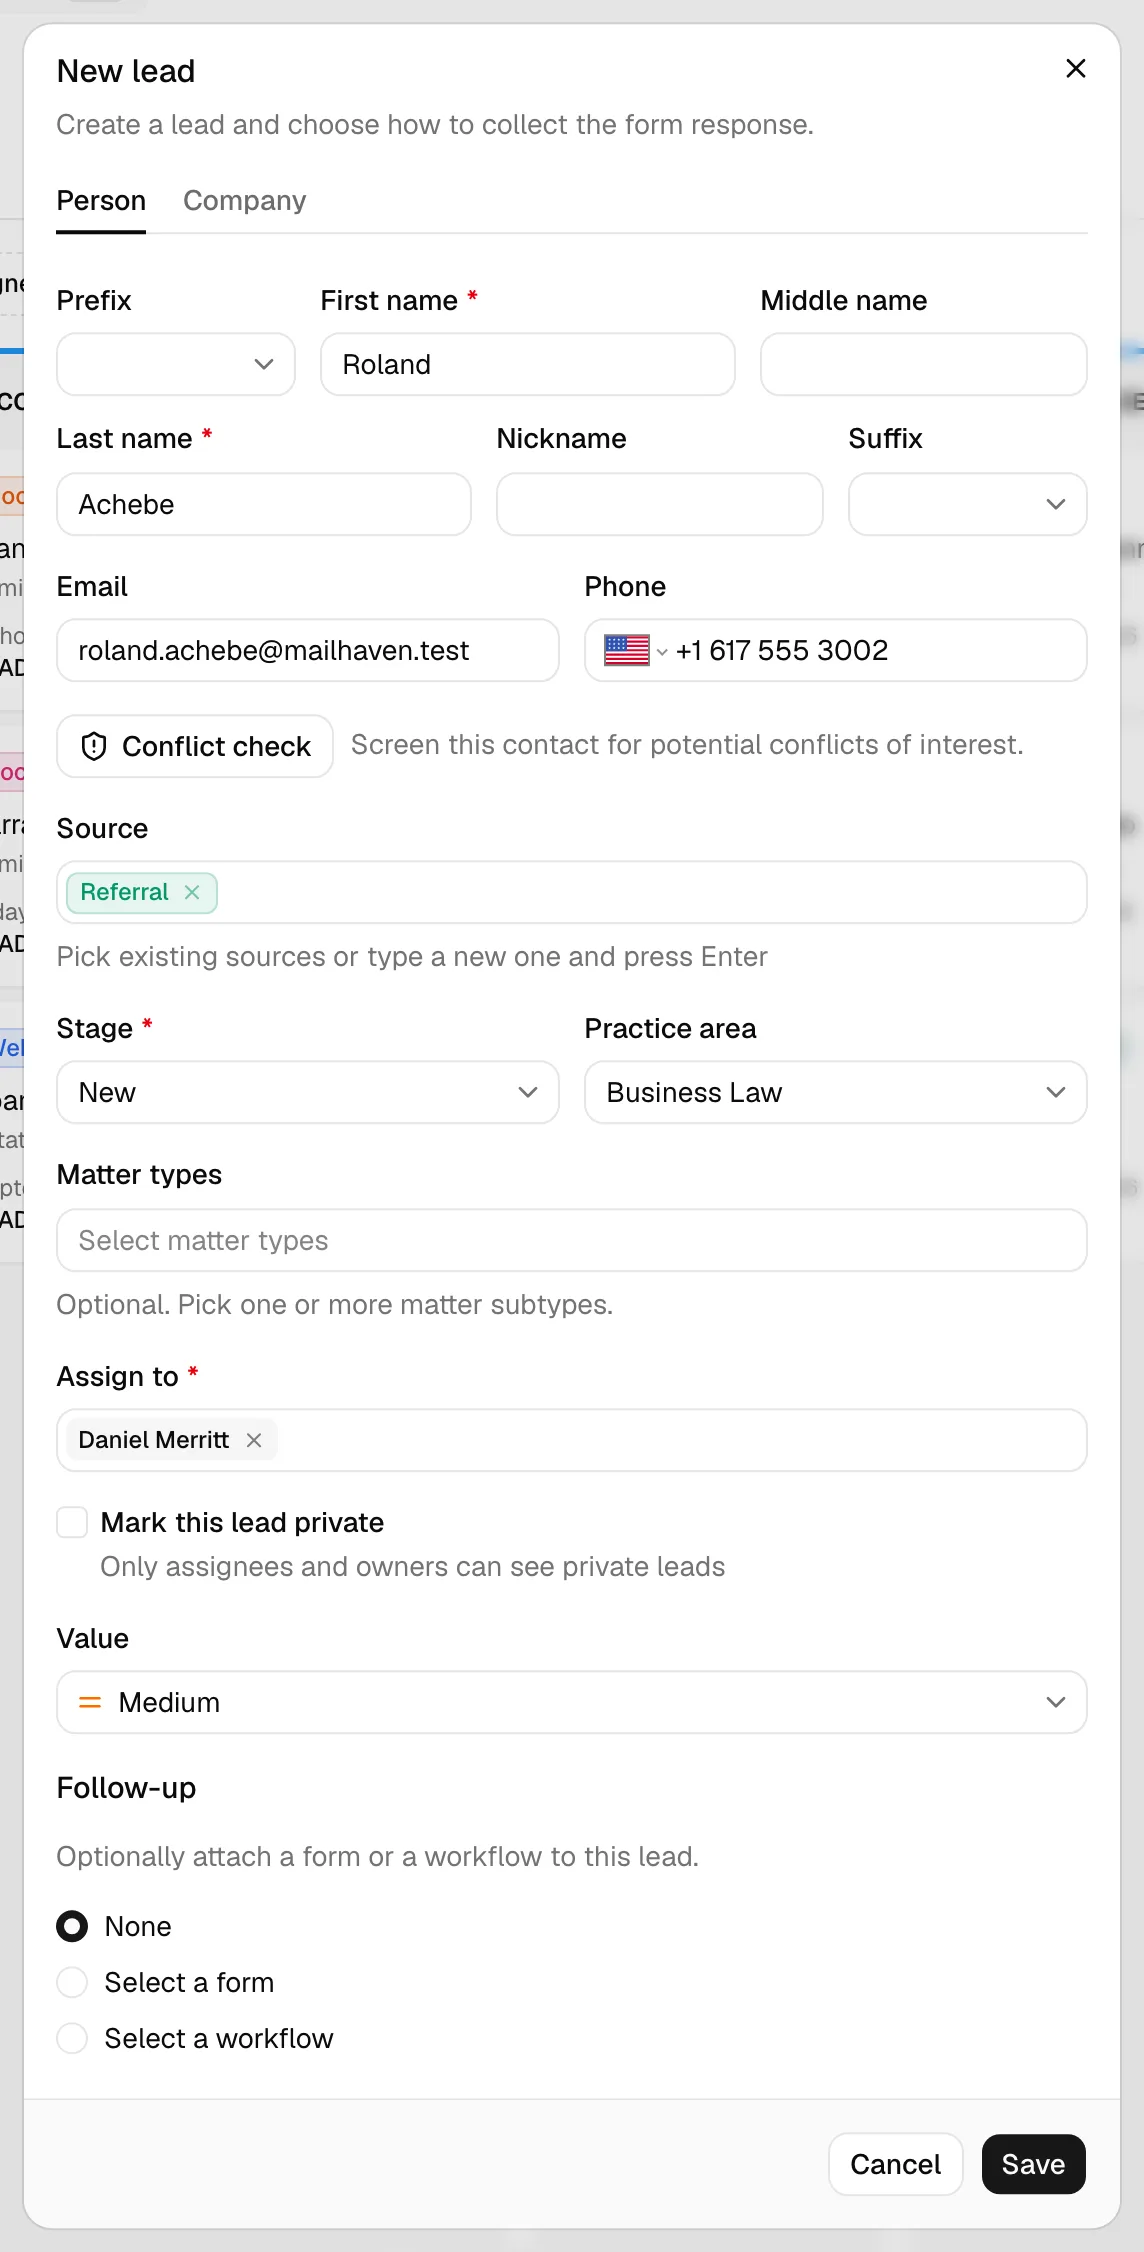
- At the top of the New lead dialog, choose Person or Company:
- Person: fill in First name and Last name (both required), plus optional Prefix, Middle name, Nickname, and Suffix. Prefix and Suffix are searchable lists: click one and start typing to filter, then pick a value. They offer the same titles and credential markers as the contact form (Mr., Mrs., Ms., Miss, Mx., Dr., Prof., Rev., Hon., Atty., and more for Prefix; Jr., Sr., II, III, IV, Esq., J.D., LL.M., Ph.D., M.D., C.P.A., and more for Suffix).
- Company: fill in Company name (required), plus optional Trade name and Company type.
- Add contact details: Email and Phone. The phone field defaults to your firm's country.
- (Optional) Click Conflict check to screen the name you entered against existing records before you go further, then click Run conflict check in the dialog. The button is disabled until you enter a name: a first and last name for a person, a company or trade name for a company. If you run a check here, it is saved and attached to the lead once you create it. See Running a conflict check.
- Set the lead's attributes:
- Source: pick existing sources or type a new name and press Enter to create one on the spot. A "System" source is selected by default. See Lead sources.
- Stage (required): which pipeline column the lead starts in. It defaults to the first column.
- Practice area (optional): the area of law this inquiry relates to.
- Matter types (optional): one or more subtypes within the chosen practice area. This is disabled until you pick a practice area.
- Assign to (required): one or more members responsible for the lead. Your own name is selected by default.
- Mark this lead private: check this so only assignees and owners can see the lead.
- Value (optional): a priority indicator from Lowest to Highest. It shows as a small icon on the card.
- Under Follow-up, optionally attach a form or a workflow:
- None: no follow-up attached.
- Select a form: pick a form, then choose a Submission mode (see below).
- Select a workflow: pick a workflow. Its steps are copied onto the lead as pending checklist items.
- Click Save.
Who is told about a new lead
Saving the lead tells the rest of the firm, so nobody has to watch the board.
- Firm owners and colleagues whose role can see leads get a New lead notification naming the prospect and the lead number.
- Everyone you picked under Assign to gets A lead was assigned to you instead, so the people responsible for it are not sent the generic announcement as well.
- You are not notified about a lead you created yourself, even when you assign it to your own name.
This works the same way however the lead arrived: typed in here, booked through your public booking page, submitted through a public intake form, or pushed in by another system through the developer API. See Notifications.
Form submission modes
If you choose Select a form under Follow-up, you also pick how the response is collected:
- Manually fill up form: after you save, Esqase opens the form so you can complete it on the prospect's behalf (for example, during a phone intake). Fill it in and click Submit form. If the form has a File upload question, you can attach files here too: they upload as you add them, Submit form waits until every upload finishes, and each file is saved under Documents. See The form builder in depth.
- Send to client: Esqase creates the lead and queues the form to be sent to the client, then closes. You will see "Lead created and form queued to send".
In all other cases (no form, or a workflow attached) you simply see "Lead created" and the dialog closes.
View and edit a lead profile
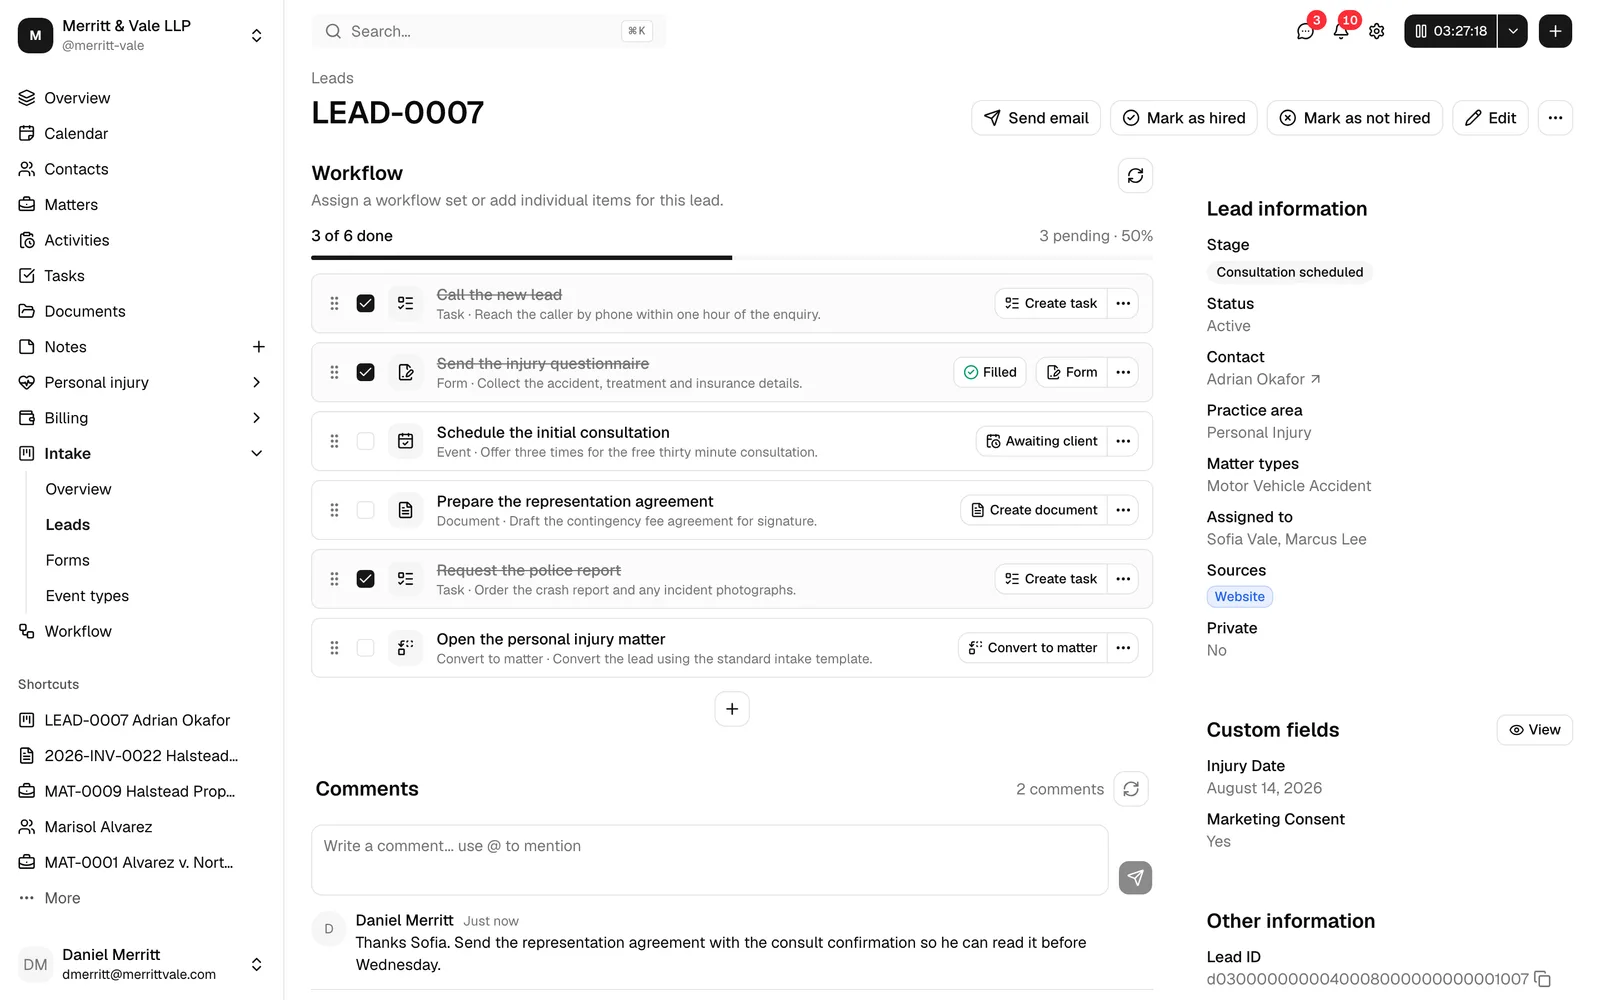
Click any lead card or table row to open its profile. The header shows the lead's reference number with a Leads breadcrumb back to the list. The page has two parts: a main column with the Workflow checklist and Recent activities timeline, and a sidebar with the lead's details.
The sidebar's Lead information group shows the Stage, Status, linked Matter (once converted), Contact (a link to the full contact record), Practice area, Matter types, Assigned to, Sources, and whether the lead is Private. The Other information group shows the Lead ID (with a copy button), and who created and last updated the lead and when.
Edit the lead's details
- On the lead profile, click Edit in the header.
- In the Edit lead dialog, update the Source, Stage, Practice area, Matter types, assignees (Assign to), Value, and the private setting.
- Click Save changes.
Note: The Edit button edits the lead's own attributes only, not the underlying contact. To change the contact's name, email, or phone, open the contact record from the Contact link in the sidebar. See Working with contacts.
Important: Once a lead is hired, the Edit button (and archiving) is turned off, so the lead's record stays consistent with the matter it produced. You can still work its workflow checklist and, if it has not yet been converted, change its outcome.
Screen the lead for conflicts
Open the More actions menu (the "..." button) in the lead's header and click Conflict check. The option appears only if your role can view matters. The check runs on the lead's contact as soon as the dialog opens, and every earlier screening for this lead is listed underneath the results under Previous conflict checks. There is nothing to acknowledge here: this view is for reviewing. See Running a conflict check.
Note: Conflict check, Mark as hired, and Convert to matter share one screening on the lead's header. If one of them has already run the check, opening another shows those same results instead of screening again. Click Re-run conflict check when you want a fresh screen.
Manage custom field values
Custom fields let your firm capture extra, structured information on a lead (for example, "Referral fee agreed?" or "Estimated case value"). They are set up under Custom fields.
- On the lead profile sidebar, find the Custom fields group and click View.
- In the Custom fields dialog, fill in or update the values shown. Only fields your firm has assigned to leads appear here. Phone and address fields start on your firm's country, and you can change the country on any of them. See How your firm's country sets phone and address defaults.
- Click to save. Filled values then appear in the sidebar; empty ones are hidden.
In the sidebar, values are written out in plain reading form rather than the way they were typed in: a name field reads Dr. Jane A. Smith, Esq., an address reads as a postal address with the state and country spelled out, an amount reads as $1,200.00, dates are formatted in your time zone, a dropdown or checklist shows the option's label, and a tick box reads Yes or No. See Field sets and using custom fields for the full list.
If no custom fields are filled, the sidebar shows "Not set". If your role cannot edit the lead, the dialog opens in read-only mode.
Add and remove sources, matter types, and assignees
These three attributes are managed together through the Edit lead dialog.
- On the lead profile, click Edit.
- Adjust any of the following:
- Source: add a source by selecting it from the list or typing a new name and pressing Enter. Remove a source by clearing its tag.
- Matter types: add or remove subtypes. Remember these depend on the selected Practice area, so set the practice area first.
- Assign to: add or remove the members responsible for the lead.
- Click Save changes. The sidebar updates to reflect the new sources, matter types, and assignees.
Tip: You can set the same attributes at creation time in the New lead dialog, so a lead arrives in your pipeline already routed to the right people and tagged with its source.
Mark a lead Hired or Not hired, or put it back to intake
When you decide the outcome of an inquiry, you record it from the lead's profile header. These actions change the lead's status and move it off the intake board.
Mark as hired
Use this when the prospect has engaged your firm but you are not ready to build the matter yet.
- Open the lead.
- In the header, click Mark as hired.
- A Conflict check dialog opens and screens the lead's contact for you straight away. Review the results. If your role cannot view matters, there is no screening step and the lead is marked as hired directly.
- If the check found high-priority matches, tick I have reviewed the [n] high-priority matches and choose to proceed. If the check could not be completed, tick I understand the conflict check could not be completed and choose to proceed instead. Mark as hired stays disabled until you do.
- Click Mark as hired in the dialog. The status changes to Hired and the lead moves to the Hired tab. You will see a confirmation with the lead's reference.
A hired lead can still be unmarked, marked not hired, or converted to a matter, right up until you actually convert it.
Note: The screening is saved against the lead. Reopen it any time from the lead's ... menu under Previous conflict checks. See Running a conflict check.
Mark as not hired
Use this when your firm declines the inquiry or the prospect goes elsewhere.
- Open the lead.
- In the header, click Mark as not hired.
- The status changes to Not hired and the lead moves to the Not hired tab.
Put a lead back to intake
If you mark an outcome by mistake, or a "not hired" prospect comes back, you can return the lead to the pipeline.
- Open the lead (or use the row menu in an outcome table).
- Open the More actions menu (the "..." button) and click Put back to leads kanban.
- The lead returns to the first stage column with the Active status.
Note: Marking a lead Not hired pauses any workflow Esqase is running on it, so nothing else reaches the prospect. Putting the lead back to intake, or marking it hired, starts the workflow again from where it stopped. If somebody paused the lead's automation deliberately with Pause automation, that stays paused until they resume it. See How automation runs your workflows.

Note: The header also has a Convert to matter button on a hired lead and a Send email button on every lead. Converting is covered in Converting a lead to a matter; emailing in Sending email.
Archive, restore, and delete a lead
Archiving keeps a lead's record without it cluttering your active views. Deleting removes it permanently and is only possible after archiving.
Archive a lead
- Open the lead.
- Open the More actions menu (the "..." button) and click Archive.
- The lead is archived. You can restore it later.
You can also archive several leads at once from the Hired or Not hired tabs: select their checkboxes and choose Archive from the batch actions, then confirm in the Archive selected leads? dialog.
Restore an archived lead
- Open an archived lead, or find it via the Status filter set to Archived in an outcome table.
- Open the More actions menu and click Restore. The lead returns to intake as Active.
You can also select archived rows in an outcome table and click Restore in the batch actions.
Delete a lead
A lead must be archived before it can be deleted.
- Open the archived lead.
- Open the More actions menu and click Delete.
- In the Delete lead? dialog, confirm by clicking Delete lead.
Important: Deleting a lead permanently removes it and cannot be undone. The Delete option only appears on archived leads, and only if your role includes Delete access. You can also delete archived rows in bulk from an outcome table's batch actions.
Work the per-lead workflow checklist
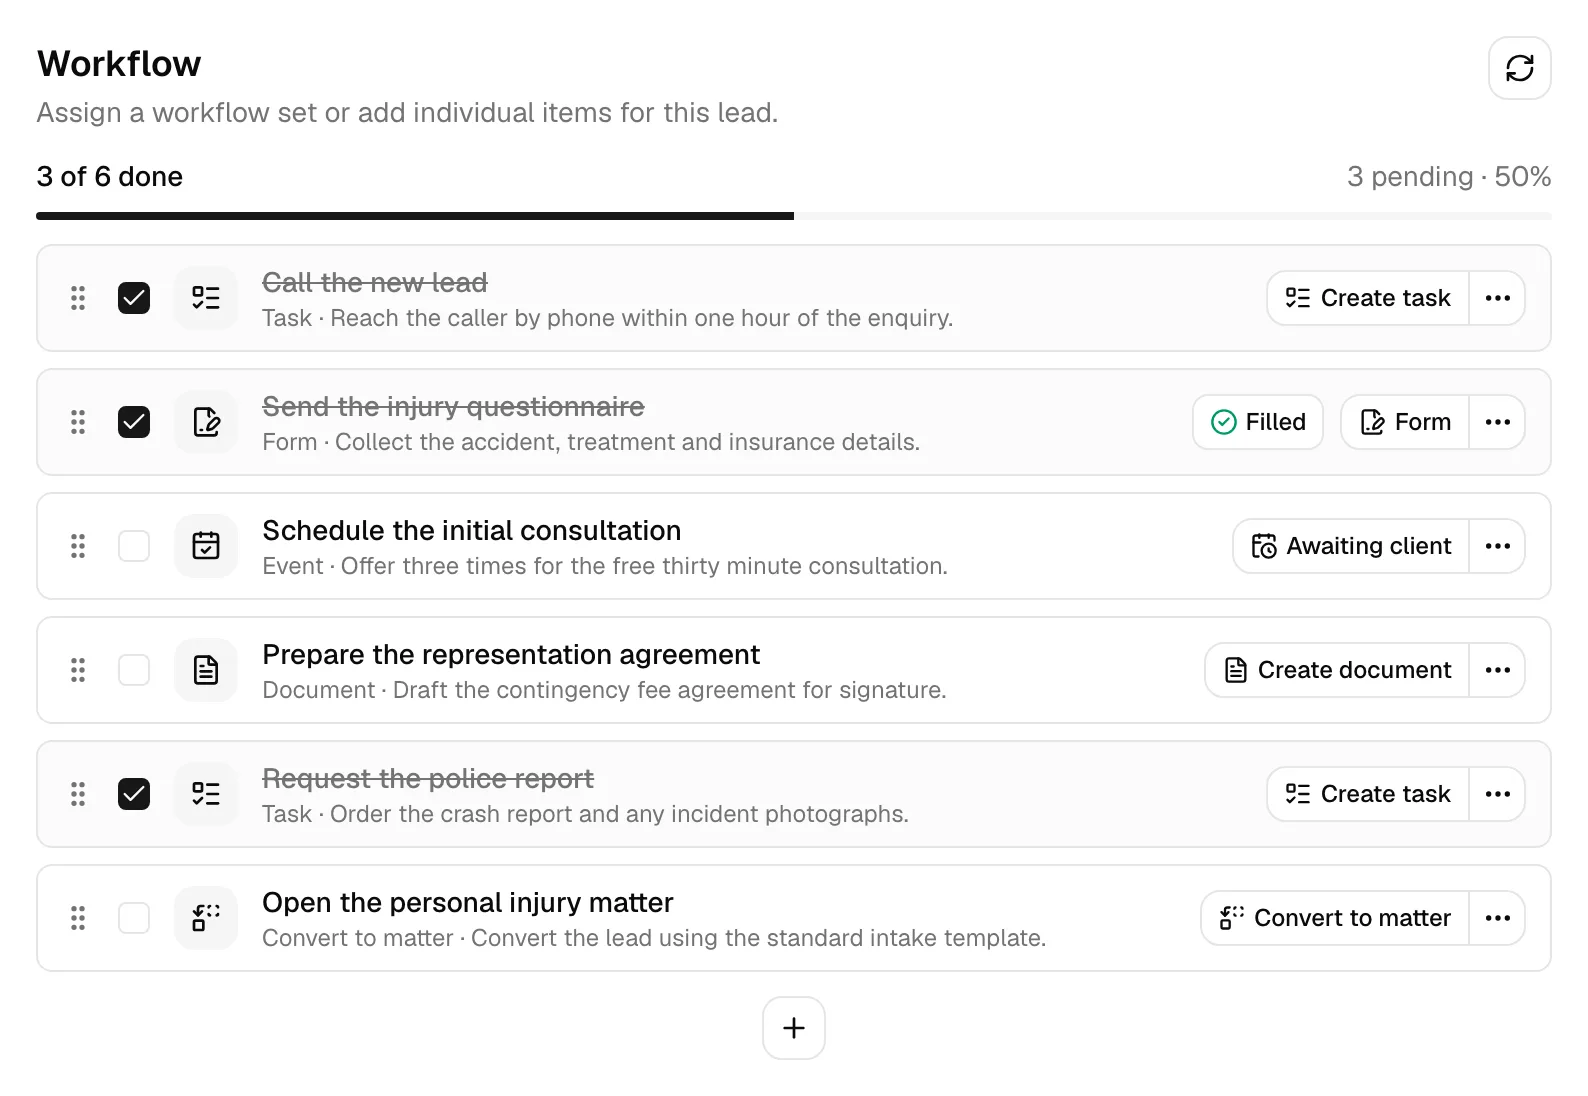
Every lead has a Workflow section at the top of its profile: an ordered checklist of follow-up steps such as sending an email, scheduling a meeting, creating a task, drafting a document, or sending a form. A progress bar shows how many steps are done.
How much of the checklist runs on its own
A workflow can work through its own steps. Each step is set to one of three modes when the workflow is built:
- Manual: someone on your team runs the step from this list, the way the checklist has always worked.
- Automatic: Esqase runs the step itself when its turn comes.
- Automatic, needs approval: Esqase prepares the step (writes the email, drafts the invoice) and waits for a member to say yes before anything leaves the firm.
Steps run in order, from the top. A step's turn comes when the step above it is done or skipped, and a step can be set to start a set time later, for example three business days after the previous step. Nothing further down runs while a step is waiting on a client or needs attention. See How automation runs your workflows.
The automation bar
When a lead's steps came from a workflow, a bar sits above the list showing whether Esqase is running them for you.
- A badge reads Automation on, Automation paused, Automation off, or Automation paused for the firm.
- Next: names the step that runs next and when it starts, for example "Next: Send the welcome email, 2 days after the previous step".
- Pause automation stops Esqase starting anything else on this lead. Steps already waiting on a client stay where they are. Resume automation picks the workflow up where it left off.
- Start automation appears when the workflow arrived with automation switched off for this lead, which is what happens to leads that come in from your booking page, a public form, the client portal, or the API until your firm allows those to run automatically. Click it to let the automatic steps run.
- Run history opens a panel listing what has happened on this workflow: steps scheduled, run, skipped, waiting, approved and rejected, and what came back from the client. Each line names who was behind it, either the member who did it, The client, or Esqase automation. A step that finishes because something came back, such as an email going out or the client returning a form, records what came back and then a closing line saying the step is done. Before anything has happened it reads Nothing has run yet.
Note: Pausing here covers this lead only. A firm owner or administrator can pause automation for the whole firm under Settings > Firm > Automation, and while that is on the bar reads Automation paused for the firm and nothing automatic runs on any record, including steps you try to start by hand. Lift the firm-wide pause first. See Automation settings.
What a step's status tells you
An automated step carries a status badge and a short sentence under its title:
- Not started: its turn has not come yet.
- Scheduled: it has a start time, for example "Runs Tue 23 Sep, 9:00 AM", in your firm's time zone.
- Running: Esqase is working on it right now.
- Waiting: the step ran and is waiting for something to come back, for example "Waiting for the form to come back" or "Waiting for the invoice to be paid".
- Needs approval: Esqase has prepared the step and is holding it for a member.
- Needs attention: the step could not run. The sentence says why in plain words, for example that the contact has no email address on file. Nothing below it runs until you deal with it.
- Done: it finished, with when and who, for example "Ran 22 Sep, 9:02 AM by Esqase automation" or by the member who did it.
- Skipped: it was passed over, with the reason.
- Cancelled: the workflow was stopped.
Act on a step Esqase is running
Buttons appear on the row to match its status:
- Run now starts a step immediately instead of waiting for its scheduled time.
- Review opens the prepared step. For an email you see who it goes to, the subject and the message, and you can Send now, Edit and send (which opens the normal email composer on the very wording you just read, ready to change), or Do not send. For an invoice you get Review draft invoice, which opens the draft, a checkbox reading Also approve this invoice that is ticked for you, and Approve and continue: leave the checkbox ticked and the invoice is approved along with the step, clear it and the invoice stays a draft. Other step types offer Approve or Skip this step.
- Try again re-runs a step that says Needs attention once you have fixed what stopped it.
- Skip this step, in the row's More actions menu, passes over a step and lets the workflow carry on with the next one.
- Run it anyway appears on a skipped step if you change your mind.
You can always do the step by hand instead: the ordinary buttons (Send, Create task, Create document, Advance, and so on) stay on the row, and a step counts as done whoever did it, so the workflow carries on either way.
Note: Run now, Review, Try again, and Run it anyway ask Esqase to do the work, so they are greyed out whenever Esqase is not running this lead. Hover over one to read why: Automation is paused for your firm, Automation is paused for this lead, Automation has not been started for this lead, or This workflow is no longer running on this lead. The buttons you use yourself are never blocked.
Tip: A notification about a workflow step opens the lead with that step highlighted, so you land on the row that needs you rather than hunting for it.
Conflict check steps
A Conflict check step screens the lead's contact against the work your firm already has.
- Set to run by hand, the row shows Run conflict check, which opens the usual conflict check dialog with the lead's contact filled in. See Running a conflict check.
- Set to run automatically, Esqase screens the contact itself and files the result with the lead's conflict checks, where it is listed as Automatic screen by Esqase. The automatic screen looks at matters, clients, related contacts, the organisations a contact is linked to, other contacts, other leads, and invoices. It does not search tasks, activities, events, notes, emails, or documents, so it is a first pass rather than a replacement for the full check a member runs.
- If the screen finds a possible conflict and the step is set to block on one, the step stops the workflow and reads Needs attention with "Possible conflicts were found. Review them before continuing." Review conflicts opens the conflict check dialog on the screen Esqase already ran, without starting a new one, and reads "Esqase found a possible conflict on this step. Look at the checks below before you clear it or run a new one." Run a fresh check from the dialog's own Run conflict check button if you want one, then Clear and continue to let the workflow carry on, or Stop workflow in the More actions menu to end it there.
- Once a check is attached to the step, the row carries a status button reading Conflicts found, Matches to review, Nothing found, or Not checked. It is there whatever state the step is in. Click it to read the saved results without starting a new check: the outcome, when the check ran and who ran it, the parties screened, and the matches, limited to what your own access allows. Previous conflict checks at the bottom highlights the step's own check, and Run a new check in the footer starts a fresh one.
Create tasks from a task list step
A Task list step on a lead shows Create tasks. Clicking it creates the tasks from that list, assigns them to the members named on the list, and marks the step done. The tasks belong to the lead until it becomes a matter. See Creating and managing tasks.
Complete and uncomplete items
- Click the checkbox on a step to mark it done. The step is struck through and the progress bar updates.
- For steps that have an action attached (send an email, create an event, advance the stage, convert to a matter, and so on), checking the box first asks Run the action first?. Choose Apply and mark done to perform the action and complete the step, or Just mark done to only tick it off.
- Uncheck the box to mark a step not done again.
Each step also has its own action button matching its type (for example Send for an email, Create task for a task, Create document for a document, Advance for a stage change, Convert to matter for a conversion, or a Form menu with Fill on behalf of client, Send to client, and Copy link). For the full list of step types and what each one does, see Workflow step types.
Note: The Advance button on a Status change step moves the lead to the next pipeline stage right away, with no confirmation to click through. If the lead is already at the final stage, nothing moves and the step is simply marked done.
Note: Once a Document step has created its document, its button changes to View document so you can open the file. The document is filed with the lead's documents. See Workflow step types.
Note: An Invoice step on a lead shows Create draft invoice. Invoices belong to a matter, so Esqase puts the draft on a small invoicing matter linked to this lead, creating that matter the first time you bill the lead and reusing it afterwards. The lead itself is not marked hired, converted, or done. The row then reads View invoice so you can open the draft. When the step runs automatically, Esqase does the same thing and holds the draft for approval before the workflow carries on. See Creating and sending invoices and Converting a lead to a matter.
Reorder items
Drag a step by its grip handle (the dotted icon on the left) and drop it to reorder. The new order saves automatically.
Link and unlink records
When you apply a step, Esqase links the resulting record (a task, an event, or a form submission) to the step so you can jump straight to it. To detach it, open the step's More actions menu and choose Unlink record. The step reverts to "to do" so you can redo it.
To edit a step's configuration, choose Edit from its menu. To remove a step entirely, choose Remove; if it has a linked task, event, or form, the confirmation dialog can optionally delete that record too.
Add a single workflow item
- In the Workflow section, click the + button (or, on an empty list, Workflow item).
- In the Add workflow item dialog, pick the item type from the grid (Email, Task, Task list, Form, Event, Document, Invoice, Status change, Convert to matter, or Conflict check).
- Configure the item's details on the next screen, then click Add to lead.
Import a workflow set
Instead of building steps one by one, you can copy an entire saved workflow onto the lead.
- In the Workflow section, click Add workflow (or, on an empty list, the Add workflow button).
- In the Assign workflow set dialog, choose a workflow from the Workflow dropdown. Only active workflows appear.
- Click Import workflow. Its steps are copied onto the lead as pending items, and you will see how many were imported. You can edit them afterward.
If your firm has no active workflows yet, the dialog tells you to create one first. See Workflows and the builder.
Note: The workflow checklist stays editable on a hired or not-hired lead. Once a lead is converted to a matter, its checklist moves to that matter and the lead's copy becomes read-only.
Comment on a lead
Every lead has its own discussion thread, the same chat-style feed used on contacts, matters, tasks, documents, and invoices. Use it to record what a caller said, ask a colleague whether to take the case on, or leave context for whoever picks the intake up next.
- Open the lead and scroll to the Comments section, which sits between the workflow checklist and Recent activities. A count next to the heading shows how many comments the lead has.
- Type your note in the Write a comment... use @ to mention box.
- Click the send button (or press Enter) to post. A Comment posted confirmation appears, and your comment shows in the list with your name and how long ago you posted it.
If there are no comments yet, the feed reads No comments yet. Start the discussion.
What you can do with a comment:
- Mention a colleague: type @ to bring up your firm's members, each with their profile photo (or initials), keep typing to search, and click the person you want. Their name is highlighted in the posted comment and they are notified.
- React: hover a comment, click the add reaction (smiley) button, and pick one of 👍, ❤️, 😂, 😮, 😢, or 🙏. Reactions gather into counters beneath the comment; click a counter to add or remove your own.
- Reply: hover a comment and click the reply button. A Replying to banner naming the author appears above the box, and the posted reply carries a short quote of the comment you answered.
- Edit or delete your own: hover a comment you wrote and use the edit (pencil) or delete (trash) button. An edited comment shows an edited marker next to its time; deleting asks you to confirm and removes it for everyone.
- Read older comments: the feed shows the 20 newest comments first, with Page 1 of N and back/next buttons beneath it. Use those to walk back through a long discussion. The refresh control on the Comments heading pulls the conversation by hand at any time.
The feed updates on its own while you have the lead open, so a colleague's comment, edit, deletion, or reaction appears without a refresh.
Commenting on a lead notifies the person who created it, its assignees, and anyone who has already commented; anyone you @mention is notified too. You control those under Settings > Notifications (the Comment on my lead and Mentioned in a lead comment events). See Notifications.
Note: Unlike the lead's own fields, the discussion stays open after a lead is marked hired or converted to a matter, so you can keep talking about an intake you have already taken on. Posting still needs Update access for leads; with View access only, you can read the conversation but the comment box and those actions are hidden. A converted lead's discussion stays on the lead, it does not move to the new matter.
Review the lead activity timeline
Below the workflow section, Recent activities logs what has happened to the lead: when it was created, moved between stages, edited, marked hired or not hired, converted, archived, and so on. Entries are paginated.
- On the lead profile, scroll to Recent activities.
- Use the page arrows to move through older entries.
- Click the filter button (the list icon) and turn on Show view activity to also include records of who opened the lead. These are hidden by default.
- Click the refresh button to reload the timeline.
For more on activity timelines across Esqase, see Activity timelines and audit logs.
The Hired and Not-hired outcome tables
The Hired and Not hired tabs list leads that have reached an outcome, in a sortable table rather than a board. Each row shows the lead's reference, contact, practice area, who it is assigned to, its status, who last updated it, and when.
- On the Leads page, click the Hired or Not hired tab.
- Filter and sort the table:
- Search leads matches the reference, contact, or practice area.
- Status, Practice area, and Assigned to are faceted filters. The Status filter also lets you include Archived leads.
- Click a column header to sort. The table defaults to most-recently-updated first.
- Clear filters resets everything.
- On any row, click View to open the lead, or open the row's More actions menu for outcome actions:
- On a Hired row: Mark as not hired, Put back to leads kanban, or Archive.
- On a Not hired row: Put back to leads kanban or Archive.
- On an Archived row: Restore or Delete.
- To act on several leads at once, select their checkboxes and use the batch actions (Restore, Archive, or Delete) at the top right.
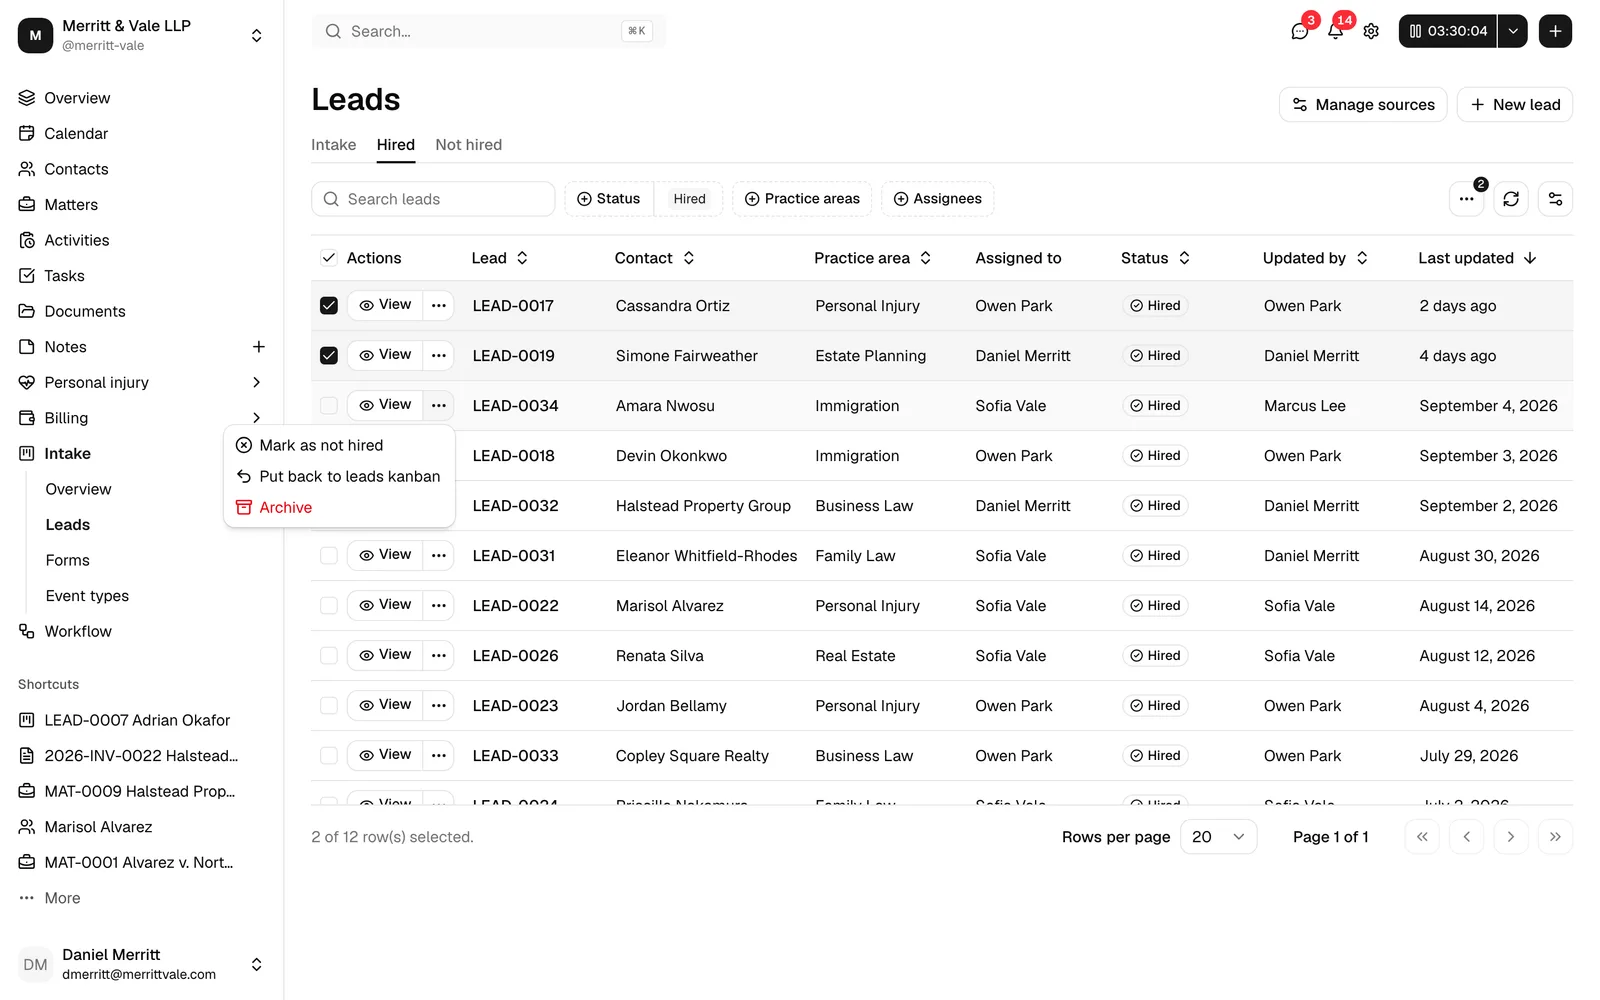
Note: The outcome tables do not offer "Mark as hired" or "Convert to matter". To convert a lead, open it and use the Convert to matter button in its header. See Converting a lead to a matter.
How booking and form submissions become leads
Not every lead is created by hand. When someone books a meeting on your firm's public booking page or submits one of your public intake forms, Esqase automatically creates a contact and a lead for them, so the inquiry lands in your pipeline without any manual entry.
- Booking submissions: when a prospect books a time, the new lead arrives tagged with a source such as "Booking", and the booking shows up as an event on the lead. See How clients book meetings and Event types (scheduling).
- Form submissions: when a prospect completes a public lead-intake form, the new lead arrives tagged with the form's name as its source and carries the submitted answers. See Public lead-intake forms and Reviewing form submissions.
These leads start in your intake pipeline exactly like manually created ones, and you work them the same way: assign members, run the workflow checklist, and decide the outcome.
Common questions
- Why can't I see the New lead button? Your role does not include Create access for leads. Ask a firm owner or administrator to grant it.
- Why is the Edit button missing on a lead? The lead is already marked hired. Hired leads are read-only to keep them in sync with their matter; you can still work the workflow checklist or change the outcome if it has not been converted.
- A lead disappeared from the pipeline. Check the Hired and Not hired tabs, and set the Status filter to Archived, in case it was given an outcome or archived.
- Can I undo deleting a lead? No. Deletion is permanent and is only available after a lead has been archived. Archive instead of delete if you might need the record later.