Calendar and events
The Calendar is your firm's shared schedule. Every event your firm creates, every meeting a client books, and every task with a due date shows up here in one place. This page walks you through viewing the calendar, creating and moving events, setting up recurring events, inviting guests, setting reminders, syncing with Google Calendar, and responding to client scheduling requests.
Before you begin
- You reach the calendar from the main sidebar by clicking Calendar.
- Your role must include view access for the calendar. If it does not, the calendar page shows a "no access" message instead.
- Create, edit/move, and delete are each governed by their own permission. By default, firm owners and administrators have full access, while attorneys and staff can view, create, and edit events but cannot delete them. If a button described below is missing for you, your role most likely does not include that level of access.
- The first time you open the calendar, Esqase makes sure you have a personal default calendar to add events to, so you can always create an event right away.
View and manage the firm calendar
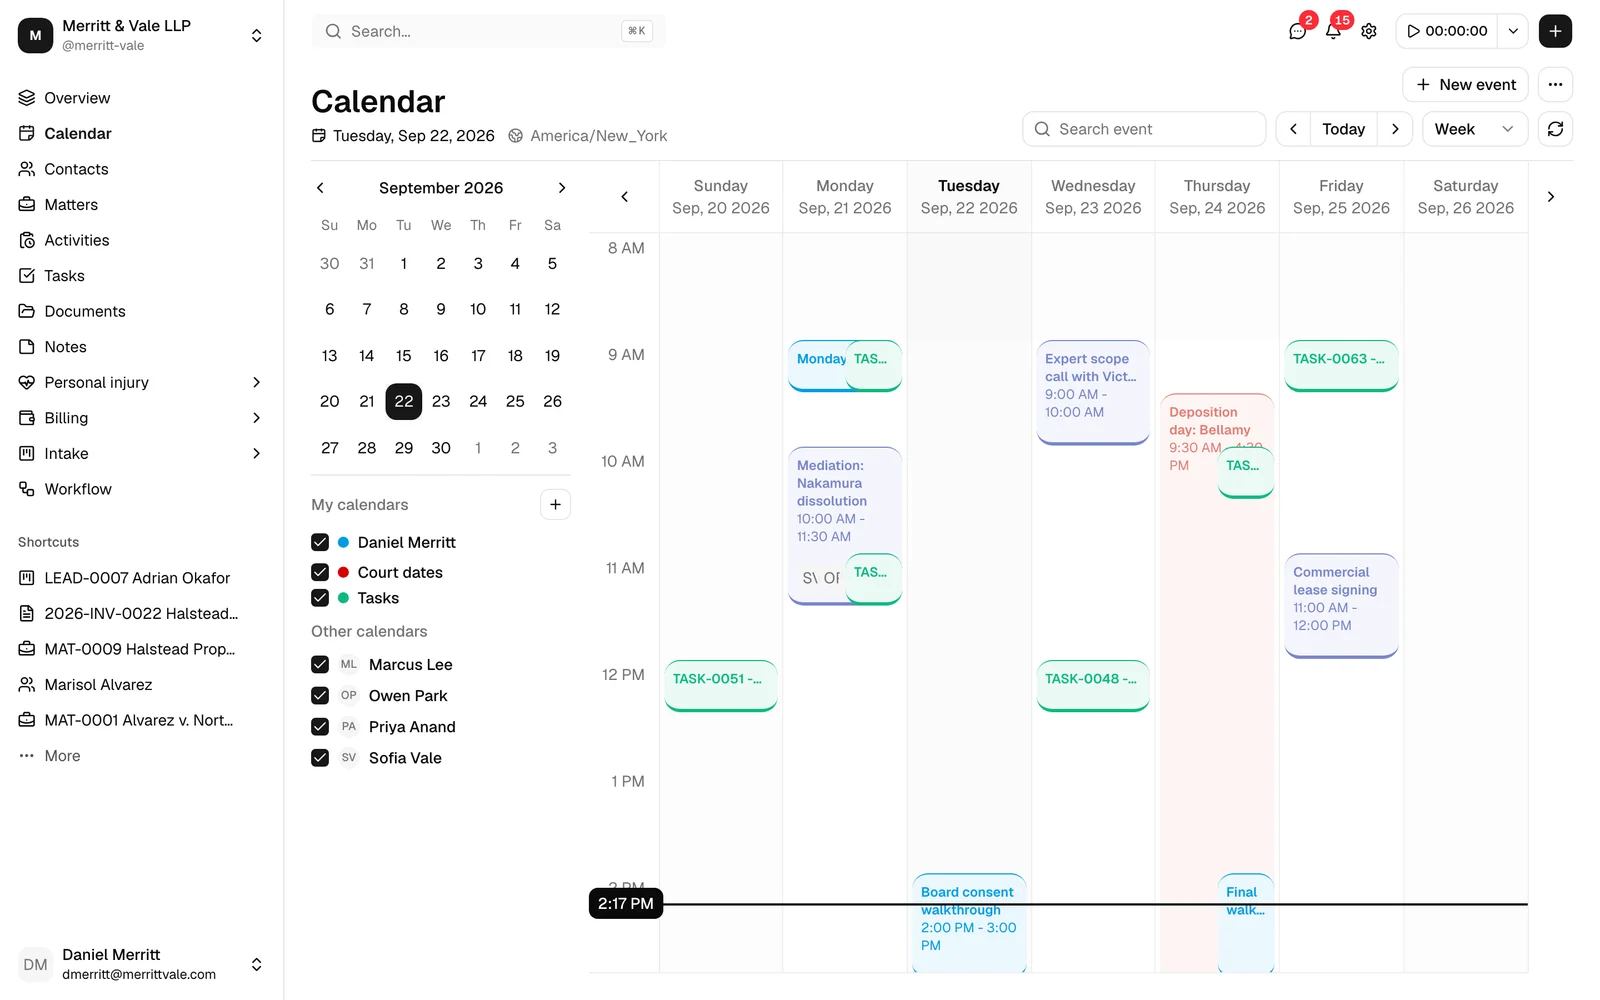
The header above the calendar has two sides. On the left sits the page title, and under it a single line that opens with a small calendar icon (the same one Calendar carries in the sidebar) and today's date, for example Monday, Sep 21, 2026, then a small globe icon and the time zone the calendar is drawn in. On the right, two rows stack beside it: New event and the ... menu (New calendar and Event types) on top, and underneath them everything you need to move around the schedule, switch views, and search. The calendar itself starts just below the header.
- In the sidebar, click Calendar.
- Type in the Search event box, the first control in that lower right-hand row, to filter the calendar down to events whose details match your search.
- Move through time with the arrow buttons beside it: click the left arrow to go to the previous day, week, or month, and the right arrow to go forward. Click Today to jump back to the current date.
- Use the view button after them (it reads Day, Week, or Month) to switch how the grid is laid out:
- Day shows a single day, hour by hour.
- Week shows the current week in a time grid.
- Month shows the whole month at a glance.
- Click the refresh button (the circular-arrows icon), the last control in that row and the one at the far right of the header, to reload calendars and events, for example after a teammate adds something.
- In Day and Week view, the grid carries a pair of its own arrow buttons, one at each end of the row of day headings. They step back and forward one day at a time in Day view and one week at a time in Week view, so you can walk through the schedule without reaching back up to the header. Month view has no such pair: use the arrows described in step 3.
- Use the mini month picker in the left rail to jump to any date quickly. Clicking a day there moves the main grid to that day.
What the grid shows
- Each day column is headed by the weekday over its date. Today's heading is in bold and its column carries the strongest tint on the grid, so the current day stands out in Week view. The shading that marks your firm's closed hours is kept faint, so the cards on top stay the first thing you see.
- The time axis down the left side labels every hour, for example 10 AM, and the hour rows are tall enough to read a short meeting at a glance.
- A dark pill on the time axis gives the current time, with a line running across the grid at the same height. It keeps up with the clock, and it appears in Day and Week view.
- Every event is a card tinted in its calendar's color, with a colored edge along the top and a heavier one along the bottom, and no line down the sides. How much the card shows depends on how long the event runs: under 45 minutes it shows the title only, from 45 minutes up to an hour and a half it adds the time range (for example 10:00 AM - 11:00 AM), and an hour and a half or longer also carries the guests' avatars along the bottom, up to three with a +N chip for the rest. An all-day event shows its title only, and in Month view every entry is a single title line.
- A task is a card in the same style in the built-in Tasks color, labelled with its ID and title together, for example TASK-0007 - Draft the settlement letter.
- The row of all-day entries above the grid appears only when something all-day falls in the days you are looking at. When nothing does, the grid starts straight at the hours.
Which time zone the calendar shows
The whole grid is drawn in one time zone. The line under the Calendar title gives today's date first and then, after a small globe icon, the name of that zone, written in region form, for example Asia/Manila. The date is read in that same zone. Both are labels only, not switchers. Every event sits where it belongs in that zone, no matter which time zone it was created in.
- If you have set a Timezone on your own schedule, the calendar uses yours. Your teammate in another country sees the same meetings on their own clock.
- If you have not set one, the calendar uses your firm's timezone.
A faint shading behind the grid marks the hours your firm is closed, taken from your firm's business hours for each day, so the unshaded part of each day is the stretch you are open. A day your firm does not open at all is shaded from top to bottom. The shading is deliberately light, so it never competes with the entries drawn on top of it, and today's column carries its own light tint over it. See Setting firm availability and Update a member's timezone and schedule.
Tip: If every meeting looks an hour or two out of place, check the Timezone on your own schedule first. That field, not your computer's clock, decides how the calendar is drawn.
Preview an event or task on the grid
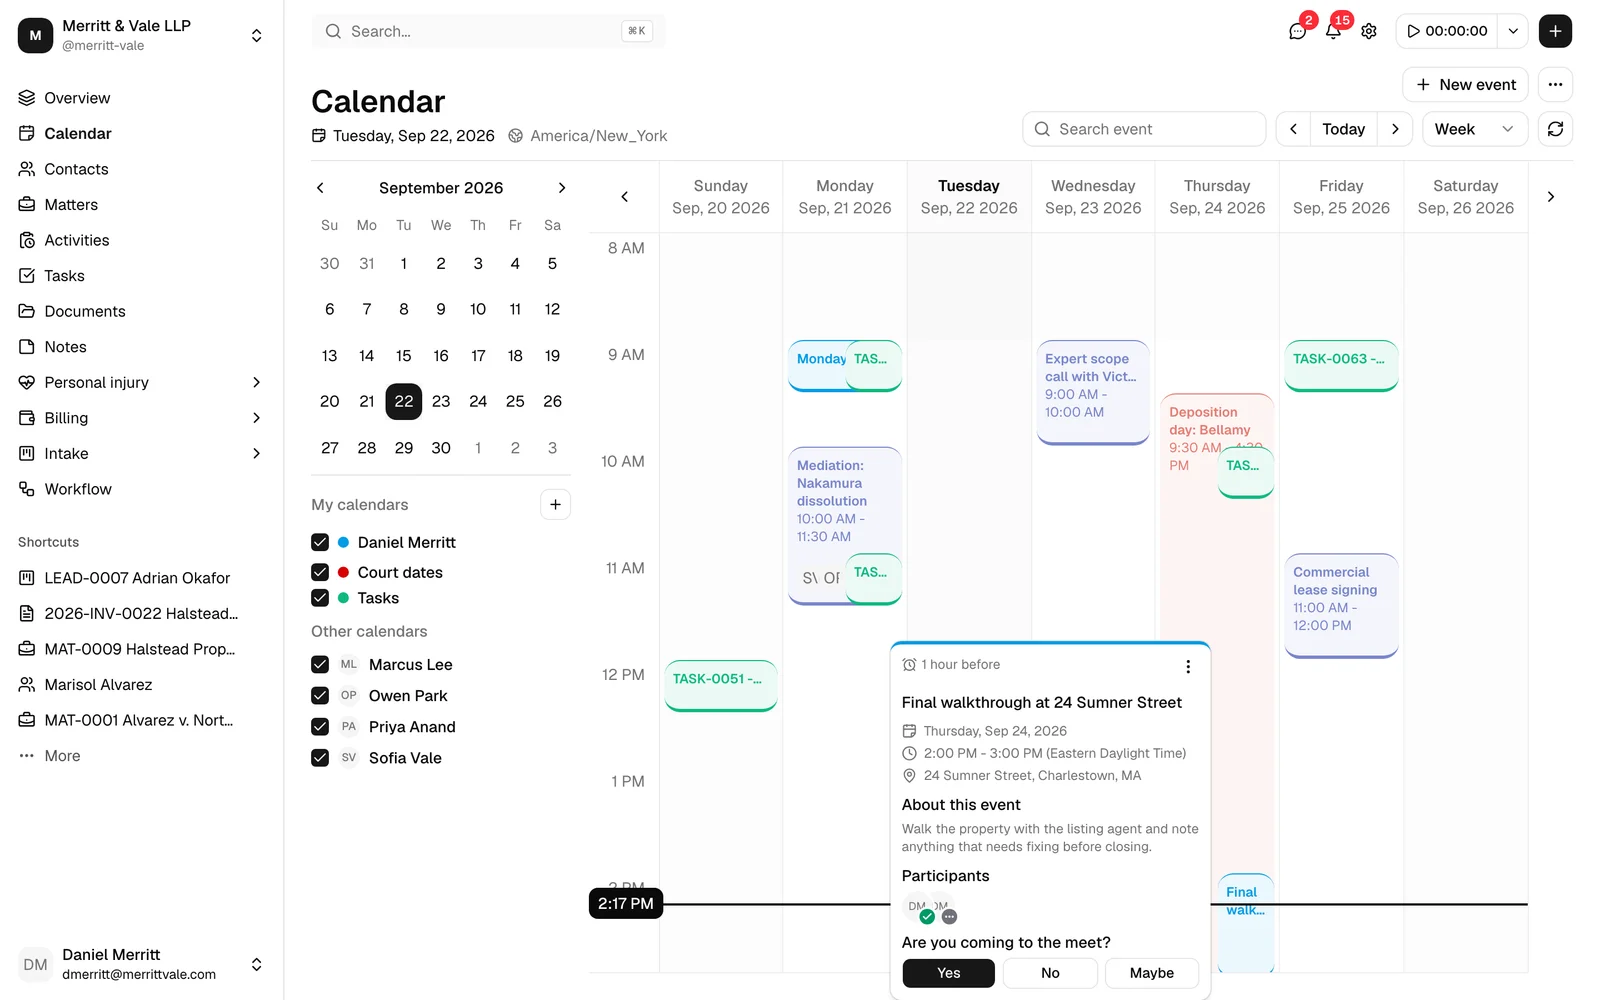
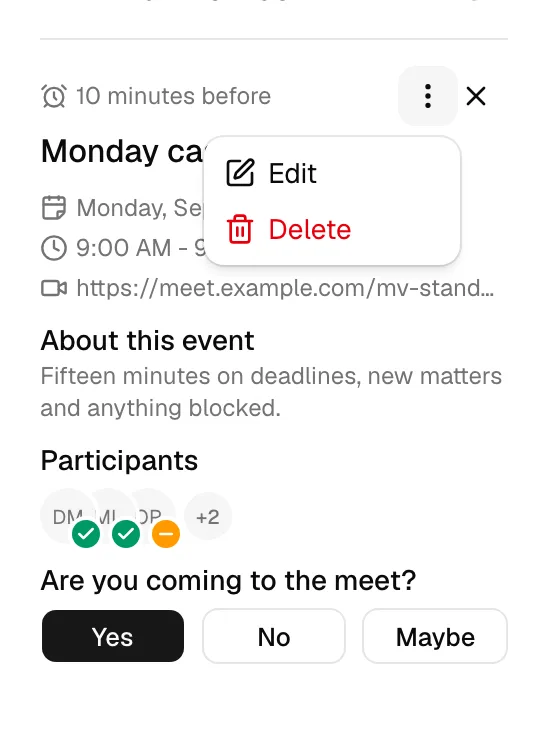
Hover over any event or task on the grid to open a preview card. It shows the same details as the panel that opens when you click, and it carries a few actions you can take on the spot, so you can check or change something without losing your place in the calendar.
- A colored bar runs across the top edge of the card. It is the color of the calendar the entry belongs to, so you can tell at a glance which calendar it came from. Tasks use the built-in Tasks color.
- For an event, the card shows the reminder (for example, 15 minutes before, or No notification), the title, the full date, the start and end time (or All day for an all-day event), the location, the meeting link, an About this event summary of the description, and a Participants row of avatars.
- For a task, the card leads with the task's ID and title together, for example TASK-0007 - Draft the settlement letter, then shows the due date, the time, the priority, and the matter it belongs to. If the task has a description, it follows under a Description heading. A task with no description shows no heading.
- Clicking the meeting link inside the card opens the call in a new tab. Clicking anywhere else opens the entry: an event opens in the detail panel in the left rail, and a task opens in the Edit task dialog without leaving the calendar.
Tip: The Participants avatars on the preview card carry the same RSVP badges as the event detail panel, so you can see who has accepted before you open anything. See Respond to an invitation (RSVP).
Act on an event from its preview card
An event's preview card carries two actions:
- The ... menu in the top-right corner of the card, the same menu you get in the event detail panel:
- Edit opens the usual event dialog, with the same fields you filled in when you created the event.
- Delete asks you to confirm in the Delete event? dialog. The event is removed once you click Delete event there, and this cannot be undone.
- Are you coming to the meet? with Yes, No, and Maybe buttons appears at the bottom of the card when you are one of the event's guests. Picking an answer saves it right away, without opening the event. See Respond to an invitation (RSVP).
Note: The ... menu appears only if you are the event's host or the person who created it. That is the same rule that decides who sees Edit and Delete in the detail panel and who can drag an event to a new time. For everyone else the card is a read-only preview (the RSVP row still appears if you are a guest).
Note: For a recurring event, Edit and Delete apply to the whole series, the same as when you open the event from the grid. To change a single occurrence, drag or resize it instead and choose Only this event. See Move one occurrence vs. the whole series.
Act on a task from its preview card
A task's preview card has an Open task button in its top-right corner. Click it to go to your task list with that task already open. That is the one way out of the calendar: clicking the task on the grid itself opens the Edit task dialog in place, so you stay on the calendar. See Creating and managing tasks.
Choosing which calendars you see
The left rail lists the calendars you can show or hide:
- My calendars lists your own calendars, each with a colored swatch and a checkbox. Uncheck a calendar to hide its events; check it to show them again.
- A built-in Tasks entry appears in the same list. Turn it on to overlay your firm's tasks (shown on their due dates) on top of the calendar, or off to hide them. A task on the grid is labelled with its ID and title together, for example TASK-0007 - Draft the settlement letter, so you can tell tasks apart from events at a glance. Clicking one opens the Edit task dialog on the calendar, with the task's details, schedule and assignees, the same dialog you get on the tasks page.
- Other calendars lists your teammates' calendars, grouped by person. Check a person's name to show all of their calendars at once, or uncheck it to hide them.
Tip: Hiding a calendar only changes what you see. It does not affect anyone else's view or delete any events.
Creating, editing, and deleting calendars
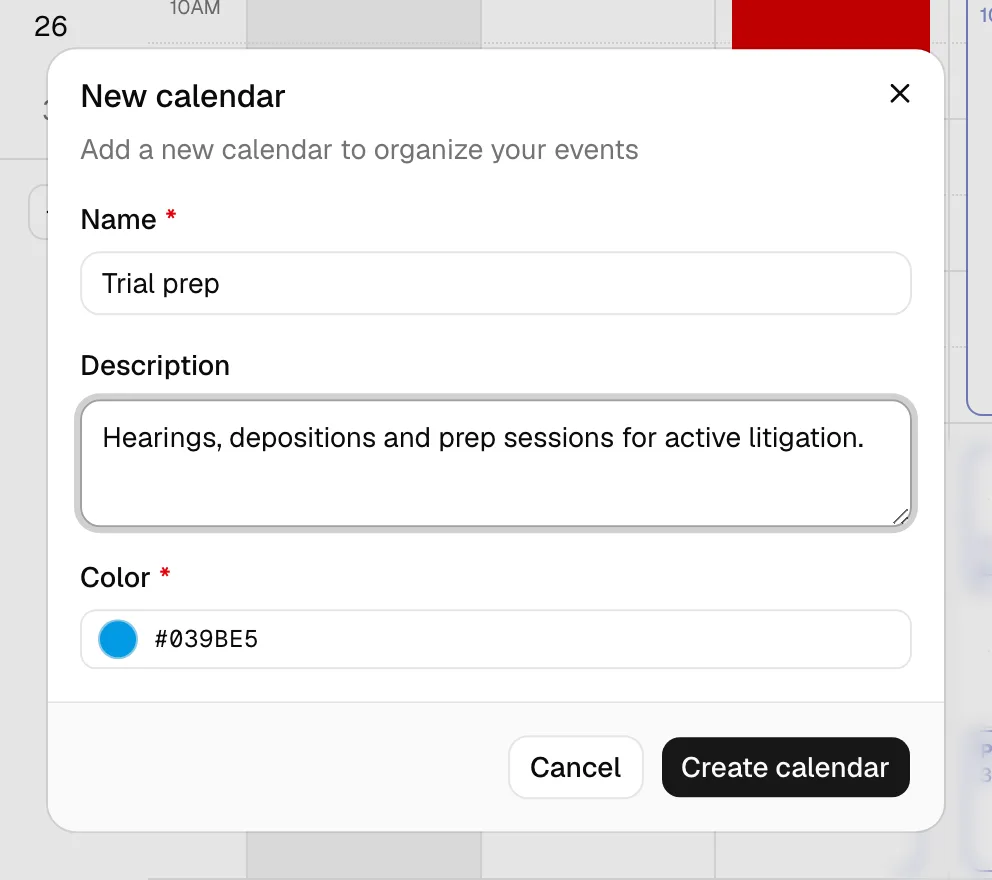
Calendars are color-coded buckets you use to organize events (for example, a "Trial prep" calendar separate from your default one).
- To add a calendar, click the small plus button next to the My calendars heading, or open the ... (more) menu in the header and choose New calendar.
- In the New calendar dialog, fill in:
- Name (required): what the calendar is called.
- Description (optional): a short note about what it is for.
- Color (required): the color used for its events on the grid.
- Click Create calendar. To change a calendar later, hover over it in My calendars, open its ... menu, and choose Edit.
- To remove a calendar, open its ... menu and choose Delete, then confirm in the Delete calendar? dialog.
Note: Your default calendar uses your name and cannot be renamed or deleted. When you delete a non-default calendar, its events stay on the firm but lose their color bucket.
Create a calendar event
You can create an event in two ways: with the New event button, or by drawing it directly on the grid.
- Click New event in the calendar header. (If your role does not include create access, this button is hidden.) Alternatively, click an empty slot on the grid, or click and drag across a time range, to open the same dialog with the date and time prefilled.
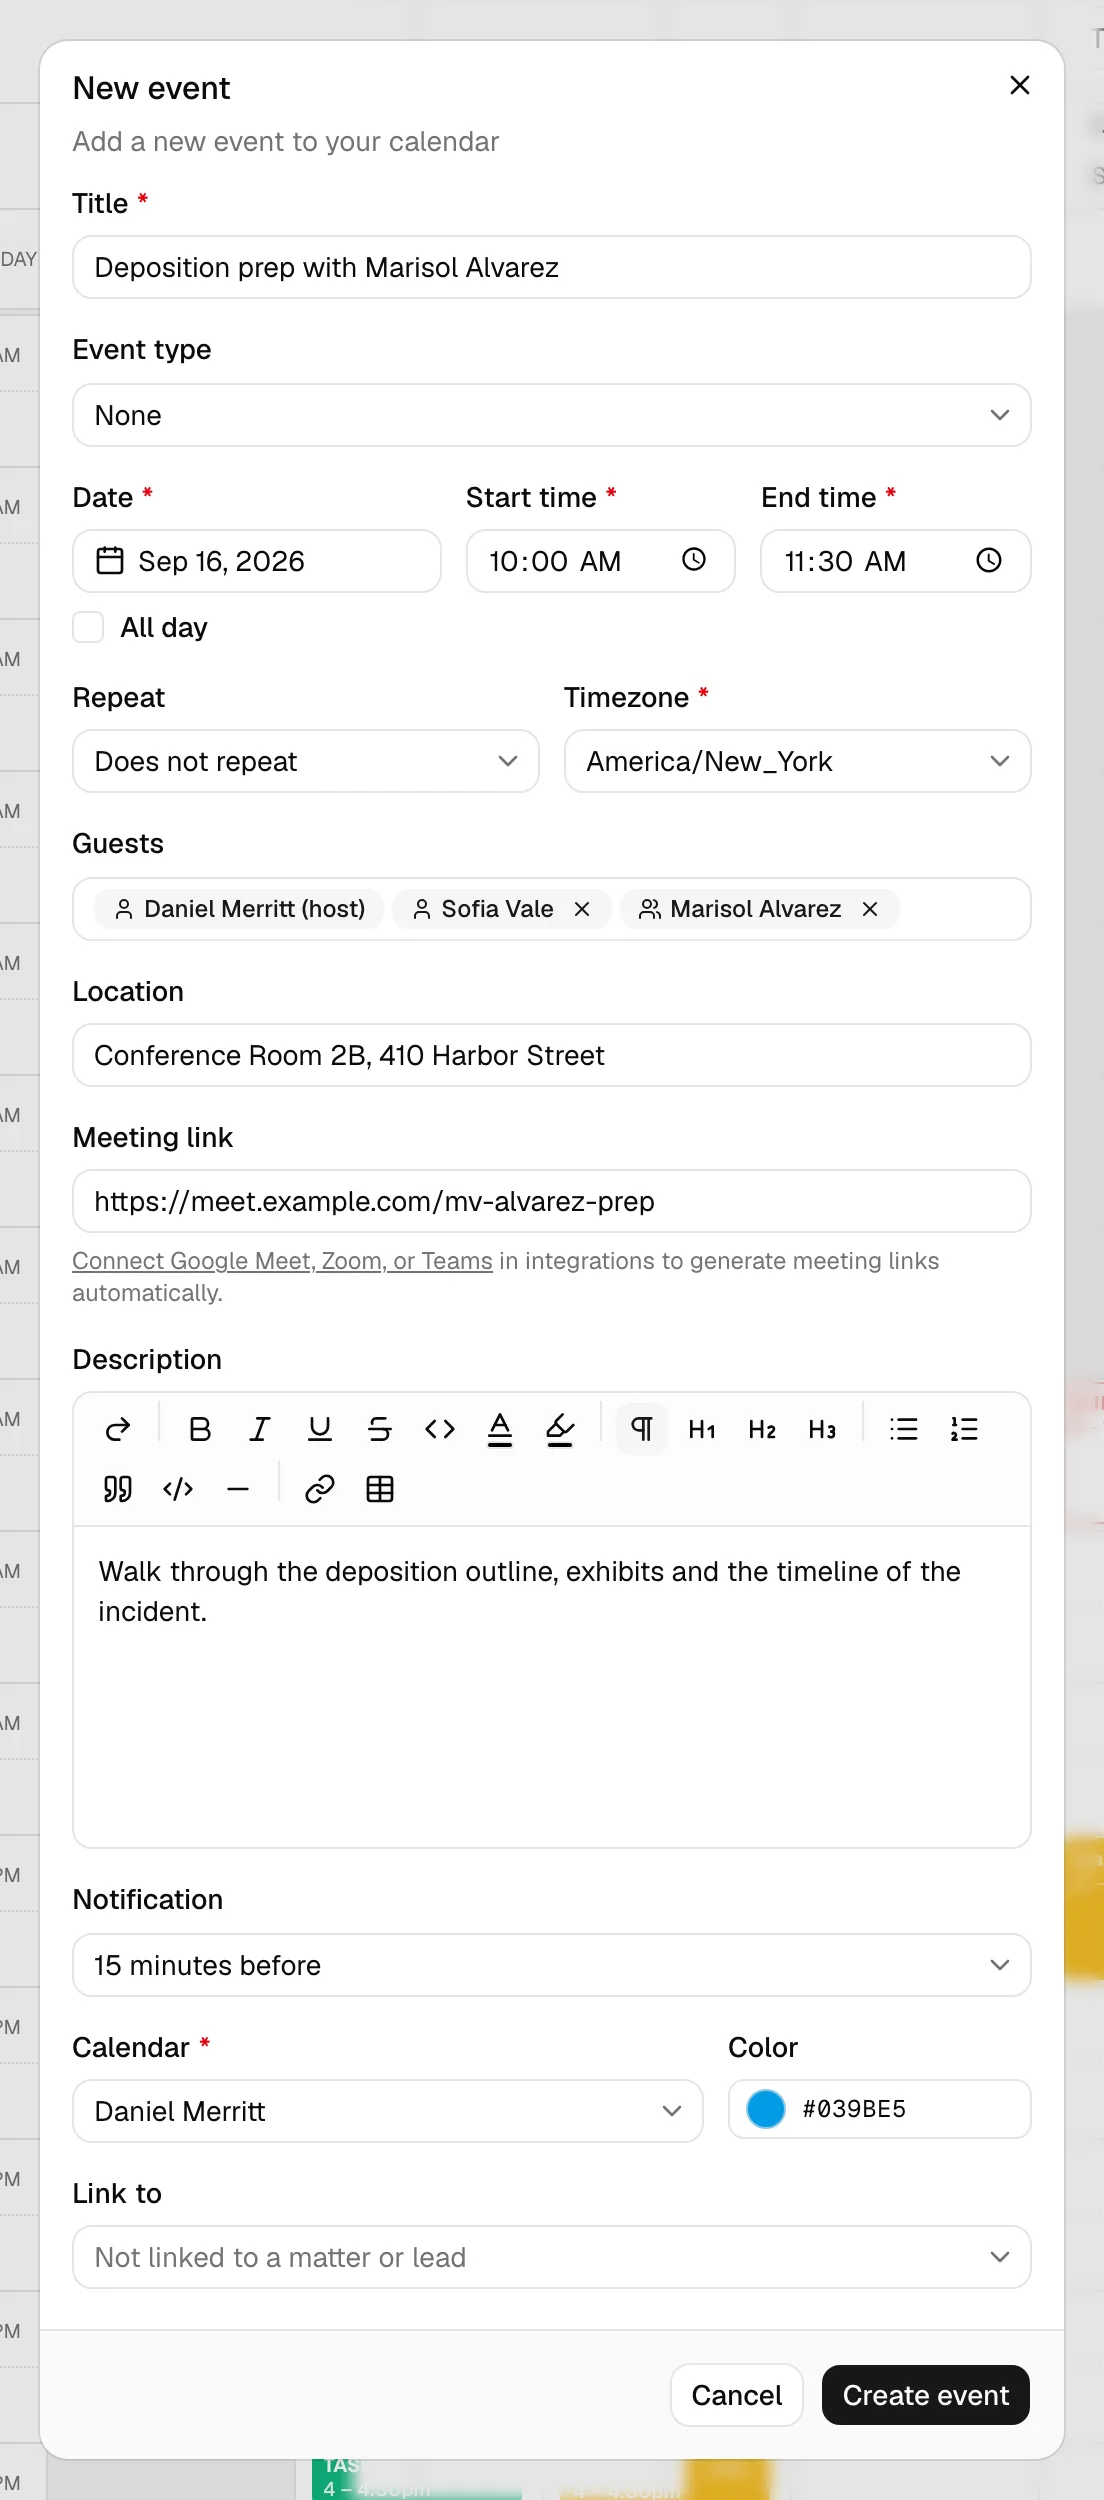
- In the New event dialog, fill in the details:
- Title (required): the name of the event.
- Event type (optional): if your firm has set up bookable meeting types, you can pick one here. Choosing a type fills in the title and adjusts the end time to match the type's standard length. Leave it as None for an ordinary event. (See Event types (scheduling).)
- Link to (optional): link the event to a matter or lead. This field appears at the bottom of the form, after the Calendar and Color fields. Picking a matter makes the event appear on that matter's Events tab; picking a lead ties it to that lead. Leave it on Not linked to a matter or lead for an unlinked event. This field is hidden when you create an event from inside a matter or lead (the record is pre-filled automatically).
- Date (required), Start time, and End time (required): when the event happens. Check All day to make it an all-day event and hide the time fields.
- Repeat: leave this as Does not repeat for a one-time event, or pick a recurrence (covered below).
- Timezone (required): the timezone the Date, Start time, and End time you typed are read in. It defaults to the event's own timezone when you are editing, otherwise to your firm's. This field decides the real moment the meeting happens, so set it before you fill in the times. When it differs from the timezone your computer is in, a Your time: line appears under the time fields showing the same moment on your own clock, so you can check it before saving.
- Guests: the people invited (covered below).
- Location (optional): a free-text place, for example an office address or a courtroom.
- Meeting link (optional): a video link such as a Google Meet or other URL.
- Description (optional): a rich-text note with the agenda or any details.
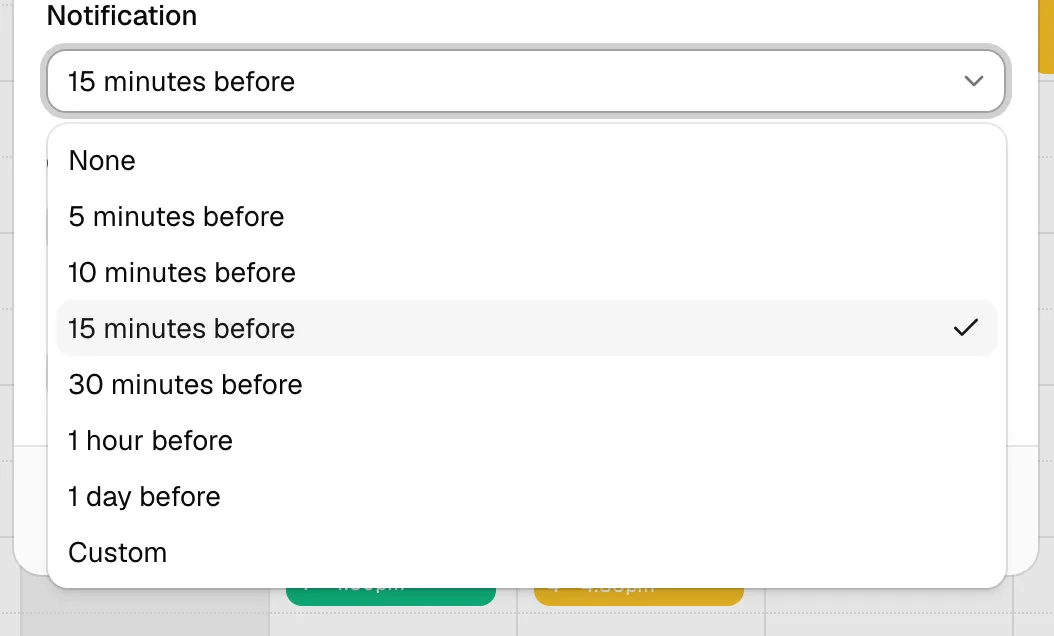
- Notification: when to remind attendees, for example 15 minutes before. Choose Custom to set your own interval, or None for no reminder. Everyone invited, plus you as the creator, gets one reminder at that time. See Event reminders.
- Calendar (required): which calendar the event lives on. It defaults to your default calendar.
- Color (optional): override the calendar's color for just this event.
- Click Create event. The event appears on the grid right away, and a confirmation message is shown.
Important: The Timezone field is not a label, it is the instruction. A member in Manila who sets Timezone to the firm's New York zone and types 10:00 creates a 10:00 AM New York meeting, not 10:00 AM Manila. If you want to work in your own clock, set Timezone to your own zone first, then type the times.
Tip: If you have connected a Google account that includes Google Meet, a Generate Google Meet link button appears beneath the Meeting link field. Click it to create a fresh Meet link and drop it into the field. If you have not connected Google Meet, you will see a Connect Google Meet link that takes you to your integration settings instead. See Connecting Google (Gmail, Calendar, Meet).
Edit or move an event
You can open an event for editing, drag it to a new time, or resize it on the grid.
Edit event details
- Click an event on the grid. Its details open in the left rail, showing the date, time, meeting link, description, and participants. The time carries the name of the calendar's time zone after it, and when the event's own Timezone is a different one, a Firm time line underneath gives the same moment in that zone.
- If you are the event's creator (or its host), open the ... menu at the top of that panel and choose Edit.
- The Edit event dialog opens with the same fields as when you created it. Make your changes and click Save changes.
- To remove the event instead, open the same ... menu and choose Delete, then confirm in the Delete event? dialog. Deleting an event cannot be undone.
Tip: You do not have to open the event first. Hovering it on the grid gives you the same ... menu on the preview card. See Act on an event from its preview card.
Note: Only the event's creator or host sees the Edit and Delete options in the detail panel. Other members can still view the event but cannot change it from here.
Move or resize on the grid
Only the event's host or the person who created it can move or resize it on the grid. This is the same rule that controls who sees the Edit and Delete options in the detail panel. If you are not the host or creator, the event stays fixed in place: you can still click it to view its details, but you cannot drag it to a new time or change its length.
- To reschedule, drag an event to a new day or time. Esqase saves the new time and shows a brief "Event rescheduled" message.
- To change how long an event lasts, drag its bottom edge (in the Day or Week views) to make it longer or shorter. The duration updates automatically.
Note: Tasks that appear on the calendar (shown on their due dates) cannot be dragged or resized. To change a task's due date, open the task itself. See Creating and managing tasks.
Note: Court dates cannot be dragged or resized either, even by their host. Their date comes from the matter's Court dates tab, so that is where you change it. See Court dates on the calendar.
Tip: If a move does not save (for example, you lose connection), Esqase puts the event back where it was so the grid always reflects what is actually saved.
Create a recurring event and edit a single occurrence
A recurring event repeats on a schedule (for example, a weekly case review) so you only have to set it up once.
Set up a recurring event
- Create or edit an event as usual.
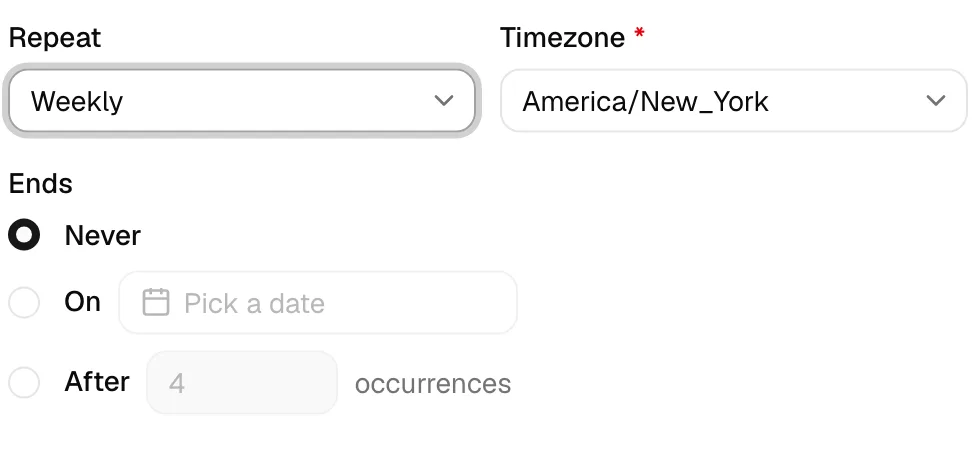
- Open the Repeat menu and choose how often it repeats:
- Daily, Weekly, Monthly, or Yearly for the common patterns.
- Custom to set your own interval, such as every 2 weeks. With Custom, set Repeat every to a number and choose the Unit (Day, Week, Month, or Year).
- Once you pick anything other than Does not repeat, an Ends section appears. Choose when the series stops:
- Never: the event repeats indefinitely.
- On a specific date: pick the last date the event should occur.
- After a number of occurrences: enter how many times it should repeat.
- Save the event. The grid shows every occurrence in the series.
Note: A repeating event keeps its local start time when the clocks change. A 9:00 AM weekly review stays at 9:00 AM through the daylight saving switch in the event's Timezone, rather than drifting to 8:00 or 10:00. Guests in another zone see their own clock shift instead, which is what a clock change actually means for them.
Move one occurrence vs. the whole series
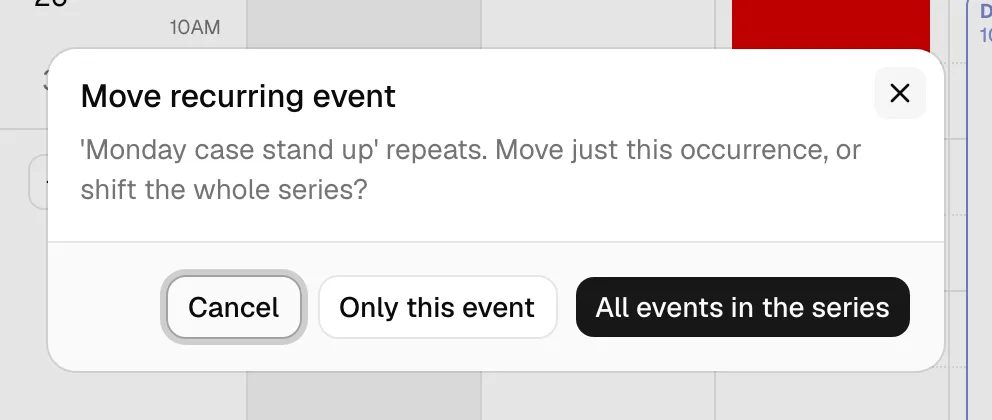
When you drag or resize an event that is part of a series, Esqase asks how to apply the change. As with single events, only the host or creator can move or resize a recurring event; for everyone else it stays fixed in place.
- Drag a single occurrence of a recurring event to a new time.
- In the Move recurring event dialog, choose:
- Only this event: moves just the occurrence you dragged and leaves the rest of the series untouched. That occurrence becomes an exception with its own time.
- All events in the series: shifts the entire series by the same amount.
- Esqase saves your choice and refreshes the grid. To keep things as they were, click Cancel and the occurrence snaps back.
Add guests and send RSVPs
Guests are the people invited to an event. You can invite firm members, contacts, or anyone by email.
Add guests when creating or editing an event
- In the event dialog, click the Guests field to open the people picker.
- Start typing in the Search or type an email box. The list is grouped into Members (your colleagues) and Contacts (people from your contacts list, such as clients). The list searches as you type and loads more people as you scroll, so you do not have to load everyone at once.
- Click a name to invite that person. A checkmark shows who is selected; click a selected name again to remove them. Each guest you add appears as a removable chip in the field, with a small icon showing whether they are a member, a contact, or an email guest.
- To invite someone who is not a member or contact, type their full email address. An Invite by email group appears at the top of the list with an Invite option showing the address you typed. Choose it to add that person as an email guest.
- When you create a new event from a matter or a lead, the related clients who have an email on file are added as guests automatically, so you do not have to add them by hand. This includes New event on a matter's Events tab, where the primary client comes first and a note under Guests reads "Clients on this matter were added as guests. Remove them for internal events." If the event is internal, such as a team meeting, remove the client chips before you save so the clients are not invited. Editing an existing event never adds guests.
- As the creator, you are added as the host and marked as attending.
Note: A contact can only be invited if they have an email address on file, because that is where the invitation goes. A contact with no email still appears in the list but is greyed out and labeled No email, so you cannot select them until you add an email address to their contact record. See Working with contacts.
Note: You cannot remove the host from an event's guest list (the host has no remove button on its chip). Every other guest can be removed with the small x on their chip.
Note: Colleagues you invite are notified. A member added as a guest gets You were invited to an event naming the event, and clicking it opens the event. This happens both when you create the event and when you add somebody to an event that already exists. You are not notified about an event you created yourself, and each person can turn this off under Invited to an event in their notification settings. Contacts are told by email and, if they use the client portal, in the portal. See Notifications.
Respond to an invitation (RSVP)
If you are a guest on an event, you can mark whether you are coming.
- Click the event on the grid to open its detail panel in the left rail. You can also just hover the event: the same Are you coming to the meet? buttons sit at the bottom of its preview card, so you can answer without opening anything.
- Under Are you coming to the meet?, click Yes, No, or Maybe. (In the read-only event preview that opens from a lead or matter step, the same three buttons read Going, Not going, and Maybe.)
- Your response is saved immediately. It does not change how the event is drawn on the grid: every entry keeps the same card in its calendar's color, whoever is coming. To see who has accepted, read the avatars.
Note: The Are you coming to the meet? row only appears if you are a guest on that event. If you are not invited, neither the detail panel nor the preview card offers it.
Note: Answering changes only the badge on your own avatar. Neither your answer nor a colleague's changes how the event is drawn on the grid.
See who has responded
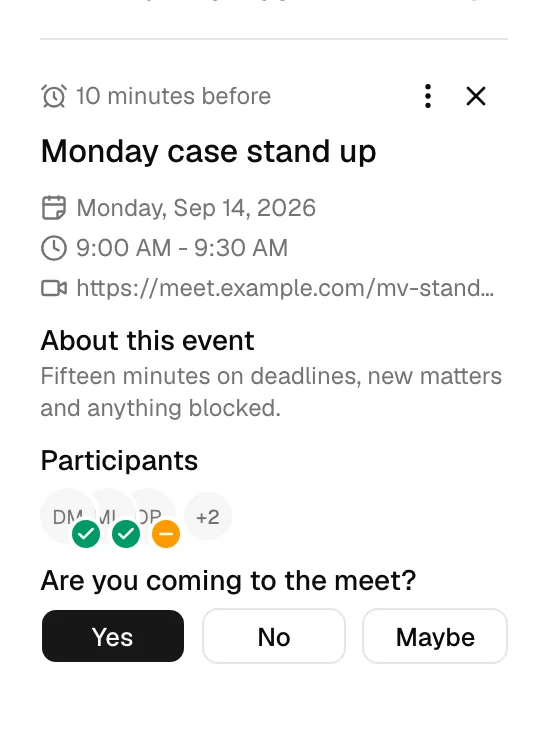
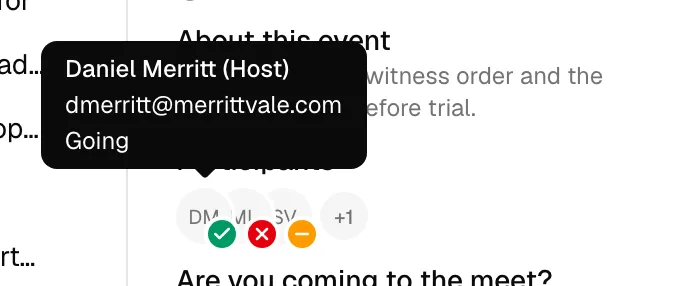
Wherever an event's Participants are shown (the detail panel in the left rail and the hover preview card on the grid), each avatar carries a small badge in its lower corner with that person's answer:
| Badge | Meaning |
|---|---|
| Green check | Going |
| Red x | Not going |
| Amber dash | Maybe |
| Grey dots | No response (they have not answered yet) |
- The host is listed first, then the other guests.
- Up to three avatars are shown at once. If the event has more guests, a +N chip after them tells you how many are not pictured.
- Hover over an avatar to see that person's name, (Host) if they are hosting, their email address, and their answer.
- The full guest list, one row per person with the same wording, is on the read-only event preview you open from a lead or matter step.
Note: Esqase uses the same four answers everywhere: Going, Not going, Maybe, and No response. The buttons in the calendar's left rail are shortened to Yes, No, and Maybe because the rail is narrow, but they set the same answers.
Event reminders
Every event can remind the people attending it before it starts, so nobody has to keep an eye on the clock.
Set the reminder
- Create or edit an event, and open the Notification field.
- Pick how far ahead the reminder should arrive: 5 minutes before, 10 minutes before, 15 minutes before, 30 minutes before, 1 hour before, or 1 day before.
- Choose Custom to set your own lead time instead. Two fields appear: enter a number in Notify and pick the Unit (Minutes, Hours, Days, or Weeks), for example 2 days before.
- Choose None if the event should not remind anyone.
- Save the event. The reminder line also shows on the event's detail panel and on its hover preview card, so you can see the setting at a glance without opening the event.
How the reminder reaches you
- You receive one reminder per occurrence, at the time you chose. Set 15 minutes before and it arrives 15 minutes before the start.
- A repeating event reminds you before every occurrence. A weekly case review set to remind an hour ahead reminds you an hour before each week's meeting, not only the first one. An occurrence you removed from the series is skipped.
- Everyone invited as a guest gets the reminder, and so does the member who created the event, even if they are not on the guest list.
- The reminder arrives the same way your other notifications do: in the bell inbox, as a desktop alert, and by email if you have turned email on for Event reminders. Clicking it opens the event.
- Desktop alerts for event reminders stay on screen until you dismiss them, so one does not disappear while you are away from your desk.
- Changing the Notification field on an event that has not started yet changes when the reminder goes out.
- Moving an event arms its reminder again. Push a meeting to next week and you are reminded before the new time, even if the old time had already reminded you.
Tip: Reminders are personal on the receiving end. If a colleague does not want event reminders, they can turn them off for themselves under Settings > Notifications without changing the event. See Notifications.
Note: Reminders are sent by Esqase on its own, so they arrive whether or not anyone has the dashboard open. Guests who are clients get their own reminder in the client portal at the same lead time, worded for them. See How clients get portal notifications.
Court dates on the calendar
If your firm uses court rules, the court dates on a matter can show on the calendar too. When someone applies court rules to a matter, or adds a court date by hand, on the matter's Court dates tab, Esqase can put each date on the default calendar of the member chosen for it, which is the matter's responsible attorney unless your firm's court settings, or the member adding the dates, choose someone else. Most court dates become all-day entries. A hearing or trial with a set time becomes a timed entry. See Working with court dates.
Recognize a court date
- On the grid, a court entry carries a small gavel icon at the start of its title. A court task shows the same icon.
- Hover over a court entry and its preview card adds a court line: the rule the date comes from, a status badge once the date is no longer upcoming (for example Done or Change to review), a Check this date or Enter by hand badge when a person needs to confirm the date, and an Open in Court dates link that opens the date on the matter's Court dates tab. A court task's preview card names the rule too.
- Click the entry and the detail panel in the left rail shows the same court details, and while the date is still open, a line saying how it was worked out, for example Calculated from Fed. R. Civ. P. 12(a)(1)(A)(i).
- On the matter's Events tab, a court entry carries a Court date badge next to its title. Point at the badge to see the rule.
📷 Screenshot: The calendar grid with the preview card open on an all-day court date, showing the gavel icon on the entry, the court line with the rule it comes from, a Check this date badge, and the Open in Court dates link.
Change or remove a court date entry
The court date decides when the entry happens, so its date is kept on the matter's Court dates tab rather than on the calendar:
- You cannot drag or resize a court entry. It snaps back, and Esqase shows This date comes from a court rule. Change it from the matter's Court dates tab.
- The date fields are read-only when you edit it. Edit opens the usual event dialog with a notice, This date comes from a court rule, and an Open in Court dates link. Date, Start time, End time, All day, Repeat, Timezone, Calendar, and Link to cannot be changed. The title, description, guests, location, color, and Notification stay editable.
- The entry follows the court date. Change the court date on the Court dates tab, or recalculate it, and its calendar entry moves with it. Vacating a court date, or marking it not applicable, takes its entry off the calendar. Marking it completed leaves the entry where it is.
- Deleting the entry keeps the court date. Delete on a court entry opens Remove calendar entry?, which explains that only the calendar entry goes and the court date stays on the matter's Court dates tab. Click Remove entry to confirm. Deleting a court entry from the matter's Events tab keeps the court date too.
- All-day court entries carry no event reminder. Court dates remind the people working the matter through their own Court date reminders instead. See Notifications.
Court dates and your booking page
All-day court dates are marked as free time, so they never block a slot on your booking page. A timed hearing or trial is busy time and blocks booking like any other meeting. See How clients book meetings.
Sync events with Google Calendar
If you connect your Google account, Esqase keeps your calendar in step with Google so your events show up in both places.
- Connect your Google account from your integration settings. See Connecting Google (Gmail, Calendar, Meet).
- The first sync after you connect brings in the meetings already on that calendar for the year ahead, so your existing commitments start blocking your booking slots straight away. You do not have to move or recreate anything.
- Once connected, events you create, edit, or delete in Esqase are pushed to your Google Calendar automatically. Reminders, recurrence, and the meeting link are carried over too.
- Changes you make on the Google side are pulled back into Esqase on a regular schedule, so the two stay aligned.
Esqase respects how you marked each meeting on the other calendar:
- An event you set to show you as Free, and an invitation you declined, do not block your booking page. They stop holding your time as soon as the next sync runs.
- An all-day event blocks that whole day on your own clock, so an all-day block does not bleed into the day before or after for someone in another time zone.
Note: Syncing happens quietly in the background and never blocks you from saving an event in Esqase. If your Google connection is not active, the event is still saved in Esqase and simply is not mirrored to Google. You can reconnect Google any time from your integration settings.
Note: Outlook Calendar works the same way, including the first import, the Free and declined rules, and all-day events. See Connecting Outlook and Zoom.
Tip: If you connect Google Meet, you can generate a Meet link for any event right from the Meeting link field, as described under "Create a calendar event."
Court dates and your connected calendar
Court entries reach a connected Google or Outlook calendar a little differently from other events, so that nothing outside Esqase can change a court date by accident:
- They go to one member's calendar, without invitations. A court entry is copied to the connected calendars of the member whose calendar it is on. Esqase sends no invitations: the copy carries no guest list, and nobody is emailed.
- All-day court dates show as free in Google Calendar and Outlook too, so they do not hold that member's time there. A timed hearing or trial shows as busy.
- Removing a court date removes the copy. When a court date is vacated, marked not applicable, removed with its trigger, or dropped by a recalculation, or when someone deletes its calendar entry, Esqase deletes the copy from the connected calendar. Nobody is emailed about it.
- A copy Esqase cannot remove stays until you delete it. If the calendar refuses the removal, for example because access to it was revoked, the copy stays, and the matter's Recent activities timeline records Could not remove the court date from Google Calendar (or Outlook Calendar). Delete that copy by hand.
- Changing the copy never changes the court date. Moving or deleting a court entry's copy in Google Calendar or Outlook leaves the court date, and its entry in Esqase, exactly as they were. The next time the court date changes or is recalculated, Esqase puts the copy back at the right date.
- Other edits wait for the next date change. A new title, description, or location you give a court entry in Esqase reaches Google or Outlook the next time the court date changes or is recalculated.
Approve, reject, or propose a new time for a booking
When a client books a meeting or asks for a different time, that arrives as a scheduling request. A scheduling request is a back-and-forth where the client and your firm propose dates and times until one is accepted. You handle these from the lead or matter the request belongs to (see "View and manage events on a matter" and Managing leads).
A meeting booked from a round-robin event type (one that shares its bookings between several hosts; see Event types (scheduling)) stays with the host it was assigned to. When the client asks for a new time, they pick from that host's open times, the request goes to that host, and accepting it moves the meeting on that host's calendar. Esqase does not pass the meeting to another host in the rotation.
Where requests appear
- On a lead or matter, an event step that is waiting on you shows a View request button (with an amber clock) once the client has proposed a time. A step still in negotiation shows a status such as Review date & time or Awaiting client.
- Click that button to open the Scheduling request dialog.
- You are also notified. New time proposed goes to the colleague hosting the request, naming the client and the meeting, and it arrives every time the client proposes a time, not just the first. Clicking it opens the Scheduling request dialog on the lead or matter it belongs to, so you can accept, reject, or counter without going looking for it. Turn it off under Event change requested in your notification settings. See Notifications.
Review and respond
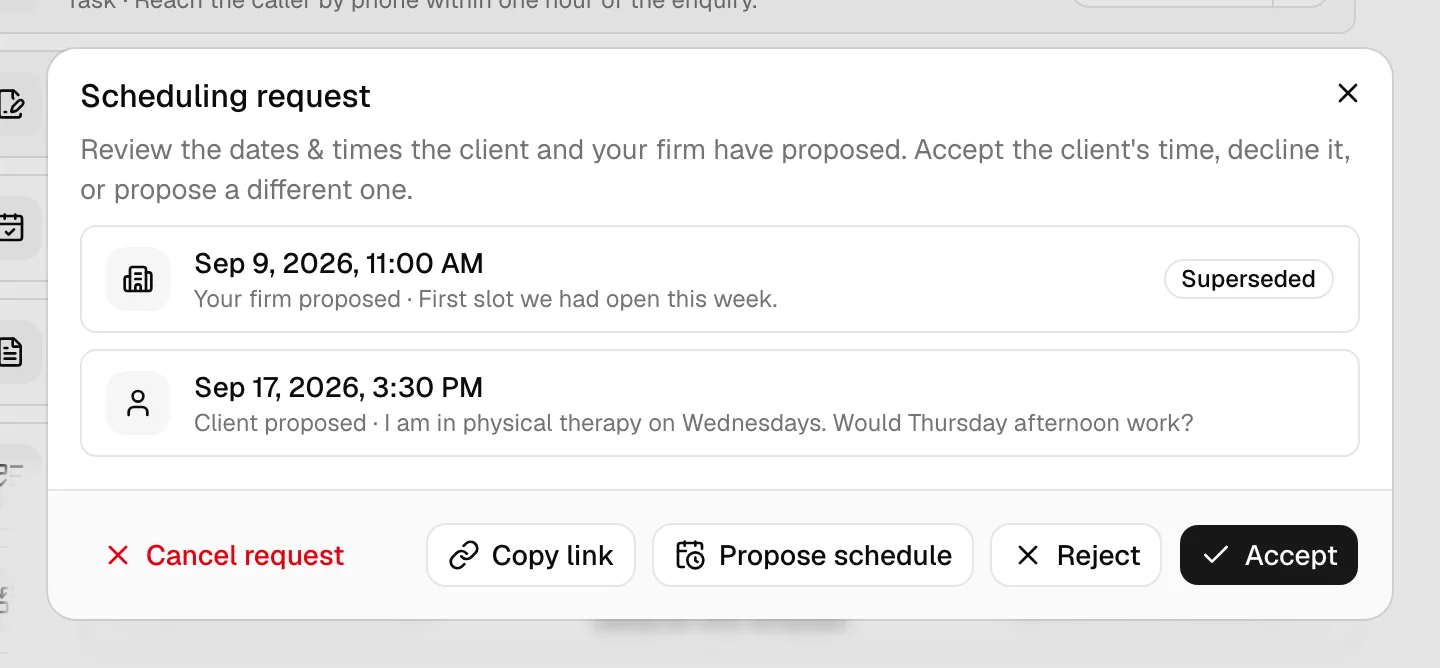
- In the Scheduling request dialog, review the list of dates and times. Each entry is labeled Client proposed or Your firm proposed, with the latest pending one being the time you can act on. Every time is written in your firm's time zone with the zone named after it, so a time a client picked in their own zone is already converted for you.
- Choose how to respond:
- Click Accept to confirm the client's proposed time. Esqase creates (or updates) the event for that time, and then offers to send a confirmation email. The email is addressed to the clients who are guests on the event, because they are the ones who can open the event link. If the booking came from your public booking page and filled a workflow Event step, accepting is also what completes that step, and the workflow carries on from there.
- Click Reject to decline the client's proposed time and hand the request back to them so they can pick another. Esqase then offers to email the client the request is for, asking for a new time.
- Click Propose schedule to suggest a different time yourself. In the Propose a new schedule dialog, pick a Date and Start time (the end is set automatically from the meeting's length) and click Propose schedule. The dialog tells you which clock it is reading: "The date & time you enter is read in the scheduling request timezone, [timezone]." If that is not the timezone you are sitting in, a Your time: line shows the same moment on your own clock before you commit to it. Esqase then offers to email your proposed time to the client the request is for, so they can review it, and they can accept it or counter again.
- Use Copy link to copy the client's scheduling link, for example to resend it.
- If no event has been created yet, you can click Cancel request to stop the request entirely. The client's link stops working and they can no longer pick a time. This cannot be undone.
Note: When the firm has proposed a time and is waiting on the client, the dialog shows an Awaiting the client's response to your proposed time badge. Once you accept, reject, or propose back, the View request button on the step goes away until the client responds again.
Note: You do not have to watch the request. When the client accepts the time you proposed, or approves a reschedule, the host gets a Meeting time confirmed notification with the agreed time in their own time zone (and the client's time alongside it when the two differ), and the meeting is pushed to the host's connected Google or Outlook calendar. See Notifications and Sync events with Google Calendar.
Creating a scheduling link to send a client
You can also start a scheduling request yourself so the client picks the time:
- On a lead or matter event step that has no event yet, click Schedule and choose Request client to pick a schedule.
- Esqase creates a link for a single client and shows the Scheduling link ready dialog. On a matter that client is the primary client; on a lead it is the lead's contact. Click the copy button to copy the link, or click Send email to client to email it. The email is addressed only to that client, because only that client can open the link.
- The client opens the link from their own email, confirms their identity, and picks a date and time, which comes back to you as a scheduling request to accept. For the client's side of this, see How clients book meetings.
View and manage events on a matter (the matter Events tab)
Every event linked to a matter also lives on that matter's Events tab, so you can see and manage a case's schedule without leaving the matter.
- Open a matter, then click the Events tab.
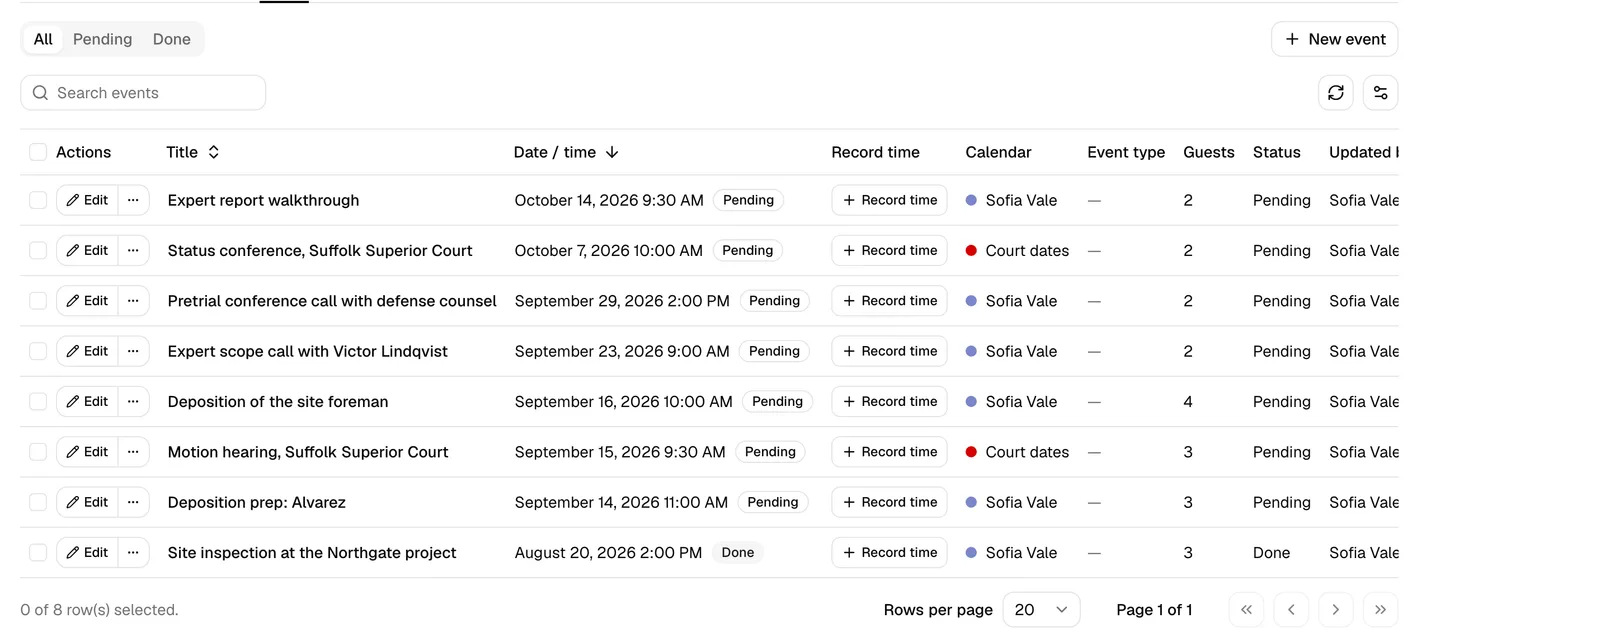
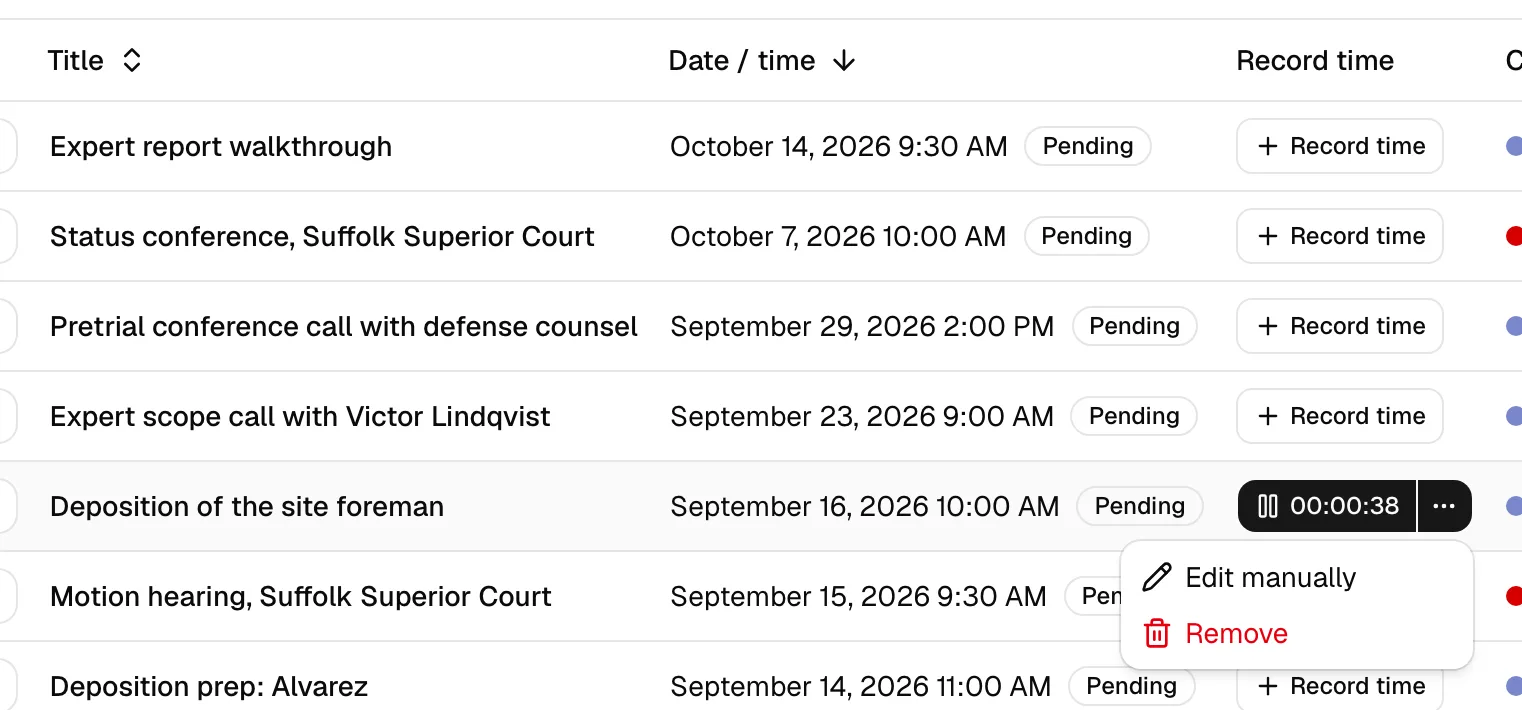
- The tab shows the matter's events in a table with columns for Title, Date / time, a Record time control (right after Date / time, for billing time spent on the event, covered below), Calendar, Event type, Guests, Status, Updated by, and Last updated. Each event is tagged Pending (still upcoming) or Done (already past).
- Use the tabs above the table to filter by All, Pending, or Done, and use the Search events box to find an event by title.
- To add an event to this matter, click New event. The event dialog opens with the matter pre-filled and the Link to field hidden, so the new event is automatically linked to the case. The matter's clients who have an email on file are already in Guests; remove them if the event is internal (see "Add guests when creating or editing an event").
- To change an event, click its title or the Edit button on its row. To remove one, open the row's ... menu and choose Delete, then confirm. If you can delete events, you can also select several rows and remove them together with the batch Delete action.
Note: The New event, Edit, and Delete controls follow the same calendar permissions described under "Before you begin." If your role does not include a given level of access, that control is hidden or disabled.
Tip: Global search brings you straight here. Picking an event that belongs to a matter opens this tab with the event open, in the edit dialog if your role can edit events or in a read-only preview if it cannot. An event with no matter, or on a matter you do not have access to, opens on the Calendar with its details in the panel on the left. See Navigating the dashboard.
Record time on an event
If you bill for the time you spend on a meeting or appointment, the events table has a Record time column so you can run a timer right on the event and turn it into a time entry on the matter. This control is in the Record time column of the events table (right after Date / time) on both the matter Events tab and the contact Events tab. There is no timer inside the event dialog itself; you record time from the table.
Before you begin: Recording time needs permission to create activities (time entries). If you do not have it, the Record time control shows a dash and the timer button is hidden.
- Find the event's row and look at the Record time column.
- In the Record time control:
- If no time entry exists yet, click Record time to start a fresh timer. The button turns into a running clock showing elapsed time, and a confirmation reads "Timer started."
- While a timer is running, the button shows the elapsed time and a pause icon. Click it to pause. Pausing opens the time-entry window so you can review and adjust the recorded time.
- When a timer is paused, the button shows a play icon. Click it to resume.
- Use the options menu (the three-dots button next to the timer) for:
- Edit manually -- open the time entry to set the duration, rate, or notes by hand.
- Remove -- detach and discard the timer from this event.
- Starting a timer creates a time entry (an activity) linked to this event and its matter. To manage it further, see Time and expense tracking.
Note: Once the time entry has been billed or paid, it is locked. The Record time control then shows a view-only eye icon (with the recorded time) that opens the entry read-only, and the timer and options menu are hidden. See When a time entry is locked.
Open an event from a lead or matter workflow row (the stable event link)
Events that come from a workflow step (for example, a scheduled intake meeting) carry a stable link so you can always jump straight to them.
- On a lead or matter workflow step that has an event, click View to open a read-only preview of the event.
- From the preview you can click Edit to make changes, Copy link to copy the event's public link, or use the step's ... menu for further actions such as Send email, Unlink event, or Delete event.
- A direct event link always opens the event in the calendar's detail panel, even if you paste the link into your browser or arrive from a notification. Esqase resolves the link and shows the event with its RSVP controls.
Tip: Unlink event keeps the event on your calendar but detaches it from the workflow step, returning the step to its to-do state so you can reschedule. Delete event removes the event and detaches it, but leaves the step so you can start again.